How to dispose of wooden waste for the benefit of the economy? How to organize free heating of a garage, greenhouse or utility room? What are the types of homemade stoves? Is it possible to make them yourself? You will find answers to these questions in this article.
Cheap heating will always be a topical issue for discussion among household owners, small businesses, garages or summer cottages. This is especially appropriate in the countryside and in carpentry shops, where there is a problem with the disposal of wood waste. The easiest way to get rid of them is to burn them. This is not difficult, but how to utilize the heat from combustion and put it into action? O different ways we will describe in detail the taming of open fire in our review.
"Zero method" - a topless barrel with material burning in it. We will simply mention this option as primary way combustion organization. It is applicable only outdoors, and effectively handles the disposal of combustible waste. It can be used for heating, melting substances that are in a solid state of aggregation (bitumen, ice). Does not require any additional devices.
All subsequent types of furnaces will be made of one form or another of round or rectangular containers. The shape of the cylinder or tube is ideal for combustion, and offers the following advantages:
- unimpeded exit of exhaust gases;
- a single flame vortex (independent vortexes form in the corners, which disrupts the combustion dynamics);
- easy cleaning - combustion products do not clog into corners, it is enough to tap the case;
- the most important advantage is that uniform heating does not allow local overheating (in rectangular walls they burn out faster than corners).
The iron potbelly stove has earned eternal glory, saving people and animals from frost in any conditions. She is always ready to work, while it is difficult to break, lose or sell. The variety of its forms is limited only by the imagination of a single master. Anyone who has the skill of a welder and a little free time can realize their ideas. The result is surprisingly efficient combustion-based booster heaters.
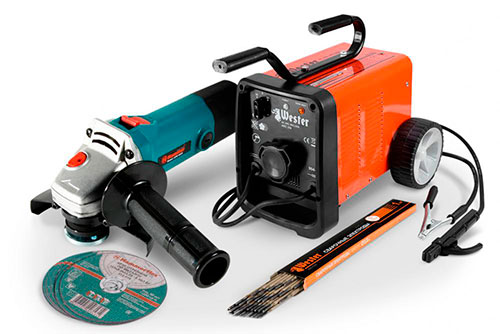
For the manufacture of all the "models" described below, you will need:
- welding machine;
- grinder or gas cutter;
- drill with drills for metal (can be replaced by burning with an electrode);
- a simple metalwork tool - a hammer, a ruler, a center punch.
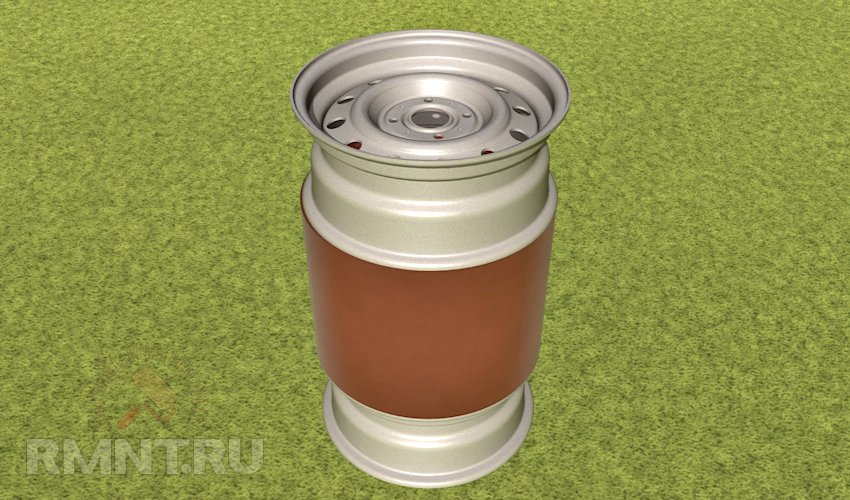
Publicly available options for a cylindrical body are already asking for work - a barrel, a spent gas cylinder or a cut steel pipe. Metal in such a factory form is 70% of the entire construction of a potbelly stove. It remains to organize combustion, exhaust gases and heat exchange in this form.
Firebox. More than just a barrel
Description. This product is in second place in terms of manufacturability after the open-top barrel. The firebox has an entry-level efficiency, suitable where there are no problems with fuel, and sterile cleanliness is not required.
Design. A barrel of 100-240 l in a horizontal position with a furnace hatch, grate made of improvised material and a chimney.
Advantages:
- Can be crafted in 1 hour alone.
- The price of the issue is only a barrel.
- Disposes of a large amount of waste.
- Does not require welding.
Flaws:
- Local overheating in the central part (above the hearth).
- Inconvenient cleaning of the firebox.
How to make
The barrel should have a modern design - with a pressure relief hole (20 mm). It will serve us as a primary air supply channel (colloquially, a blower). The large 50mm hole will be an additional air duct at the top.
1. We cut out an even rectangle 400x300 mm in one of the covers - we got a hatch with a finished door. In this case, one of the factory openings of the cover must be strictly under it.

2. We install the door on any hinges using a drill and a riveter.
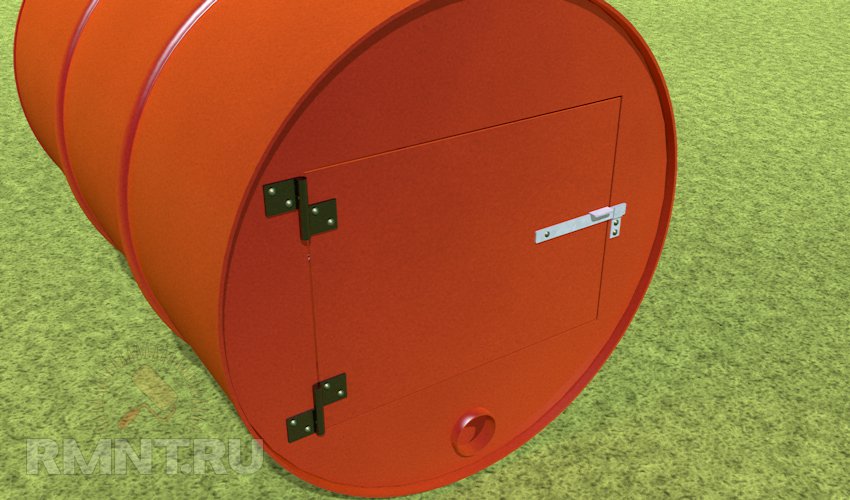
3. Any thick grate or perforated sheet can be used as a grate. If this is not available, drill 10-15 mm holes in a continuous sheet with a thickness of 1.5 mm or more in a checkerboard pattern with a step of 50 mm.
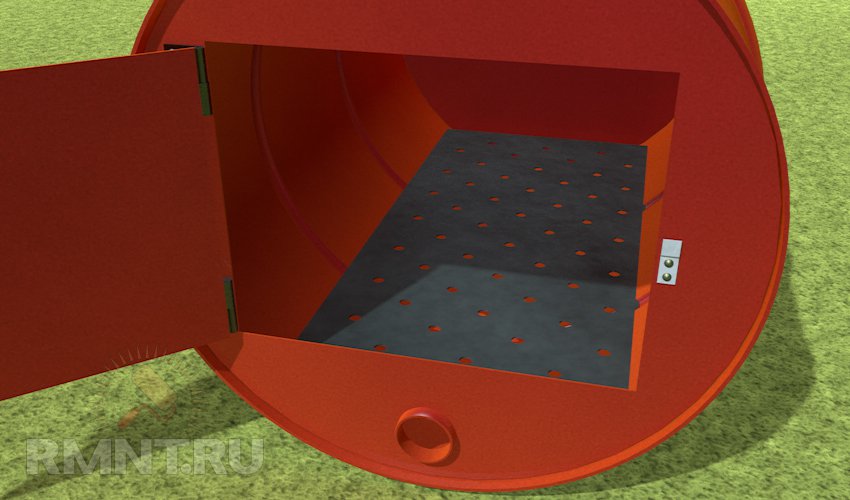
4. Fit the grate under the firebox so that there is at least 70 mm between it and the bottom of the firebox. If necessary, bend the edge of the grate or place a corner on it as a support leg. It is not necessary to fix the grate to the walls of the furnace - it will be easier to maintain.
5. Mark the diameter of the chimney pipe on the upper side opposite the hatch. Make diametrical cuts with a grinder and bend the metal sectors of the resulting circle (they will look like sharp teeth). If it so happened that the chimney is rectangular, we cut the diagonals and bend four “teeth”.

6. We strongly heat the barrel on the street to burn the paint and the remnants of the contents.
7. We install the barrel-furnace in the design position at a permanent place of work. We fix it by laying dry bricks, or in another way.
8. We mount the chimney pipe to the "teeth" on the rivets.

9. We put a bucket of water and a ladle next to it - this is a fire extinguisher.
Where it is useful: greenhouses, production workshops, agricultural machinery garages, fireproof large premises.
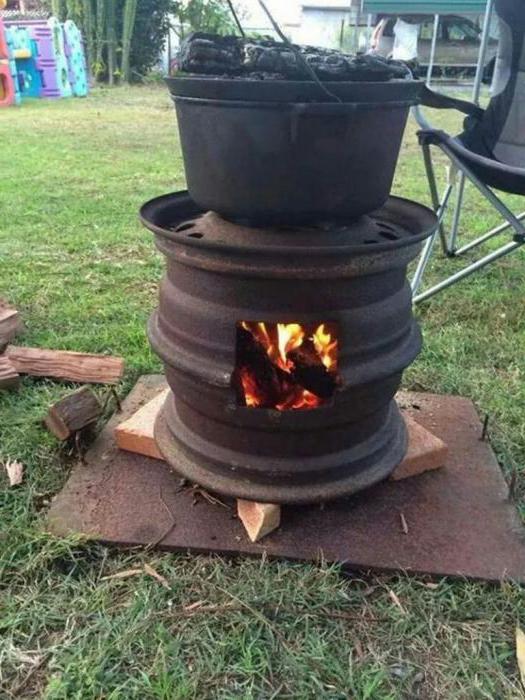
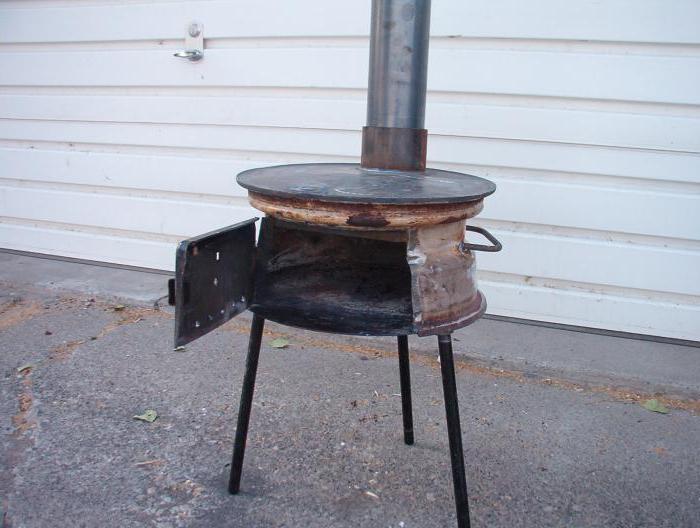
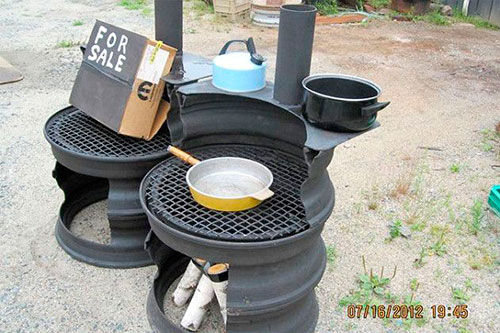
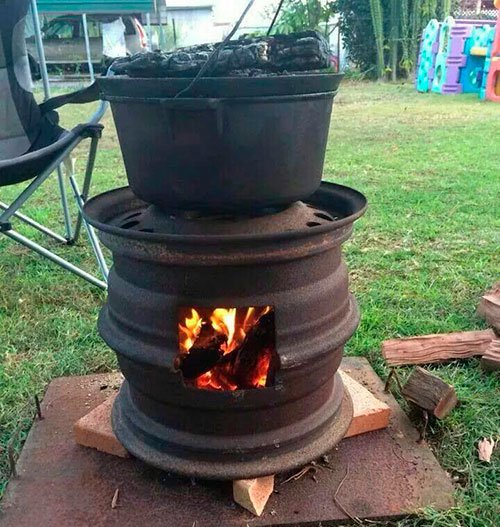
Oven-stove from automobile disks
Description. Heating and heating device made of improvised material, intended for cooking and household needs.
Design. It consists of two automobile steel disks welded together in the form of a container with a hatch for supplying combustible material.
Advantages
- No chimney required.
- Thick walls will not burn out for a long time.
- Used disks go to work.
- For motorists - free of charge.
Flaws
- Questionable appearance.
- High fuel consumption.
How to make
In principle, this firebox is a fire organized inside the tank and fundamentally differs from an open barrel only by the lower fuel loading and the vertical arrangement of the wall.
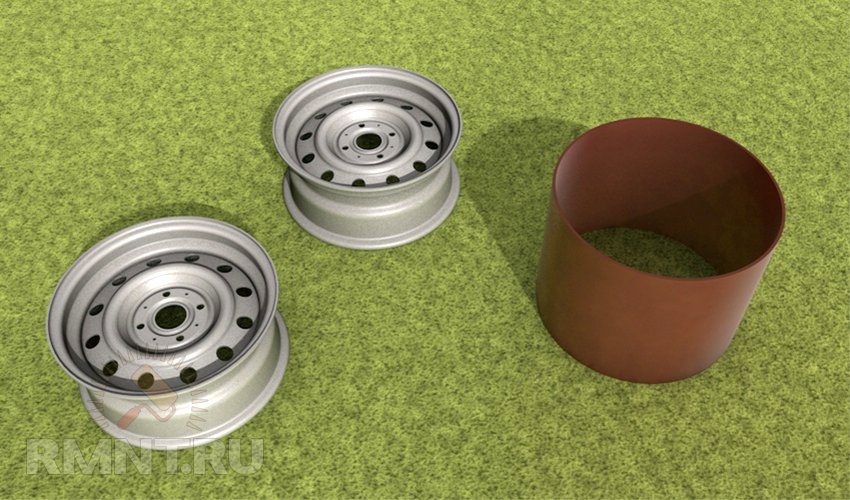
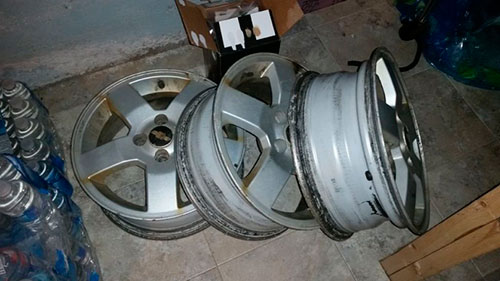
1. We take a pair of steel discs (for example, from a VAZ) with slightly wrinkled rims. Strongly jammed rims are unbent with a sledgehammer.
2. From each disk we cut out one side edge with a grinder.
3. We cut a strip from a metal barrel along the circumference of the wheel and weld it with a ring. The optimal strip width (element height) is 400-450 mm. High altitude will lead to loss of stability.
4. We weld all three elements so that the ring is between the disks, and the remaining ribs play the role of the upper grate and grate.
5. We cut out the furnace hatch in the middle with a grinder (in the material of the barrel sheet). And we install the cut out element as a door on the hinges. We put a hook or a latch.
6. We make a blower. To do this, it is necessary to cut out from the lower disk (in the design position) a rim segment from the edge to the middle with a width of 100-120 mm at a furnace height of up to 500 mm and 150 mm at a higher height.
7. In the upper opposite part of the firebox, we cut a hole for the chimney and weld a branch pipe or outlet with a gate.
8. For indoor use, the upper grate will need to be plugged by welding a thick steel sheet on top (it will also act as a heat sink).
Where it is useful: cooking (including for animals), heating change houses, pens for livestock.
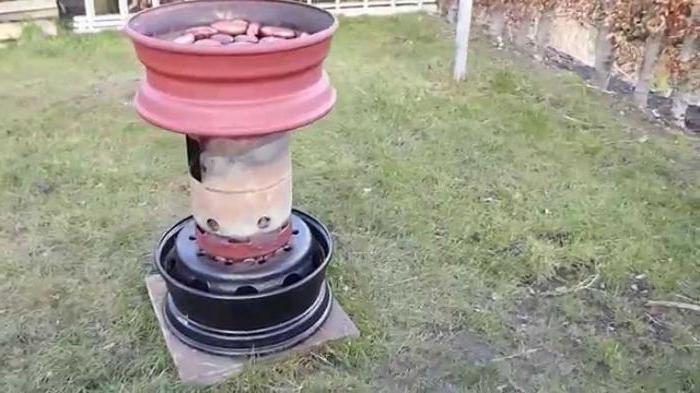
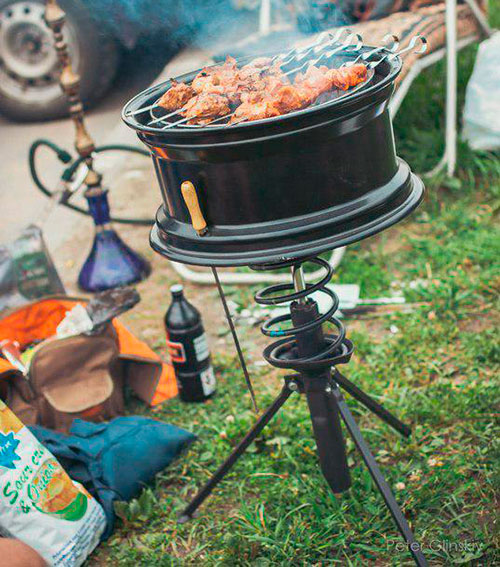
Another option for using discs is an outdoor open fire brazier (without a chimney).
In this case, one rim and a disk with one rib are obtained from two disks. They are welded together, forming a vertical open firebox with a grate at the bottom (disc edge). A loading hatch is cut in it, legs and handles are welded. Painted with heat-resistant paint, such a stove has an interesting, and even decorative look.
Where it is useful: a summer cafe, a picnic, a barbecue replacement.
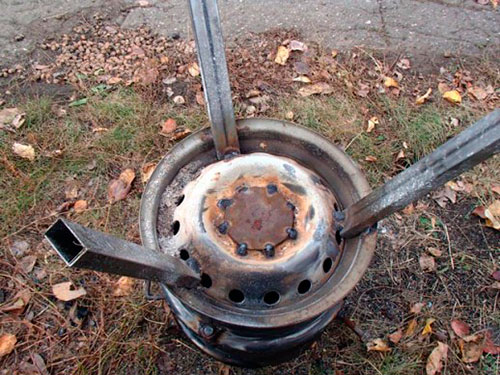
Vertical "garage" potbelly stove
Description. Compact heating device for utility rooms.
Design. It is a hollow cylinder (pipe, box) with thick walls in a vertical position with a chimney, firebox, blower and heat sinks.
Advantages:
- Simple construction.
- Compact dimensions (equal to the diameter of the pipe).
- Can be made without welding.
Flaws:
- Doesn't allow food to be cooked.
- Low efficiency.
How to make
For the furnace, you will need a pipe with a diameter of 250 to 400 mm and a height of up to 1 m, two sheets of iron 3-4 mm with an area larger than the cross section of the furnace. Instead of a pipe, you can use a steel box. The larger the cross section, the higher the oven can be made.
1. We cut the edges of the firebox evenly, without distortions on both sides.
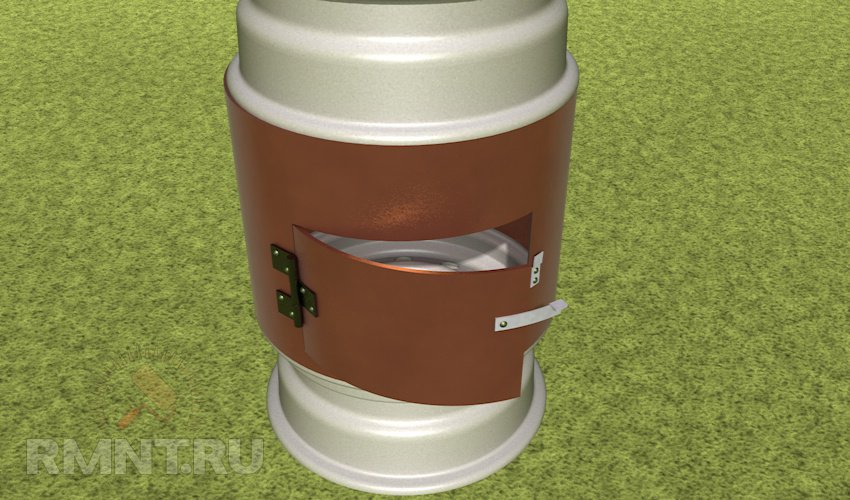
2. Cut out the furnace hatch. Top - 100-200 mm from the top of the firebox, bottom - at least 250 mm from the level of the grate. Hatch width - 250-200 mm.
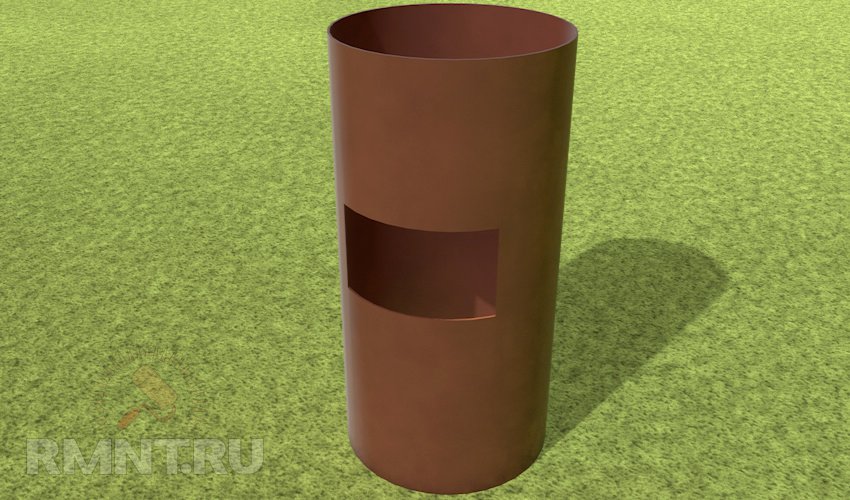
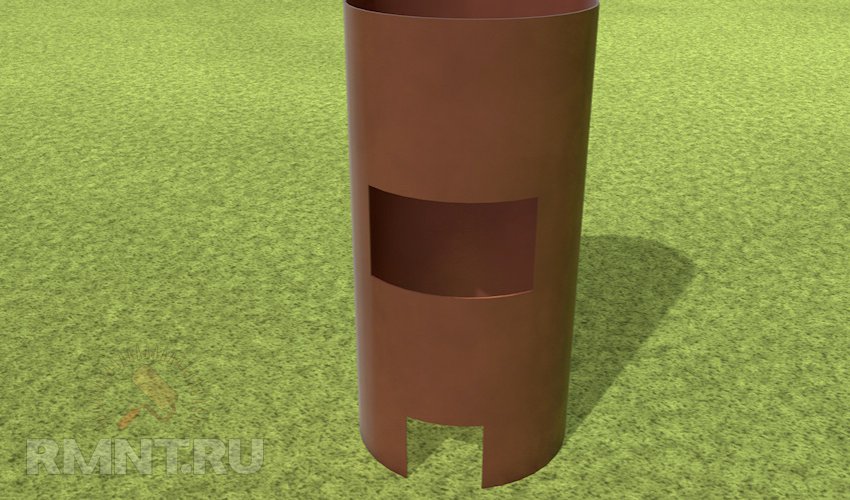
3. Cut out a rectangular section measuring 100x100 mm from the bottom edge of the pipe. This will be an inlet (blower), which can be adjusted with a brick.
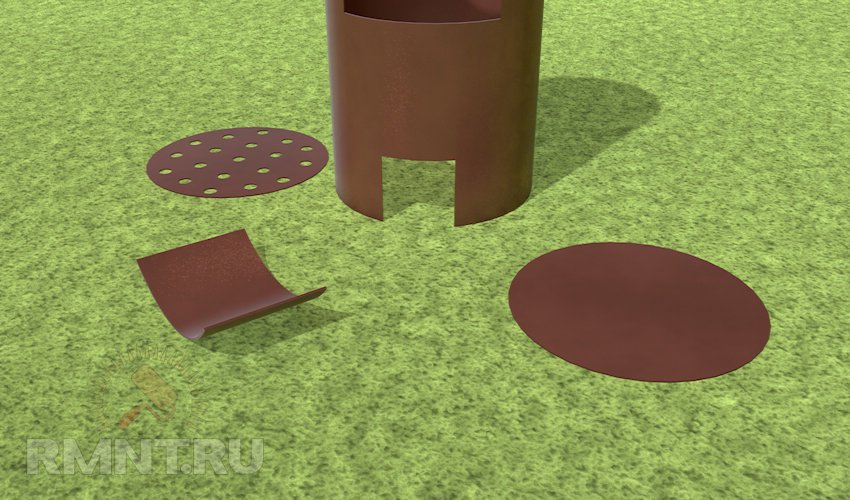
4. We make a grate. We cut a sheet of metal under the internal section of the furnace and make holes in it (by drilling or welding) 15-20 mm in a checkerboard pattern with a step of 30-40 mm.
5. We make a blank for the “lid” of the furnace. We cut a sheet of metal exactly along the outer diameter of the firebox.
6. We make a door. It can be made from a barrel segment. It should completely cover the firebox.
Option 1. With welding
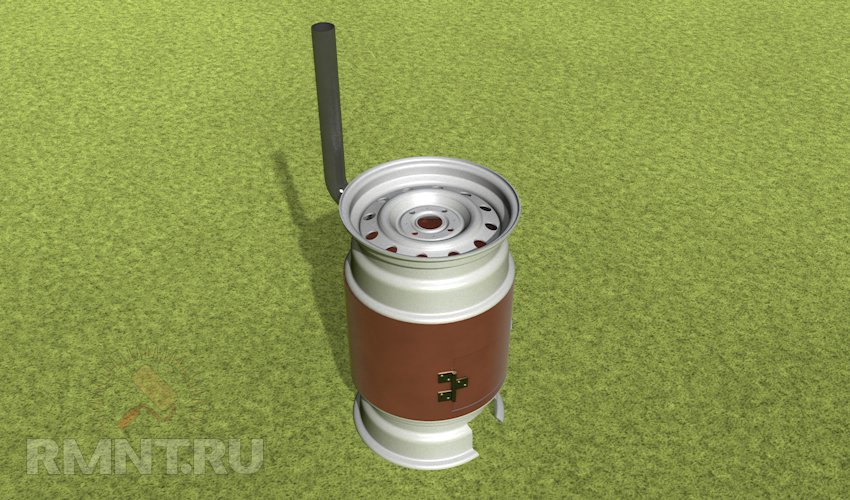
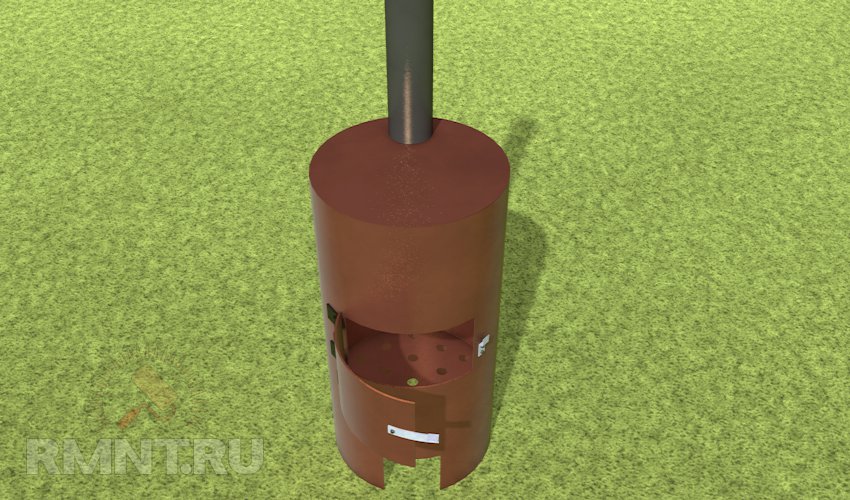
1. In the lid of the furnace, we make a hole with a diameter smaller than the chimney pipe by 15-20 mm. We weld a pipe from a thick-walled pipe to it. If possible, you need to make a cover of thicker metal.
2. We weld the brackets for the grate 30 mm from the top of the inlet and install the grate on them.
3. We weld the door hinges and experimentally achieve the most snug fit and accurate work.
4. We weld the cover with the pipe.
Option 2. Without welding (locksmith method)
The principle remains the same, but the fastener method changes. Additionally, you will need a heat-resistant sealant and an asbestos sheet (flaps).
1. Making a cover. We cut a hole in the workpiece into which the chimney pipe will freely pass. We cut the tin pipe of the chimney from the edge adjacent to the cover by 20-40 mm along (10-12 cuts). We unbend the incised strips in the manner of "chamomile". We apply sealant to the joints and fasten the pipe to the cover with rivets, screws or bolts.
2. Cover installation. At 40-50 mm from the top of the firebox, we drill 4-8 holes at an equal distance from each other. We install bolts in them with a hat inside the firebox and bait nuts with washers. We apply sealant to the edge of the firebox and lay out narrow strips of non-combustible canvas. We also apply sealant to it. Carefully install the lid on the firebox and press it on top. Then, with a wire or cable, we drag the cover from bolt to bolt and fix it with nuts.

3. Brackets for grate. We cut a corner 30x30 (40x40) 4 pcs. 30-40 mm long. We drill holes in them for M8-M10 bolts. We drill the same holes on the seats of the grate. We install the brackets on the bolts. We install the grate on the brackets.
4. Furnace door hinges are mounted on bolts or rivets.
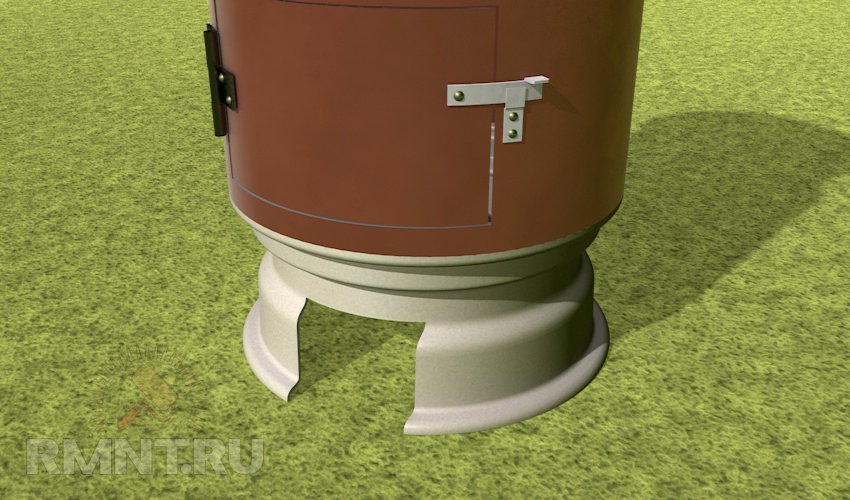
Such a vertical potbelly stove must be installed on a non-combustible base, or legs can be attached to it.
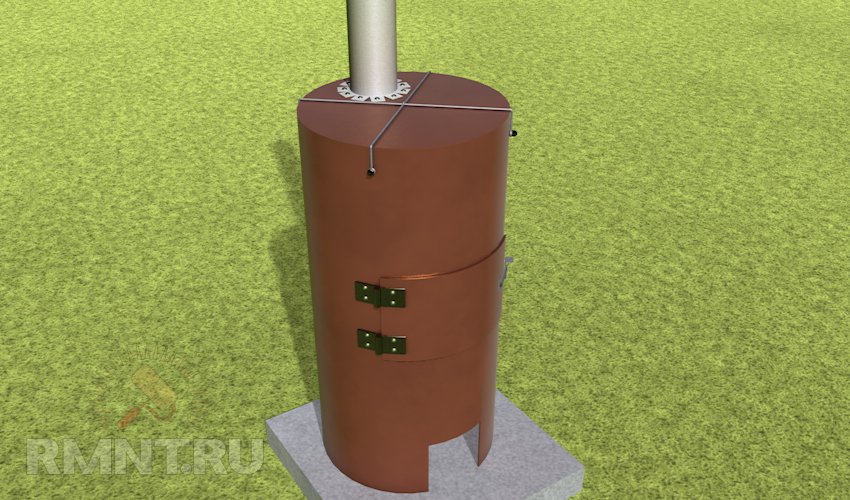
Attention! In the course of burning, hot coals will pour from below. Please take this into account when choosing an installation location.
Where useful: garage, basement, cellar.
The stoves described above can be called "purebred" (full-fledged, one hundred percent) potbelly stoves, because they have one common feature- the principle of combustion on a large influx of air with the active release of hot products into the atmosphere. Simply put, heat escapes into the pipe, the design does not allow it to pass through the walls into the room.
Their owners have been thinking about how to make potbelly stoves more efficient for a long time. One of the simple and effective ways- device of an additional heat exchanger. These can be quite complex devices, including liquid-based ones. We will consider the option of an "advanced" home-made stove with a heat exchanger arranged right in the chimney.
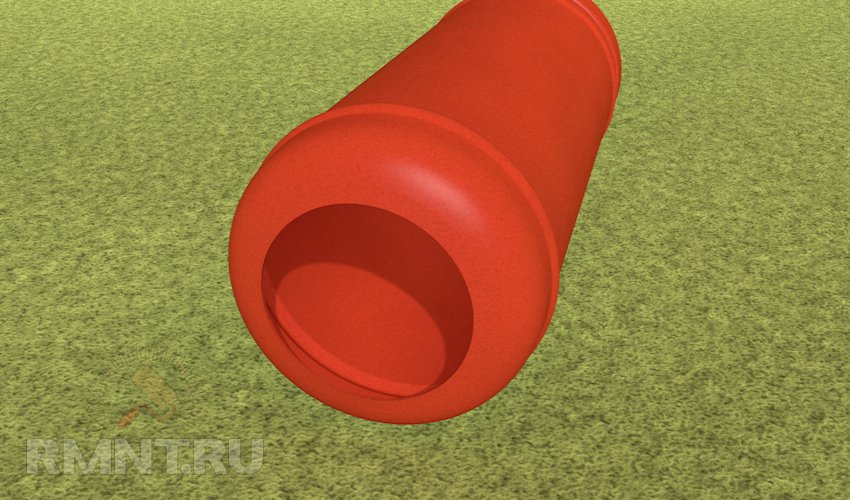
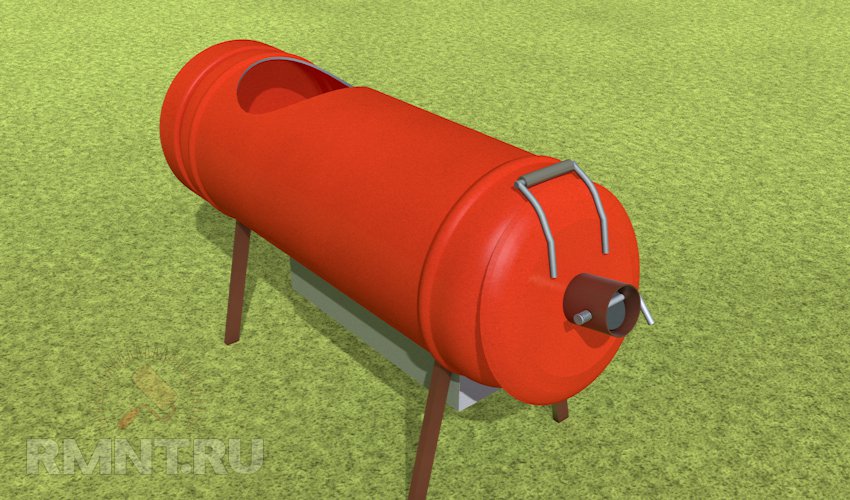
Potbelly stove from gas cylinders with a heat exchanger
How to use waste gases as an agent in a heat exchanger? The answer is simple - to slow down the course of smoke by arranging artificial obstacles in the chimney. This will require the skills of a higher level welder (medium), three empty gas cylinders and some sheet and improvised metal.
1. We will make a firebox from the first cylinder. To do this, cut its top so that the diameter of the hatch is 200-250 mm.
2. Then we mark a 500x200 rectangle on the wall and apply a grid with a cell of 30-40 mm. Drill holes in the crosshairs.

3. We make a box (ash pan) a little larger than the field with holes. It must have a lid and only serve as an ash bin. At the corners of the ash pan, weld the legs to the wall.

4. At 30-40 mm from the bottom of the former cylinder (rear wall of the furnace), we mark and cut a hole 30 mm smaller than the inner diameter of the cylinder.
5. The firebox door is best made from the head of another cylinder, cutting a hole in it in the center. A piece of pipe with a diameter of 76 mm or more and an adjustable damper (ideally with a gate valve) should be installed on it. The mobility of the door can be provided with hinges and locks from inventory boxes.
6. We make a heat exchanger from another cylinder. We cut out three bulkheads from metal 4-5 mm in such a shape that they overlap the inner diameter of the cylinder. In them we make a hole with a diameter equal to the diameter of the chimney plus 20 mm from the edge.
7. We cut off the bottom part of the cylinder and cut it out in the form of a fit on the firebox at an angle of 90 °.
8. Cut out a hole for the chimney in the valve part.
9. We install bulkheads for welding in such a way that the holes are staggered.
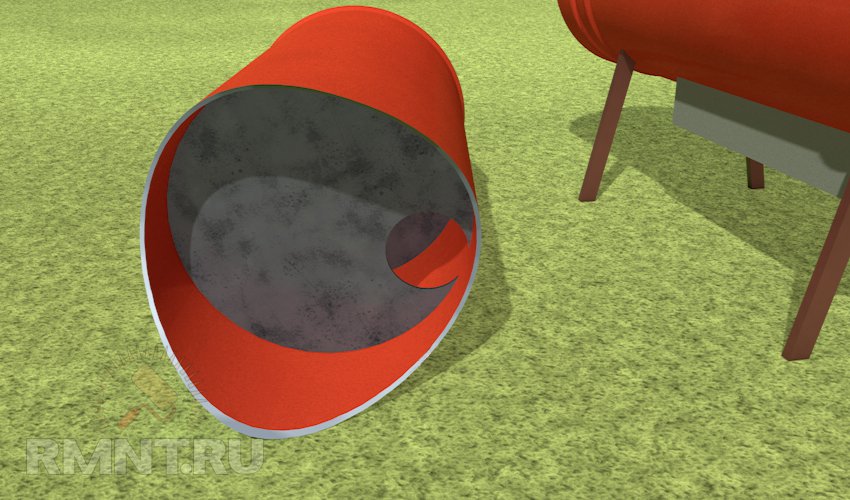
10. We install the heat exchanger on the furnace and scald the entire structure. We weld the chimney pipe to the heat exchanger.

Advice. The efficiency of any steel furnace increases several times if a fan is directed at it.
Any stove with a heat exchanger is much more efficient than a "basic" potbelly stove. This is no longer just an incinerator, but a heat generator for solid fuel, albeit of a primitive design. By limiting the air flow during combustion in the chimney heat exchanger, we have achieved a tangible effect - the fuel burns longer and burns better, the temperature of the gases at the outlet is lower and more heat remains in the room.
We will talk about how to develop this result and improve the heat transfer of the furnace in the next article.
Vitaly Dolbinov, rmnt.ru
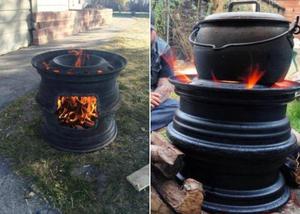
Many craftsmen today make wood stoves and boilers using thick-walled pipes. But sometimes such products become too expensive, while several old disks from the car may be at hand. In this case, you can make a furnace, which will be completely free. You just have to work on the design itself, using your own skill and ingenuity. Some masters even create such "works of art" that deserve attention.
Such designs are attractive not only for performance, but also for the thickness of the metal. The case will burn out rather slowly, especially if you use a wheel from truck. The latter are used for the manufacture of bath stoves, as they differ in overall dimensions and impressive metal thickness. For a sauna stove, which quite often operates under heavy loads, this factor cannot be called unimportant. If you use the wheels of a commercial or passenger car, you can make a wood-burning heater for a garage or a small barbecue oven.
Instrument preparation
If you decide to make a hearth for a cauldron or an ordinary stove using car wheels, then you need to take care of the availability of tools, among them should be highlighted:
- welding machine;
- electric drill;
- chisel;
- sledgehammer;
- disks;
- paint brush;
- ruler;
- grinder;
- hacksaw for metal;
- hammer;
- file;
- pliers;
- roulette.
It is noteworthy that almost any of the completed disk-based models will be portable, which is very convenient, because using this design can be in the bath or on the street. Best used steel diameter which varies from 40 to 50 cm. Their height can be 25 cm. The hearth for a cauldron, like a sauna stove, cannot be made of aluminum disks, as well as those made on the basis of aluminum alloys.
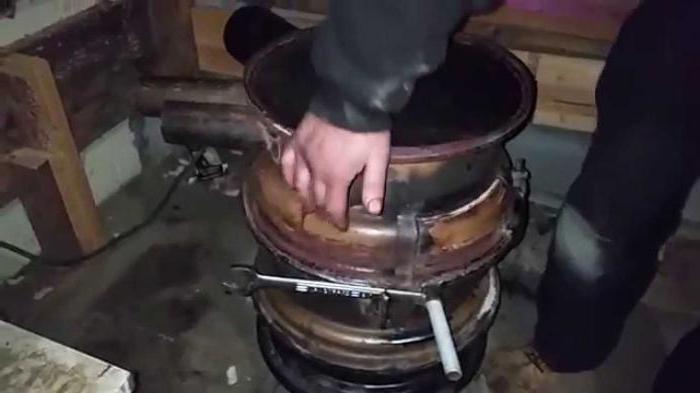
Making a furnace in the form of a heat generator
If you decide to make a stove from disks, then you can take Buleryan as the basis for the design. The original will cost quite decent money, but the handmade product will cost less. If you find three wheels from a GAZelle or UAZ, then you can assume that half of the work has already been done. Sheet metal and pipes will be needed, the diameters of the latter should be equal to the limit from 100 to 150 mm. Prepare a short branch pipe, with a diameter of 76 mm.
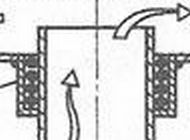
When a disc oven is made using this technology, the most difficult thing will be to cut out the inside. at the same time, it is not very convenient to work, because the metal is quite thick. It is best to use, however, if it is not available, the first of the mentioned tools will do. Using a welding machine, the disks must be hermetically joined in such a way that a body is obtained. The back part must be closed with a metal sheet, to which the chimney pipe is welded. If desired, you can install a damper on this pipe, it will allow you to adjust the draft. However, the presence of a damper is not necessary if the oven will have an air supply adjustment. To do this, it is necessary to integrate a nozzle with a damper with a spring-loaded axis into the door located at the front. A plate is installed inside the firebox, which will divide the space into two parts. This technique will become more understandable if you familiarize yourself with the design of Buleryan. A secondary chamber will be located on top, where the chimney pipe is welded. When a furnace is made from Buleryan-based discs, the design can have any diameter, orientation in space and length. Everything will depend on what and their number.
Making a large stove for a bath
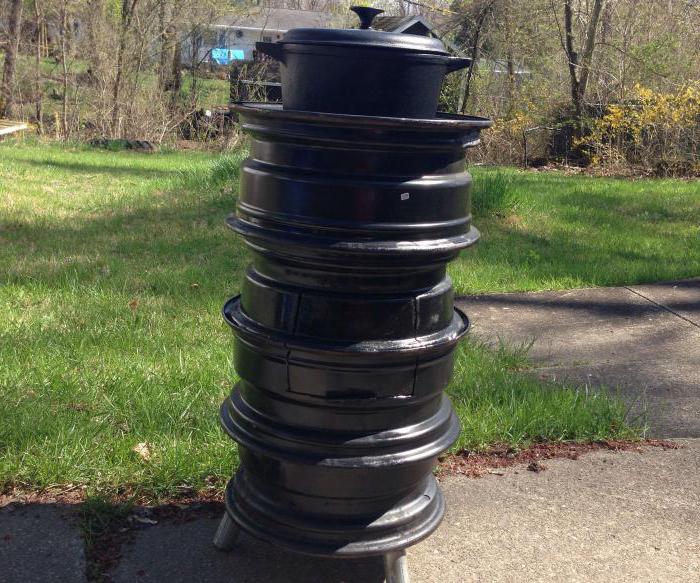
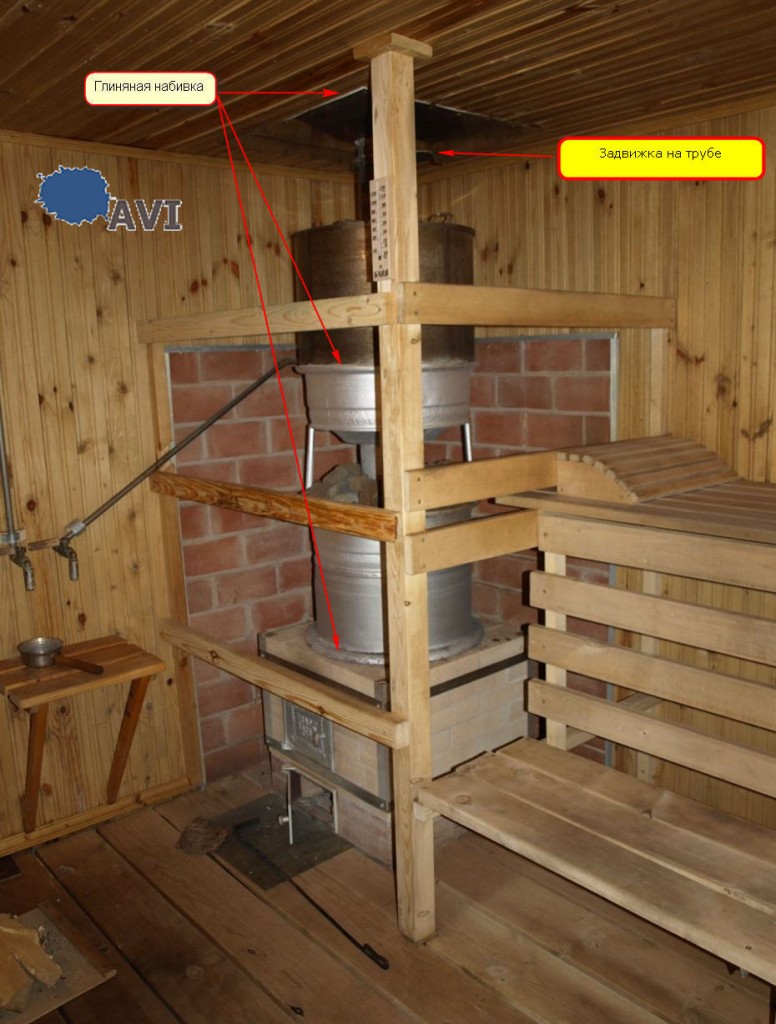
For such work, conventional discs from passenger cars will not be enough, since they have a small diameter. It is best to stock up on old rims from the ZIL-130 truck. They will be used in the amount of 4. The elements should be located one above the other, each will perform its role. The first product will act as a cap for the combustion chamber. The sauna stove will have a small brick firebox, it should be equipped with doors that should go into the dressing room. The heater will be the second rim, while the third will act as an additional heat exchanger. He will take the energy of the gas and transfer it inside the steam room. The last disc will be the hot water tank.
Things to remember when making a sauna stove
When a do-it-yourself bath stove is made from discs, the furnace part is usually made of red heat-resistant brick, which is laid on a clay mortar. If the body dimensions are 625x625 mm, then you will have to purchase approximately 60 bricks. When installing the second rim, it should be placed with the hub down, only in this way it will be possible to place a sufficient number of stones in it. The lower end of the pipe segment is welded to the central hole of the hub, its length should be 50 cm.
On top of the rim, it is necessary to fix the lifting plates for water. In disk number 4, a hole should be drilled for a pipe with a valve for filling the tank with hot water. The wheel where the water will be filled must be freed from the hub. From below, a bottom made of steel sheet is welded to the rim, the thickness of which varies from 4 to 5 mm. A hole is made in the central part, to which the lower end of the second pipe is welded, while the hole should go inside the pipe and be sealed with walls.
For reference
When a stove is made from discs for a bath, you can do without a brick firebox. In this case, it is equipped inside the first rim. However, you will have to heat the bath from the steam room, in addition, it will be much more difficult to make tight-fitting doors in the body.
Features of the location of the rims
The firewood burning in the firebox will give off its heat through the walls of the first rim, in which the bottom is cut. It is welded to the second disc, where the bottom is in place, thanks to which it becomes possible to fill it with stones. A pipe passes inside, combustion products will go through it. The pipe should get inside the third rim, where instead of the bottom there is a gas divider. It is made from sheet metal. The last stage of gas cooling takes place inside the last rim, which looks like a tank with a tap and a lid. As a result, the oven works no worse than factory models, and in terms of durability it turns out to be even better than any of them.
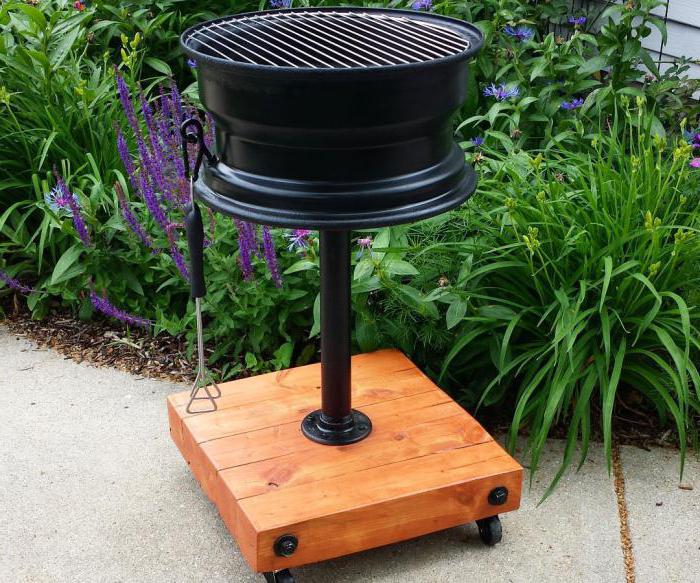
and barbecue
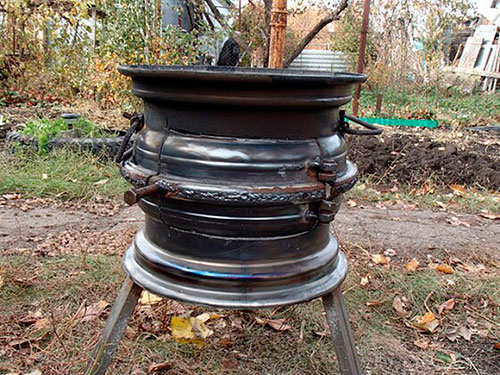
The stove under the cauldron can also be used as a barbecue. This device can be made from only two disks from the wheels of a passenger car. If you need a larger design, then there are no restrictions here, you can use wheels from GAZ-53 and UAZ. The bottom is cut in one of them, and after the rims are welded together. The unit must be installed securely on any surface; for this, legs are fixed to the lower section using a welding machine. The holes for the hub must be plugged, while the side holes are left, through which air will enter the firebox. In order to make it convenient to carry the case, handles should be welded to it from the outside, and an opening should be made in the side part for installing the door. The latter should be made from a piece that sits on the loops. We can assume that the oven from the discs is ready for this. As practice shows, a cauldron can fit on it, and if necessary, five skewers with meat.
Note
After you have completed the oven under the cauldron, you should not throw away the bottom of the upper disk, it can become a stand for pots, pans for the kettle. This element will perfectly fit into the exterior of your site.
In addition, it can be noted that a chimney pipe is installed on the other side of the door, while a diameter ranging from 50 to 70 mm will be sufficient. The tile can be slightly redone, because when working through the lower holes, ash will wake up, which is not always good. The holes must be plugged, and the air flow can be adjusted using the firebox door.
A homemade oven made of discs in the upper part must have an iron bottom. The thickness of the steel plate should be 8 mm. This container will be used to heat water. The volume of this boiler is approximately 95 liters, however, this volume will heat up quickly enough, because a chimney passes through it, which will also heat up. In order for the boiler with water to be convenient to use, it is necessary to include a tap in its design. The chimney is fixed on top, a cover is attached to it. At the final stage of construction and installation of structures, a pipe should be brought out through the ceiling and roof. It is necessary to isolate the structure from wooden materials and other flammable objects.
The issue of tightness
When a stove is made from KamAZ disks or cars of any other brands, it is important to weld the joints of the structure as reliably as possible. This is due to the fact that during the operation of the device, smoke will penetrate through the cracks and get inside the bath. It cannot be called pleasant and safe. Much attention must be paid to the joints. After some period of use of the furnace, cracks may form on it from exposure to high temperatures, but they can be easily eliminated by treating with clay and also sprinkling dry sand on top. This will allow time to detect new cracks.
Before starting to operate the oven from car rims, it is necessary to treat it with paint that is resistant to high temperature fluctuations. It is important to pay attention to the top of the structure Special attention because that's where the liquid evaporates. In this case, the metal loses its quality characteristics and corrodes. The chimney pipe is best supplemented with a stainless steel sheet. Hot water will adversely affect any structure. For fixing, you can prepare a clamp, which is performed independently or purchased in a store.
Fire Safety Rules
When a stove is made from discs for a cauldron or a stove for a bath, it is important to follow fire safety rules. There should not be a wooden covering below, it is important to install the structure on a refractory surface. In front of the room with the firebox, a refractory shield should be installed, which looks like a layer of iron with dimensions of 20x30 cm. The width should be slightly larger than the door itself. Additional insulation should be installed around the perimeter from below. And the gap between the insulation and the furnace is usually covered with dry sand, which is laid on top with stones. In this case, the oven rims will work without becoming a source of dangerous situations.
A design such as a brazier made of car wheels is an excellent option for reusing waste materials. Such a device is simple in execution, and therefore it can be done by hand. Despite the simplest design, there are enough ways to use the product, it can even replace a complex barbecue model.
Design features
A self-made brazier from a wheel disc has a mass positive characteristics. This design allows you to acquire a full-fledged grill complex with minimal costs for its manufacture. All materials are quite affordable for almost any summer resident. In addition, they guarantee the durability of the product and its strength under any operating conditions. Another plus is the compactness of the brazier. It is worth talking about its distinctive features and options in more detail.
Video: instructions for making a brazier from rims
Materials used
In order to make a brazier from disks, it will not be necessary to spend a lot of money, since practically improvised materials are used for its manufacture. Already exhausted car disks are usually thrown away or given away for a penny for scrap. This does not take into account the many ways of their alternative use, among which the manufacture of barbecue is one of the best options.
For a summer residence or a private house, a brazier is considered a mandatory attribute. Making from old disks saves money, since ready-made models are often inferior to this option in terms of their capabilities in relation to cost.
The onset of the cold season leads to the need for heating or creating simply comfortable microclimate parameters in garages or auxiliary buildings in living conditions outside the city. This problem becomes especially urgent in conditions of impossibility to carry out centralized heating.
Please note: almost every motorist has at least one unnecessary old wheel. Otherwise, you can find suitable material from friends, garage neighbors, or buy it for a small amount at a service station or from your hands.
The advantage of using discs to create a grill is the thickness of the metal. Even worn out wheels will be suitable for this kind of further operation. The metal will not fade or deform, and their shape is ideal for creating complex charcoal products.
Principle of operation
According to the principle of operation, the brazier from rims is similar to some other home-made models, for example, made from a barrel or a cylinder. It combines the following features:
- grill - allows you to cook on skewers or a removable grill;
- barbecue - for frying steaks, complemented by a lid that creates the effect of an oven;
- hob - the shape and diameter of the disk allows you to put a boiler, pan or pan on the fire;
- smokehouse - some models allow hot smoking of products.

The principle of operation is extremely simple. Firewood or ready-made coals are loaded into the lower part. A grate is installed on top or skewers are stacked. The dishes can also be placed on the grate or directly on the wheel if their diameter is compatible. The heat from below warms the air and allows you to cook like on a regular grill. For smoking, you need to close the top exit and ensure that the wood chips smolder so that smoke forms.
Each design is thought out individually, adjusted to the needs of the owners. However, the main part of the work on the manufacture of the product remains common to all models.
Versions
In more detail, you need to consider possible options for the execution of the product. If you want to make a brazier from car rims, you need to pay attention to the following models:
- Simple grill. The wheel is a container for coals, on which skewers or a grate are placed (We recommend that you study the material on our website).
The simplest option is a brazier for skewers
- Double construction. 2 wheels are used, thanks to which the brazier becomes higher. Due to this, you can put a cauldron on top. Heating from all sides allows you to cook in it delicious food like in the oven or stew them.
- closed oven. Allows you to smoke products, as the smoke is collected inside the chamber and is removed in a small amount through special openings.
- complex models. It combines all 4 functions of the product described earlier. Additionally, other useful elements can be mounted, for example, a chimney.
It is also worth noting that such a brazier can be made with legs and without legs. The stand will be needed for single models, but in double and triple models, its function is performed by the lower disk. At the same time, there are restrictions regarding the use of the structure, because damp ground can prevent the formation of heat, and hot metal is not allowed to come into contact with the wooden floor on the terrace.
We make a brazier from disks on our own
In order to independently make a brazier from auto disks, it is necessary to think over the scheme of the future product in advance. Decide on the amount of consumables, prepare the tools. To perform high-quality work, it is necessary to have the skills to use a grinder for cutting metal, as well as a welding machine.
Preparation of materials and necessary tools
In order to make a brazier from rims with your own hands, you will need the following materials and tools:
- old auto disks;
- Bulgarian;
- nozzle for cutting metal;
- rust cleaning disc in the form of an iron brush;
- file;
- drill;
- hammer;
- bolts;
- profiled pipes or steel bar;
- grill grate.
Bulgarian and welding machine - the main tools when working with metal
All these tools will be needed to process and connect the details of the brazier. It is convenient to make legs from profiled pipes and rod. In total they will need 3-4 pieces.
Tip: it is better to make 4 supports for greater stability of the product. The tripod may tip over to one side when placed on an uneven surface.

The wheels themselves need to be prepared in advance. If there are traces of rust and paint, the surface is cleaned with a metal brush using a grinder or drill. All excess is cut off.
Easy option
Several options for the manufacture of such grill structures should be considered. You need to start with the simplest - a single brazier from a wheel disc with legs. In order to make it initially, you will need to carry out a series of manipulations with the disk itself:
- On one side, the inner part is cut out - the partition. A container is formed, similar to a bowler hat.
- If there are too many holes in the bottom or they are large enough for the coals to wake up through them, an additional plate must be welded on. You should not completely close the gaps, as the coals must be blown to maintain heat.
- Legs are welded on the sides to the bottom or closer to the top. Usually they are made 40-45 cm in length. This height of the brazier is optimal, as it ensures the stability of the structure and ease of use.
Next, if necessary, you need to clean the sections so that there are no sharp edges left. You can optionally install a grille. It is not necessary to weld it, it is more profitable to use removable parts. Also, for the convenience of maintaining heat and cleaning out the ashes, you can make a window for firewood on the side of the disc. For transfer, the structure is equipped with handles, welding them symmetrically on the sides of the wheel.

Tip: if you use two or three wheels, you can limit yourself to welding metal bars to the bottom. In some cases, you can do without supports at all.
Smoking chamber
It is more profitable to make such a brazier from car disks, which can be used in different directions. For lovers of homemade balyks and sausages, a smokehouse will become an indispensable tool. In order to turn old wheels into such a useful thing, you need to use at least two units of material.
In order to combine two disks, it is necessary to cut off the partitions. Next, the wheels are joined and welded with a continuous seam to each other. Legs are welded to the bottom of the lower element. To provide access inside, a door is equipped. To make it, you need to walk with a grinder approximately in the middle of the product and cut out a rectangle.
To fix the door, one nut is welded to it, symmetrically with respect to the weld. 1 bolt is also attached to the barbecue by welding so that the door nuts can be put on them.

Tip: in order to fix the sash without any problems, the bolts are initially screwed into the already welded nuts. Then the door is applied to the opening and fixed already on the structure itself.
Such home-made barbecues allow you to equip all the conditions for relaxing with barbecue with minimal equipment costs. In addition, you don’t have to apply any extra effort, because all the stages of work are extremely understandable and easy to implement.
Or notes on the construction of a stove for a bath from rims by Alexander Ivanov
My sauna serves as a living existing example of a sauna with a rim stove.
I hope that these comments can help people who decide to make a homemade sauna stove from wheel disks with their own hands and avoid possible mistakes, and my sauna stove and its photo will show one of options implementation of the furnace from automobile disks., writes Alexander Ivanov.
Of course, such a stove can be used not only in the bath. With minimal modifications and alterations (or without them) to suit your needs, it can be used as a garage or workshop oven. From the disks of cars, you can make a good oven for a cauldron, a smokehouse oven, a small potbelly stove.
Such stoves, as a rule, are made portable, without a brick firebox.
Where to begin. Three times I tried to write an article, everything somehow did not stick. There is no clear step-by-step presentation plan in my head. Therefore, I will tell without much structuring. Whatever I remember, I will write. I apologize in advance to possible readers for the chaotic narration.
If you carefully read a magazine article on how to make a simple and effective stove for a bath from car rims from ZIL-130 and looked at the drawings of a bath stove, you probably realized that locksmith skills and a good welder are needed to make this stove.
Wheels (KAMAZ, from ZIL-130 or others) and the desire to make a good, solid and simple stove for a bath are also required. The article provides detailed drawings, diagrams, plans and a description of the furnace from discs that allow this to be done.
Once again I want to emphasize an important point: in order to weld a stove for a bath from rims, you need a good welder. With a hatred and a swoop, like the fact that I myself with a mustache and weld the stove without problems, and even with some kind of household welding machine or home-made, do not flatter yourself. This is just the case when you need to resort to the help of a professional.
I’ll make a reservation right away: everything that the author of the above article described is reliable. A combined (both brick and metal) stove made of car rims is quite economical, the bath warms up quickly, does not cool down for a long time, and dries well.
The latter advantage is very important for sufficiently spacious baths, since purely metal sauna stoves cannot ensure normal drying of the bath without additional heating or effective forced ventilation.
The steam in the bath is amazing, hot water is left for the wife to wash the next day (after washing 5-6 people). It is worth saying that the author’s hot water tank or boiler is also made of a rim and holds 40 liters of water, in my stove the hot water tank (boiler) is made of used stainless steel and holds 80 liters of water, which is enough for washing 10 people .
If you also need more hot water, then you can weld a boiler (tank) from two disks, if there is a desire and a sufficient height of the bath. Now there are many domestic and foreign metal stoves for baths (quite expensive).
Many of my neighbors, who built bathhouses with such metal stoves later than me, note with chagrin that their stoves are oh so far from mine. T
The heat in baths with such stoves is retained worse and such baths also dry out worse, since there is no heat accumulator in the form of brickwork (even if small). Such stoves can be described in one word - potbelly stoves.
The heat in the baths with such stoves is kept until the stove is heated.
I will say a few words about the modes of soaring or about the types of baths. Different sources give slightly different characteristics, but the essence is as follows.
- Finnish sauna: temperature 100-120°C, relative humidity 10% or less
- Hot Russian bath: temperature 70-85°C, relative humidity 25-40%
- Russian bath classic: temperature 55-65°C, relative humidity 60-70%
The wheel sauna stove provides all these modes sequentially from a higher temperature to a lower one (at least in my sauna). I've been taking a steam bath since I was seven years old and I prefer Russian hot bath. I'll tell you why.
I like to take a steam bath, that is, whip myself on sinful bodies with a good broom. In the sauna, this action is not a priori. A broom dries instantly at this temperature and humidity. The pleasure of steaming with such a broom is below average. As the steamers say - broom does not fit to the body.
Some bathers dip a broom into the water, but this is no longer a sauna. Humidity rises, the constant dipping of the broom distracts from the process of soaring. And the sauna itself does not involve the use of a broom. The process of inactive monotonous sitting or lying in the sauna, waiting for sweating and the moment of truth does not appeal to me.
As one good friend of mine says, you sit like a dormant chicken on a perch.
A hot Russian banya is a completely different matter: sweating starts faster, the broom does not dry out, you can steam both overlapping with or without a guy, or by pressing and blowing. The steam is dry, you don’t need to wear a mitten, you breathe freely.
There is no such pleasure and activity in the sauna by definition. The Russian classical bath is also not bad, but the humidity is already higher, you can’t take a steam bath without a mitten, and the personal belongings are already burning when steam is supplied. At any bath, a hat on the head is a mandatory attribute.
To achieve the sauna temperature, and most importantly - the absence of humidity, it is not necessary to fill the tank with water. There are practically no sauna lovers among my friends. The usual process of soaring in my bath is as follows:
- Heating the bath to a temperature of 90-95 °
- Bathing up to a temperature of 75-80 °
- Three visits to the men's steam room
- One-time washing of men (the bath after that turns into a classic one)
- Entry of women, their soaring and washing - in accordance with their capabilities and passions
Something got me carried away, distracted from the topic.
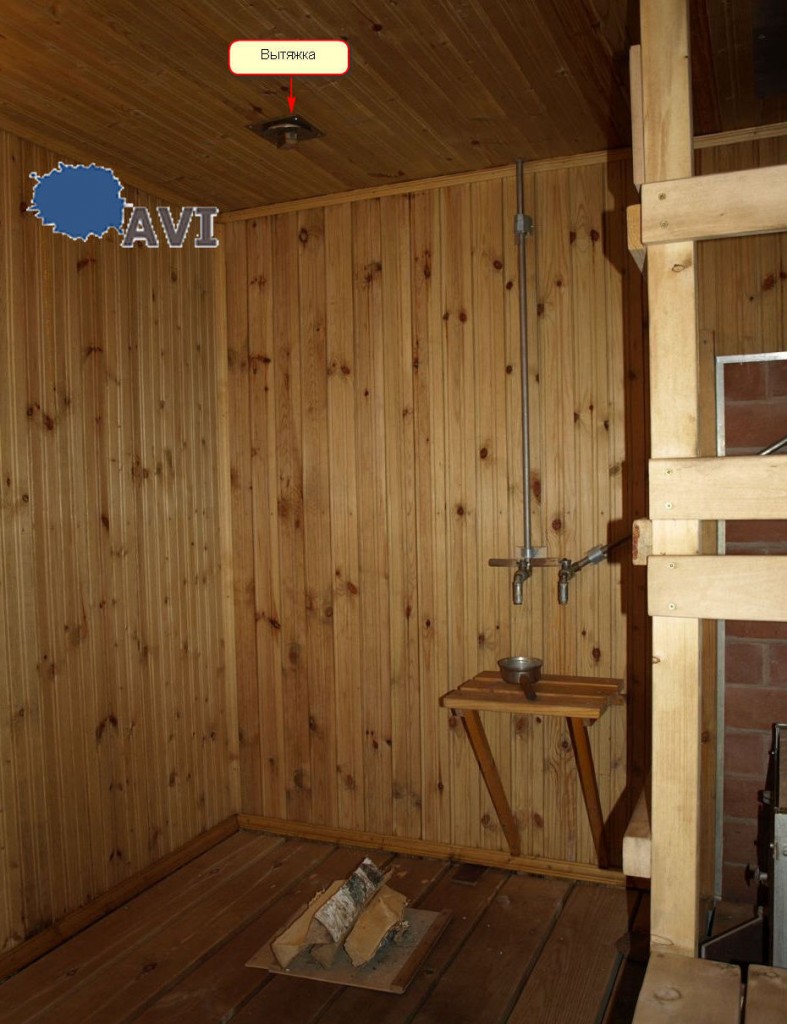
Photo 1 - Entrance to the steam room
I have already mentioned that I built this bathhouse and, accordingly, the stove with my own hands fifteen years ago. About four years ago, the brick part of the furnace was shifted.
The main reason for the re-laying was the beginning of brick chipping along the perimeter of the furnace door. The thing was that I used to have a high door, a brick higher than the current one, and above it there was only one row of brickwork.
According to all stove canons, there should be at least two rows of bricks above the door, I draw the attention of potential developers to this. In addition, the dimensions of the oven and the standard width of the door with its location in the middle of the oven dictated special masonry conditions.
Near the door, literally quarters of bricks had to be laid, which is highly discouraged. The door on the first oven was located in the middle, and not like in the pictures in the magazine. Therefore, it is desirable to position the furnace door so as to use not quarters, but halves of bricks.
The second reason was the poor quality of the brick. This refers to its shape and geometry. Some bricks, due to their concavity-convexity, unevenness, and other things, had to be finished on a large sandpaper or recoup on the thickness of the seams.
And the seams should be the minimum possible thickness (3, many 5 mm). Any good stove maker will tell you that the less clay in the stove, the better. At the time when the bathhouse was being built, finding a good oven brick was a problem of problems.
Now there is a very good oven (I emphasize, oven) brick, for example, Kostroma. If you look closely at the photo of the stove, you can see that the bottom two rows of bricks at the level of the blower door remained from the original red brick.
I did not replace them. The rest of the brick type fireclay. Its shape and dimensions are perfect. It comes in two sizes. The first is the size of an ordinary oven brick, the second is a little smaller in size.
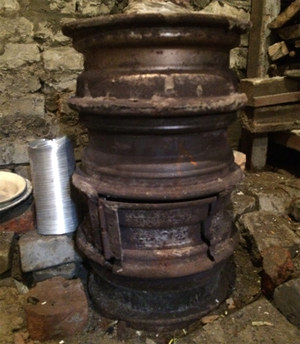
Photo 2 - General view of the disc oven
The walls behind the stove, like those of the author of the article, are protected by edge-on brickwork. This was done to ensure fire safety in the bath and is especially important for wooden baths. A small sheet of stainless steel is placed on the floor near the furnace for the duration of the furnace, also for fire safety.
The fire-fighting transition of the chimney through the ceiling is made differently for me. The author of the article has a chimney with a brick passage through the ceiling resting with all its weight on the stove (on the bottom of the water tank).
In my design, the pipe with a small gap enters the pipe coming out of the water tank. The chimney is made from the remains of pipes for a well with a diameter of 133mm. In common speech - one hundred and thirty-third trumpet.
The branch pipe coming out of the water tank has a height exceeding the ceiling level by 150-200 millimeters. That is, rises above the level thermal insulation ceiling by 150 millimeters. Its diameter is about 140 millimeters. The gap between the pipes is sealed with asbestos cord and clay.
To prevent the chimney from falling into the pipe of the water tank-boiler, two corners 1.2 meters long are welded to it perpendicularly.
They rest on floor beams, which I have in 1 meter increments. It turns out such an inverted T-shaped design. The corners rest on the beams through heat-insulating pads (rockwool, clay, brick). Fire crossing through the ceiling is done like this:
- The hole in the ceiling for the passage of the chimney is square or round with a side size or diameter of about 600mm - this is done to ensure a fire gap between the pipe and the ceiling boards.
- The transition is carried out through a pallet (baking tray) made of stainless steel - its dimensions are along the contour of the oven masonry (approximately 700x700mm). Flanging of the pallet is about 10-15mm (a little more will be better). The diameter of the hole for the pipe is such that it passes through the pallet with a small gap to compensate for the thermal expansion of the pipe.
- The pallet is stuffed with clay (naturally soaked, plastic) along the flanging and attached to the ceiling stainless (brass, bronze) bolt screws. In no case with self-tapping screws from black or galvanized (everything burns out instantly).
- Having fixed the pallet, add clay from the side of the attic to the cavity from the pipe to the ceiling boards, that is, fill the sawn hole completely flush with the boards.
- Next, install a frame (a box without a bottom and a tire) preferably wooden, 200-300 mm high), so that its upper level is at least 100 mm higher than the junction of the water tank pipe and the chimney.
- Pre-wind the frame on chimney, which you then install on the beams. The frame should be provided with holes for the passage of corners (larger than the size of the corners), which are then covered with clay.
- Through a hole in the roof (with a diameter of 300-350 millimeters), a casing rolled from a galvanized sheet is put on the chimney, the space between the casing and the galvanization must be filled with non-combustible heat-insulating material (mineral wool), preferably Rockwool. They can wrap the pipe in advance and secure it with wire. At the transition point of the roof, the casing practically does not heat up and fire-prevention cutting can be omitted.
- Next, the frame is filled with expanded clay (you can also use sand, but it is much harder).
- Here, in fact, that's all. (You can see how the transition looks from the side of the attic in the second article at this link)
Why do I talk so long and tediously about fire safety in the bath. Yes, because this is far from an idle question - in my memory there are more than one burnt bathhouse in our summer cottage. After the fires, the neighbors came to me in a jamb to see how the fire-prevention cutting was done at my place.
Photo 3 - Another type of oven
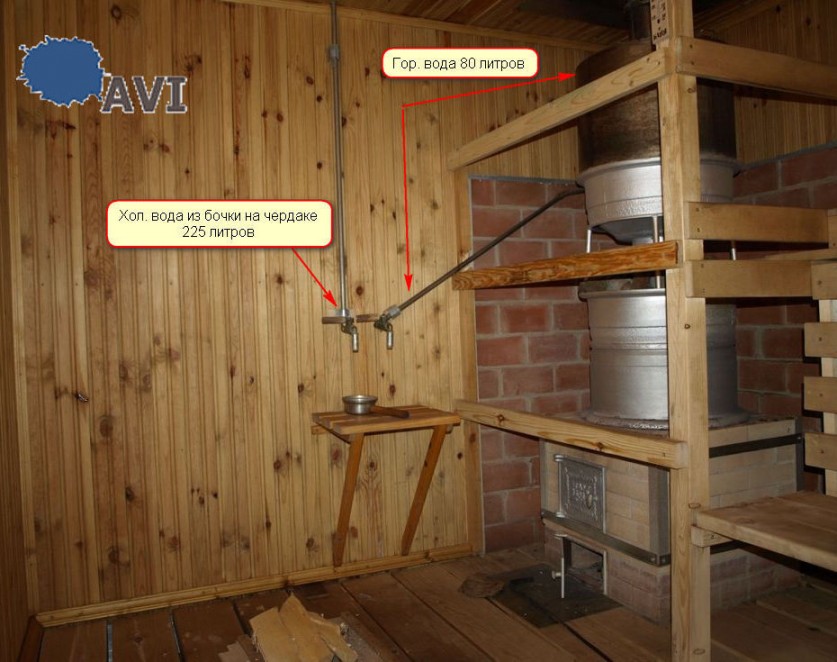
The photographs and drawings show that the author of the article and I have tanks (boilers) in the hot water bath also made differently. His boiler for hot water is made of a rim. My tank is made of stainless steel. The tank cover is made of two segments.
The larger segment, including the pipe, is welded around the perimeter to the tank, the pipe is also welded around the circumference to the segment.
The smaller segment is a hinged lid that fits snugly against the tank. Where my tank rests on the disc is a clay packing. It is located by a roller along the flanging of the disk. This design of the sauna stove made of discs allowed me to easily and simply shift the stove
A clamp with long ears is put on the pipe of the water tank, which is jacked up on both sides, the tank rises, the sauna stove from the discs is moved to the side table and removed. You can work with the brickwork of the firebox.
Under the clamps for the duration of work for safety, you can and should install reliable supports. The clamp is made from a piece of 133 pipe, sawn lengthwise into two halves, to which mounting strips and ears are welded.
The stove has a safety fence so as not to get burned (in the bath you can slip and dizzy). The author of the article has a fence made of bricks on the edge, mine is made of bars.
In one remark, the concern was expressed that a spongy type of soot deposits would be deposited in the pipe passing through the water tank (the author apparently had a bad experience).
Yes, this is sometimes observed in samovar-type tanks, but only in the case of an incorrect furnace design. Before the construction of a bath and a stove from disks, I studied a lot of literature on this topic.
Two or three sources mentioned the correct design of the furnace, namely that there should be a distance of at least 40-60 cm (even more) from the grate to the first obstacle in the form of a vault or other furnace structure. This is necessary for the correct mode of burning firewood.
With this distance, soot is least formed, which can settle on the internal elements of the furnace. This is especially true for heaters, in which the stones are directly washed by hot gases (smoke) - closed heaters.
A living example: a neighbor built a luxurious sauna with a heater of this type. A month later, she was unrecognizable, the steam room was covered with soot.
When steam was supplied from the door, which closed the channel with stones for the duration of the furnace, a cloud of soot flew out, which covered everything and everyone. The neighbor was forced to put a stretchable movie screen in front of the door, but this did little to help. After some time, he was forced to rebuild the stove.
Returning to my stove from rims, I can state with responsibility that the mode of burning firewood in it is the most optimal.
During the entire time of operation of the bath, I never had to clean the chimney, and during the aforementioned disassembly and re-laying of the stove, not the slightest hint of the formation of sooty spongy plaque was found. At the developer of the furnace, the whole design was thought out optimally.
In addition, it is necessary to insulate the chimney well and occasionally heat the stove with aspen wood.
Aspen gives long flames that burn out soot well. This is a well known old village method.
It is unnecessary to say that coniferous firewood, old fences and other wooden rubbish should not be used to heat the bath. Do not skimp on birch, aspen, oak!!!, alder!!! firewood - a stove and a bath will repay you a hundredfold.
Photo 4 - View of the shelves
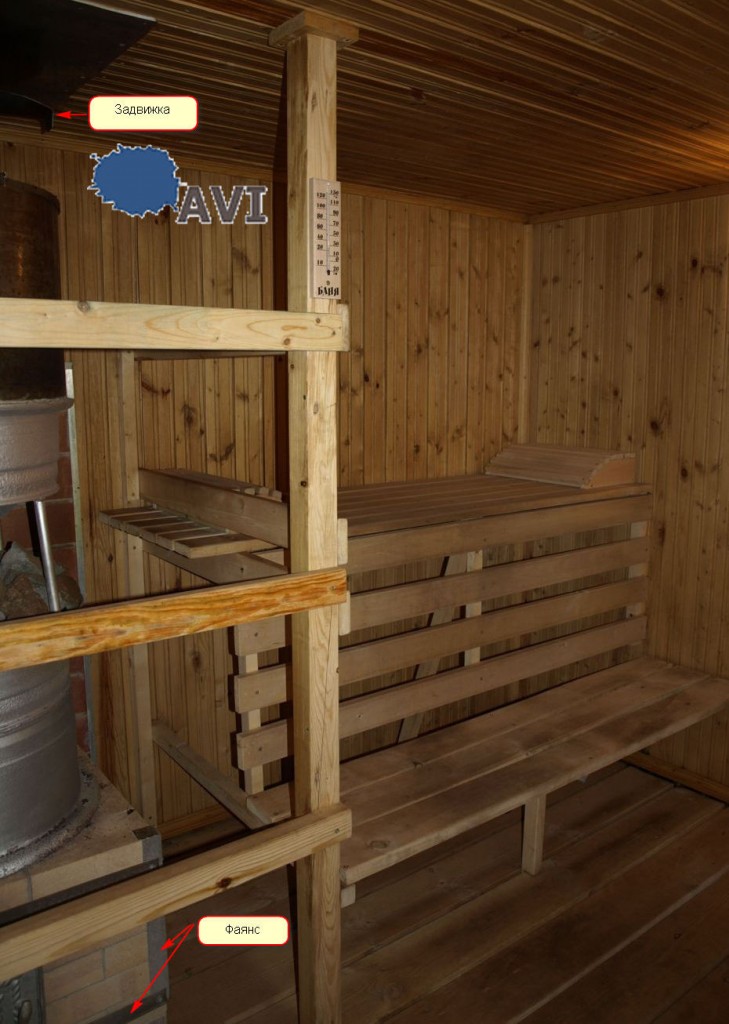
In the photo above, you can see that my bath is quite high. Its height is 225cm. I don’t suffer from claustrophobia, but in those small, low and small steam rooms where I happened to be, I feel uncomfortable, there’s nowhere even to swing a broom, and I don’t even talk about taking a steam bath together or three. The length of my bath-steam room is 3.5m, width is 3m. As you understand, the steam room and the washing department are combined for me. From the very beginning, the bath was conceived as a family bath, so I decided to make it like that. The bath is spacious and comfortable. I start to bathe from my feet (as they taught me from Kinders) lying on a shelf, resting my legs on the upper rail of the fence. Then I get up on the seat and without resting my head on the ceiling (height 180 cm) I continue to steam, steaming up to the waist. After that, I sit on the shelves and steam the upper half of the body (you can do this while standing). It’s more correct to bathe lying on a shelf, but you can’t do without an assistant-partner. I'm used to steaming as described. But some of my friends like to bathe in this way - with an assistant spacer, lying on a shelf and exhausted with pleasure. A not very wide seat, which does not interfere with the approach to the shelf, allows such aesthetes to hover with at least three brooms. The shelves and the home-made lime headrest and footboard are covered with a habesh sheet for the duration of the soaring, preferably a terry sheet. Despite a fairly decent cubic capacity, the bath quickly reaches the desired temperature and keeps heat well. We usually do two or three visits, then we begin to wash. If there are more than two bathers and bathers, I bring an additional two-meter bench into the bathhouse, on which you can not only sit, but also stand. Between visits we drink green tea with herbs or beer, whatever you like. If among the women who bathe and wash after men, there are extreme lovers (and they are) and they also need hot Russian bath, then I open the hood in the bath (to reduce humidity) and heat the stove to the desired temperature with the hood open. This takes about half an hour, then the hood closes. The temperature is adjusted to taste, the humidity is reduced, while the bath is dried to the state of a freshly heated bath. It would be nice to bring the firebox to the dressing room for this, like the author of the article. In general, the location of the stove in the bath is not such a simple matter. It is necessary to take into account many interrelated factors: the location of the door, shelf, benches, windows, the convenience of washing and moving in the bath, and other things (including the safety of the steam-washing action).
I will continue about the stove. The photo shows that the corners of the furnace are pulled together with metal bands, fastened to the corners located at the corners of the furnace (please forgive the tautology). Stove makers professionally call such edging screeds faience. Why dont know. The purpose of faience, I think, is clear. In the steam room and the locker room there are hoods that are plugged with ordinary plugs with liners made of thick hard foam. The handle of the plug in the steam room is lined with wood, as well as the handles of the taps - you can get burned. You can come up with and make more modern hoods, but your hands do not reach
Photo 5 - View from the shelf
The bathhouse was built in those days when it was not possible to find a good lining, so it was sheathed with the usual small-town folding, however, I found Finnish galvanized nails (square section, hot-dip galvanized). For the ceiling above the shelf and seat, non-resinous boards with almost no knots were selected. I found lindens on the shelves. Despite a fairly long operation, the boards still exude resin. Every year (sometimes more often) at the end of the summer season (end of November), I scrape the boards from the resin that has come out (especially on the ceiling). Once every three to four years, I additionally treat the boards with bleach based on hypochlorite. After that, I thoroughly rinse, heat and dry the bath. Everything fades very quickly and New Year nothing is felt.
Probably the last thing I want to say.
During the re-laying of the furnace, the following was discovered: the lower divider from the temperature (it is the highest in this zone) led and twisted so that it broke off or broke three of the four struts. They were made of 20 rods for me (the author of the article had 10-12).
I foolishly cut off the fourth one and removed the splitter altogether. Previously, the lower furnace rim was heated almost to a scarlet heat (now it is red-hot), it was necessary to replace the lower bar of the fence every three years.
Stones of 60 kg (as much can easily fit in my stove made of disks) heated up better due to the flow of hot gases around the disk, a couple was enough for 10-12 people.
The water boiled only towards the end of the heating of the bath to the desired condition, which ensured optimal humidity. After removing the lower divider, the water began to heat up faster, the humidity became higher, the stones heat up a little worse.
I had to additionally put two diesel brake pads under the stones (they are cast iron and have a very high heat capacity). The whole design of the furnace from the author was optimal. My lower divider was made from a blank of an elliptical bottom for boiler-supervision vessels, at least 10 mm thick.
If he was thinner, he would not tear the struts, as it seems to me. The bath still functions normally and no one around notices the difference. But I want to restore the way it was.
I am thinking over options, either to remove the stove again, or to somehow get a reduced divider through the firebox and fix it on the masonry.
Due to deformation and breakage of the lower divider due to high temperature I draw attention to this fact of possible builders of such a furnace. It seems to me that in order to prevent such cases, it is necessary to use low-carbon steel, and not a boiler room, as was the case in my case.
Probably, you need to choose the optimal thickness of the divider. So that, firstly, it simply does not burn out, and secondly, so that due to deformation (to some extent inevitable) it does not break the struts.
It may be necessary to use stainless steel, it may be to think over the floating (movable) design of the struts and the divider (which I want to do), maybe something else.
In this regard, I draw your attention to one more floating (moving) node. It is highlighted by me in the figure with a red circle. It must be done exactly as described in the article.
Everyone will have their own special stove. For example, I have a KAMAZ lower disk, which is very successful, you will have something of your own.
With a high degree of probability, both gas, and KAMAZ, and MAZ disks, disks from wheeled tractors and combines can be used for the furnace. In this case, the dimensions of the furnace and, accordingly, the brickwork may change.
It is not difficult to make new orders for laying the furnace with other discs. It seems to me that the article from the magazine and my additions cover in detail the question of how to make an oven from truck disks with your own hands.
A few words about stones. Now the stones have become more affordable, you can buy any that you like. I once bought a porphyrite. Three packs of 20 kg of different fractions, total weight stones 60kg.
This is enough for my bath. If this is not enough for someone, you can carefully lay another 20-30 kilograms of stones and also carefully surround them with a metal (stainless) screen with a grid from the side of the shelf and fix it (the grid should be with the appropriate cell).
I am very pleased with my stones, the steam is good, the stones have not burst during all this time. Once every two or three years I boil and steam them in a container with trisodium phosphate and rinse well using a stiff brush.
It is even better to use SF-2U powder for boiling, which is used for decontamination military equipment. Eats off all deposits accumulated on stones and metal for one or two. We used it in Chernobyl, even washed ourselves with a weak solution (unfortunately, the powder ended a long time ago, and I don’t recommend washing).
Many now buy jadeite (who has enough money). This semi-precious stone is very good, but many sources claim that it is impossible to heat it more than 400-500 °.
In my heater in the zone of maximum heating, the temperature is much higher, they checked it either with an industrial thermocouple, or with a pyrometer from a factory thermal (I don’t remember). For this reason, I did not change my stones.
Many of my friends use quartzite of different shades and gabbro diabase - everyone is happy. And from the use of talco chlorite reviews are negative. Just in case, let me remind you that the shelves should be located above the stones.
About essential oils. I am not a fan of the exotic, and the bath is not a SPA-salon or a hairdresser. Therefore, I use oils with native smells and in small quantities. And I don’t drip into the ladle and don’t splash on the stones, the effect of this is short-lived and the stones will inevitably become clogged from burnt oil.
I put an enamel mug with water and a few drops of oil directly on the stove five to ten minutes before the start of the bath procedure.
There should be enough water in the mug so that it does not boil away until the end of the bath session.
Even better, if possible, bring a bunch of fresh birch, pine, spruce branches, a bunch of mint or oregano to the steam room and put them on some metal sheet.
I won’t say anything about brooms, here everyone has their own preferences. http://a-v-i.ru/stove_sauna.html
Jan 27, 2016 Galinka
Winter is a great time to remember summer gatherings in nature, how you and your friends rested near a cauldron or by a fire with barbecue. In principle, even on cold winter days, you can treat yourself and your family to barbecue if you have a barbecue. The situation with the cauldron is somewhat more difficult.
To do this, you need a special oven. Among other things, you can use it as a heater for heating a small room.
But don't get ahead of time abandon an idea make a stove under the cauldron with your own hands. If you have several old wheels from a car lying around on your farm, then you can easily cope with this task.
Why are rims ideal for making a furnace body?
If you look back, you can find a lot of different materials and improvised means that can be used to create a stove with your own hands. Usually the owners make it from a metal barrel, but do not take into account the following negative moment- while working in a home-made stove, a fire so strong will be created that the thin walls of the furnace will not be able to withstand it and will burn out. If you want this homemade structure to last you as long as possible, then it is better, of course, to use a steel sheet of suitable thickness. True, such a stove will cost you a serious amount.
But in order to save money, you can make an oven from car rims. After all, this design has many advantages:
important advantage of wheel ovens is that it is not difficult to make them even without experience. The only thing that can complicate your implementation of this plan is the lack of necessary tools. To make a homemade stove from wheels from a car, you will definitely need a welding machine and a grinder.
How to make a stove from rims with your own hands?

As a result, it will take you only 2-3 hours to get a convenient and practical stove made of discs for a cauldron. This is a very compact device that you can easily take with you by placing it in the trunk of a car.
Potbelly stove made of discs as a sauna stove
In a similar way, you can make from old wheels and the well-known potbelly oven. To make it, you can use large discs from truck type KrAZ-255B.
If you are exactly follow the work order, then you should get an excellent design with a diameter of 50 cm, a height of 140 cm and a wall thickness of 1 cm. It will perfectly cope with the role of even a sauna stove.
As the basis of the potbelly stove you can take sections from old heating batteries, on which metal sheets with a thickness of 5–8 mm must be attached from above and below. As a result, you should get the base of the furnace, which has dimensions of 0.6 x 0.6 m and a height of 0.4 m.
Do not forget to add a combustion chamber with a door to the stove from rims, which must be made at the base. Before you start installing the disk enclosure, cut a hole in the top base plate.
After that, you need to follow these simple steps:
After successful completion of all steps you can cover the stove with refractory paint. First you must carefully remove the remnants of the old paint. To make it easier to do, we advise you to ignite the stove on fire, after which you can easily remove all the dirt. After waiting for the stove to cool completely, you can start painting. Given the operating conditions of the furnace, it is best to use black heat-resistant enamel.
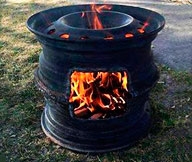
Brazier from rims
Many reasons can be given why it is worth making a brazier from old wheels. Not only is it lightweight and easy to carry. In addition, it will be easy for you to maintain the required temperature due to the free access of air.
Surely more than one owner had a desire to make a homemade brazier from rims. So today there are many options manufacture of this device. So that you do not have great difficulties with manufacturing, consider the simplest design that you can assemble with a minimum set of materials. All that needs to be done is to lay a steel sheet or other material that can be found on your farm on the bottom hole of the disc.
But with all its advantages, a brazier of a similar design has certain disadvantages:

Brazier of such execution just as easy to use, like a regular camping stand for skewers made of bricks. This option will not disappoint you if you use it infrequently. In other cases, you should think about creating a more reliable and convenient barbecue.
How to make a brazier from rims?
To make a brazier, which withstand more intensive use, you need to prepare two rims and a small set of tools and materials:
- Welding machine and set of electrodes;
- Bulgarian;
- Profile pipe 1 m long;
- Fasteners - bolts and nuts;
- wire;
- Clothing for personal protection - gloves and a mask.
The process itself making a brazier from two car disks very simple. For clarity, we describe it in the form of successive stages:
Conclusion
It often happens that there is an urgent need for an oven to, for example, heat water or prepare a special dish. Not every owner wants to spend money on it. In this case, you can make it yourself, and for this you will need available materials. It can be rims, which often lie around idle. They are made of fairly thick steel, so they are perfect for making the body of a future furnace. All you need to realize this plan is a grinder, a welding machine and a little patience. If you have the skills to work with these tools, then you can make a stove out of rims without much effort.