Today almost everyone private house equipped with a chimney. And in most cases, it has a practical meaning, rather than a purely decorative one. This is due to the fact that private houses are very rarely connected to centralized heating, they are heated using boilers, stoves, etc. And the chimney plays a very important role in this whole business. Through it, steam and smoke are emitted. It helps to properly function any heating system. Installing a chimney is a very complex and painstaking process.
Introduction
The chimney is a complex structure, the purpose of which is to remove heating by-products from the furnace into the atmosphere, which protects the house from dampness, burning, tar and burning through the walls. It is an integral part of almost every country house or cottage.
The principle of operation of this design lies in its ability to create natural draft, which removes steam, tar, etc. Installing a chimney is a very significant process. If you make mistakes during its construction, you can not get the desired result and earn a lot of problems. An example is insufficiently powerful traction for a certain type of furnace, which is fraught with poisoning
There are many different configurations of chimneys, which differ both in their installation price and in traction and other characteristics. Each of them has its own disadvantages and advantages. Let's talk about what the different types of chimneys are, what tools are needed to install them, and how to install them correctly.
Tools
We will list the minimum tools that will be needed when performing chimney installation work. This set may vary depending on what type of system you are installing. So let's get started. You need to prepare the following tools:
- Bulgarian (to her - a set of disks for working on stone and metal).
- Grinder machine.
- Hammer.
- Perforator with a set of drills of various diameters.
- (for convenience, it is better to have a large and a small one).
- Bucket, trowel, square, tape measure - small accessories that will simplify the work.
- If possible, purchase a mounting gun.
Now you can start work. Installing a chimney or building it will not seem so difficult if you have a head on your shoulders and hard-working hands.
materials
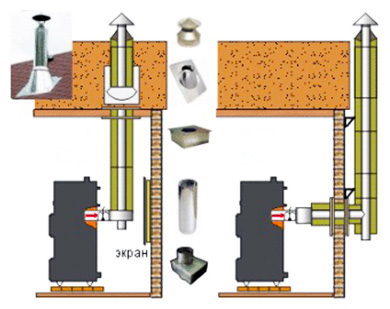
To date, there are many different types of chimneys, which are constructed from different materials. Depending on the type of construction, a certain set of materials is purchased. So, for example, installing a sandwich chimney involves the use of the following components:
- pipes of different diameters that are inserted into each other;
- filler (insulating material) with a working temperature of up to 700 degrees Celsius - this is what is between the pipes;
- pipe fasteners;
- screws for metal;
- clamps and brackets;
- pipe elbows - necessary for pipe bends, etc.
For laying a traditional brick chimney, you need cement, a special umbrella to cover the pipe, etc. And here we already see how much consumables differ for a particular design. Thus, having decided on the type of chimney, we begin the search and purchase of everything necessary for its installation.
Requirements for a modern chimney
Any modern chimney, be it a sandwich or brick, must meet a certain set of requirements and what are these requirements?
- It must be resistant to moisture. The condensation process leads to the fact that the walls of chimneys, both brick and metal, are capable of self-destruction.
- Possession of powerful traction.
- A good chimney can withstand temperatures up to 1000 degrees Celsius.
- It should have excellent resistance to chemicals.
- Smooth inner surface (cleaning such a design will be much easier).
By following the rules for installing a chimney, you can achieve good results and build a really good, high-quality system for removing combustion products.
Main varieties
There are many different classifications of chimneys, but today we will talk about such types as:
- Brick chimney.
- Chimney-sandwich.
- coaxial designs.
- Gas heat sink as a kind of chimney.
We will talk about them, as they are the most popular among summer residents and owners of country houses. It is worth noting that each of the types has its own advantages and disadvantages, so only you will choose which one is right for you.
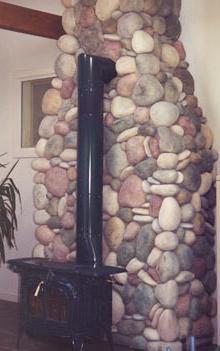
Brick chimney
Installing a brick chimney, or rather its construction from the base to the visor, is a rather complicated process, including many stages and rules that you need to know and follow. Let's start with the fact that one such design is designed for a maximum of two furnaces, provided that they are on the same floor.
The rules for installing a chimney are of great importance in this case. In part, they relate to masonry. Each brick should overlap the joint below those lying - this will avoid self-destruction. It is believed that a structure erected by this method is much stronger than any other.
The temperature at the bottom of the oven can be staggering. Especially if the house is heated with coal. To avoid damage to the base of the pipe, a special stainless steel nozzle is mounted on the furnace, which is then lined with a double layer of brick. The size of this design depends on the height of the ceilings and the stove itself. For masonry, it is necessary to use only clay mortar with the addition of cement. It is very important to make a special valve that will block the entire hole - it will serve as a regulator for increasing or decreasing thrust.
It is also allowed to build chimneys inside external walls, with one condition, of course: if they are made of non-combustible materials. IN Lately most of these systems are based on steel pipe, which is further isolated and lined with bricks.
Chimney installation: sandwich technology
Sandwich technology is a complex and expensive structure that can withstand high temperatures no worse than brick. A huge plus of such a chimney is that it practically does not need to be serviced. The only thing you need is to clean it periodically.
The chimney-sandwich consists of three main elements. First, the inner and outer pipes, which are inserted into each other. The seams of each of them must be well welded and wrapped with a protective fire-resistant fabric or fiber. The gap between the pipes is filled with a special fire-resistant and heat-resistant material, which does not allow the outer pipe to become very hot. This is the third element.
Installing a sandwich chimney will take a lot of time and effort, but it's worth it. The final stage of work is to fix the structure on the outer part of the wall of the house. This process is carried out by means of special clamps, fasteners and brackets.
coaxial chimney
The installation of a coaxial chimney is most often carried out on steam generators, gas boilers etc. This technology something similar to a sandwich, but instead of a sealant, spacers are simply installed inside, which do not allow the pipes to touch. Such a system, unlike other varieties, can be displayed in a horizontal position through an external wall. The installation is very popular today, and the coaxial view is the most used.
You ask: "Why are they installed only on gas boilers and generators?" The answer is obvious. The thing is that the temperature in such boilers at the outlet is much lower than that of real furnaces. That is why this type is not used anywhere else. Installation gas chimney similar to the work on the installation of a sandwich system.
Modular ceramic chimney
Today, modular ones are in great demand, despite their exorbitant prices. This is due to the fact that such constructions carry two key qualities that are very important for a person - they are very easy to install and quite reliable. Such chimneys can be laid even inside wooden walls, it is only necessary to observe a gap between the wall and ceramics - 5 cm. In addition, they have a very attractive appearance.
Installation of such a chimney is very simple. To do this, it is necessary to connect the already finished sections of the pipe (modules) to each other, fasten well and fill the seams with a special sealing solution, after which the whole structure is fixed on / in the wall.
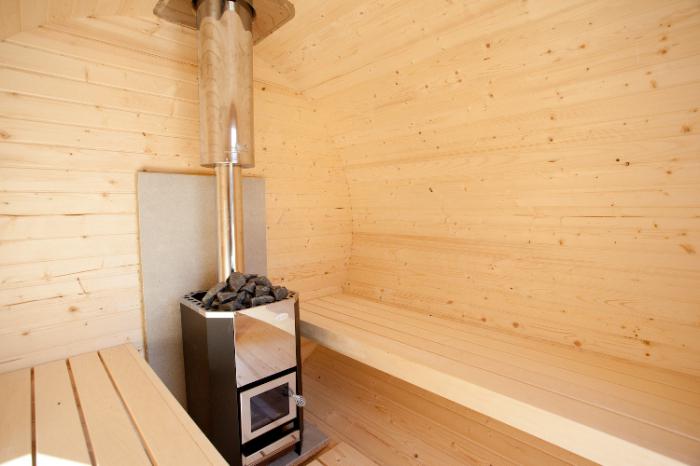
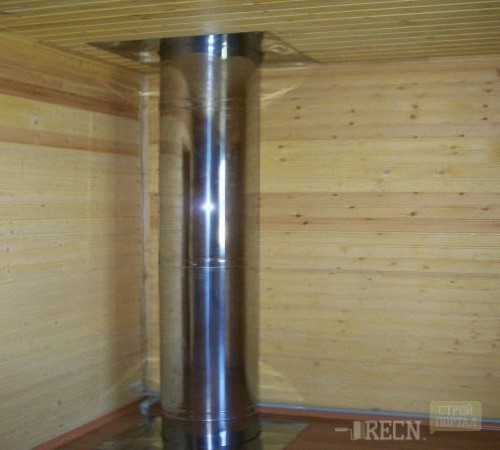
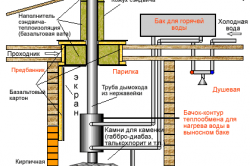
Sauna chimney
Almost any owner of a suburban area dreams of having a sauna or bathhouse in or near the house. The most important element of the latter is the oven. After all, it is she who creates high temperatures in the steam room. And for this, a high-quality installation of a furnace and a chimney is required, which will work, so to speak, in tandem. It is best to use traditional brick structures for such a case.
We have already considered the rules for installing such a chimney above. So there shouldn't be any issues. As for everything else, the installation of a chimney in a bath is possible both inside and outside the room. The decision, as always, is yours. But experienced experts advise building a structure inside. The walls of the chimney get very hot, they can increase the temperature in the room. However, if you are not confident in your abilities, it is best to entrust such work to professionals who will do everything efficiently and quickly.
Problems when installing chimneys
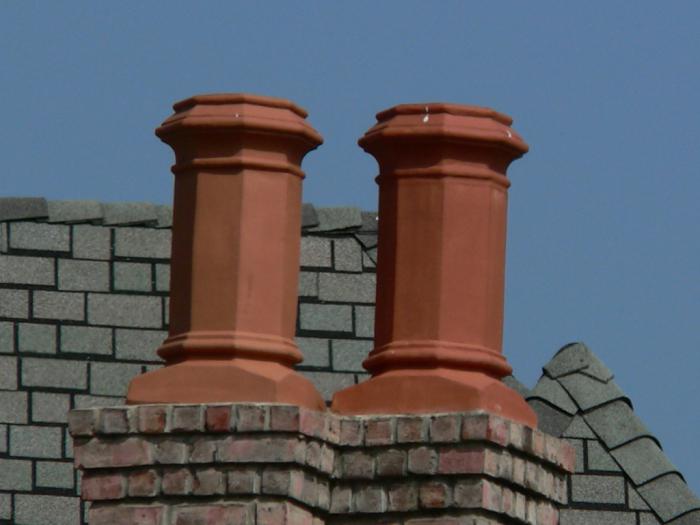
Installing a chimney pipe can be accompanied by a lot of problems, and an improperly built system will simply nullify all efforts and add headache. Various difficulties may arise. One of the reasons may be the wrong material. For example, if you put a bad brick at the base of the stove, you can be left without a chimney, as it will quickly crack and crumble. In addition, it is necessary to know the design features of such a system in order to prevent the disappearance of thrust. For example, the height of the pipe above the adjacent part of the roof should be at least 0.5 m, and for houses with a combined roof (flat) - at least 2.0 m. And one more important point. The mouths of brick channels to a height of 0.2 m should be protected from precipitation with a layer of cement mortar or a cap made of roofing or galvanized steel.
Of course, it is best to learn from the mistakes of others so as not to make your own. And mistakes in this case are fraught with major troubles. The wrong chimney can destroy your entire home. For example, burnt walls can easily cause a fire. Therefore, before you start something, you need to carefully plan and think through everything. Consult with knowledgeable people, re-read the special literature, in the end play it safe and entrust the installation of such important systems to professionals. From this, there will be fewer problems, and you can get the job done faster.
All heating systems, except electric ones, use combustible substances - fuel - as an energy source. Regardless of what type of fuel is used - gaseous, liquid or solid, it is necessary to install an effective system for removing combustion products. In the conditions of private construction, as a rule, direct-flow chimneys with natural draft are used.
Do-it-yourself chimney installation
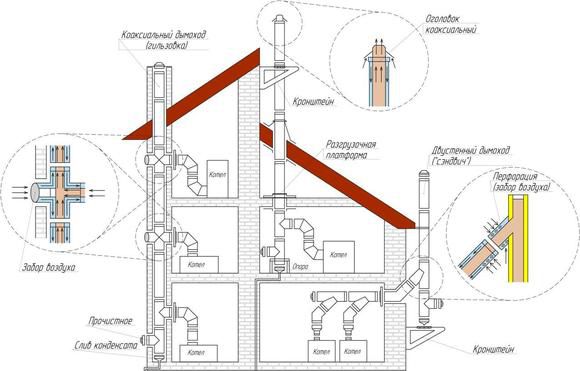
Depending on the design of the house, the type of boiler and the place where the house is located, the type of chimney is selected. It can be built of bricks, refractory or ordinary, ceramic, made of stainless or ordinary steel, ceramic pipes or sections, poured from concrete. There are a lot of options.
In building specialized stores, you can buy ready-made prefabricated chimneys for any boilers, in which case the installation of the chimney will be much easier.
As a rule, all chimneys are designed for a certain type of fuel, and before installation it is advisable to determine which boiler will be installed in your home. Many boilers require forced chimney and not all chimneys are designed for this.
Chimney installation rules
- The chimney is mounted from the bottom up.
- The upper sections must go into the lower ones if the chimney is tubular, or at least not create internal steps, if the configuration is different.
- The resulting condensate must drain freely, without lingering on the protrusions.
- To prevent the formation of condensate, soot and the occurrence of reverse thrust at low or very high outside temperatures air, it is desirable to insulate the chimney.
The best option- insulation device in the form of a sandwich with a gasket made of a non-combustible porous substance (the so-called sandwich chimney). Such materials can be found in building materials stores.
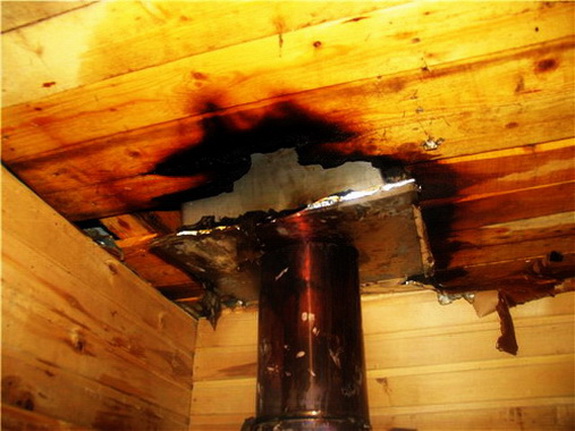
Special requirements are put forward for chimneys in wooden houses.
In places where the pipe passes through ceilings or near walls, it is necessary to install heat-resistant gaskets made of brick, concrete or expanded clay concrete. The distance from the pipe, even thermally insulated, to the tree should be more than 15 cm.
Here's what can happen without insulation.
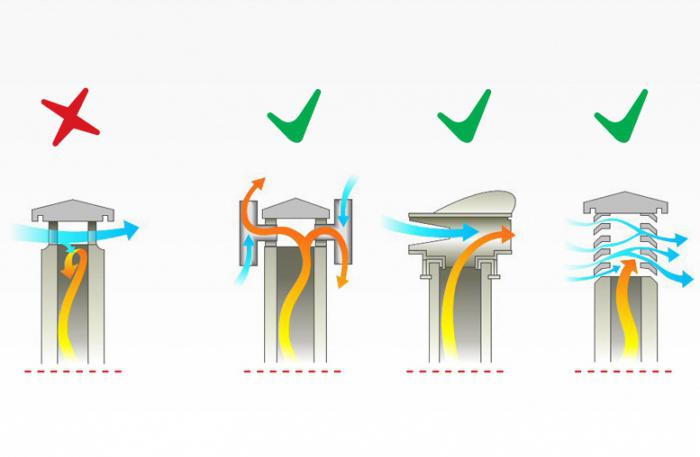
Creating normal thrust
To create a normal draft that ensures the complete removal of combustion products and excludes the return of smoke back in strong winds or low temperatures, it is necessary to adhere to several simple rules. Their requirements are not difficult to fulfill, and many problems will disappear automatically.
The chimney, both internal and external, must be strictly vertical. If it is necessary to install side outlets, they must be either horizontal or directed at an angle slightly upwards. Negative angles must be strictly avoided, even in forced draft chimneys.
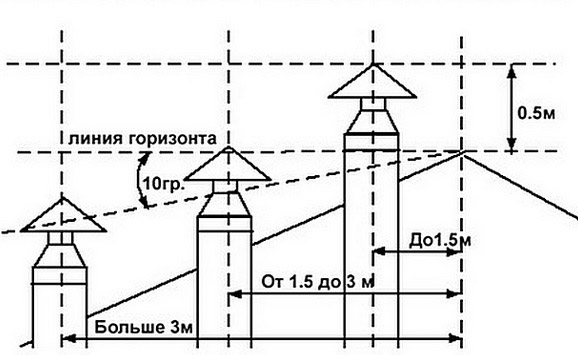
The top section of the chimney must be at least 50 cm above the roof ridge. If the chimney is installed at a distance from the ridge, the top of the chimney can only be lower than the ridge level if this distance is more than 3 m.
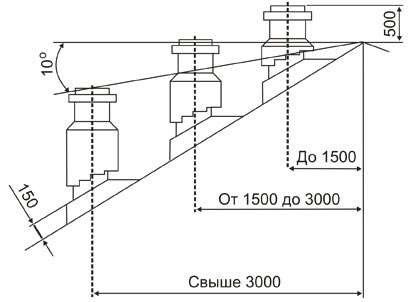
If the house is covered with a roof made of combustible materials, then the height of the chimney should exceed 1 m. In this case, it is advisable to strengthen the chimneys made of tubular materials with stretch marks.
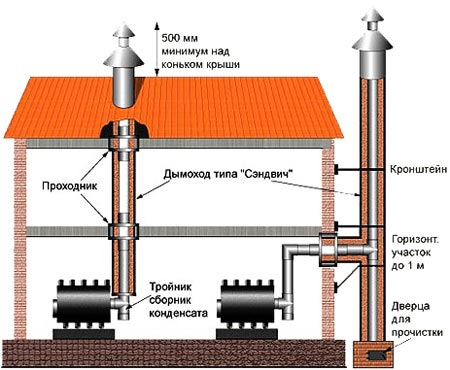
It is desirable to protect the chimney opening with a canopy - a cap from rain and snow, which simultaneously performs a decorative function. The distance from the lower cut of the cap to the upper edge of the pipe should be within 15 - 25 cm. This is dictated both by the conditions for creating normal natural draft and by the actual protective functions.
Not a single boiler plant or stove that burns any type of fuel can do without a chimney. At the moment there is big choice various materials for the construction of chimneys. Of these, the most preferred are modular products supplied in kits, the so-called sandwiches. This material will highlight issues related to the design of such pipes and their choice in each case. We will also consider how to properly install a sandwich chimney with your own hands.
Sandwich chimney device
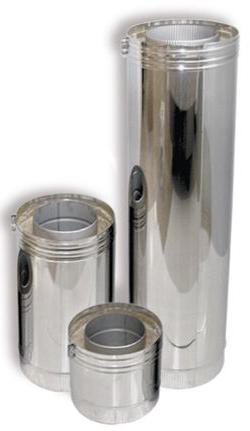
Modular kits got such a name because they consist of separate finished parts - modules of fixed sizes (usually 1 m long).
Each module is a sandwich pipe consisting of 3 layers:
- internal circuit for combustion products: made of heat-resistant stainless steel;
- insulation layer: usually it is basalt fiber with a density of up to 200 kg / m3, less often - polyurethane foam;
- outer contour: serves as a protection for the thermal insulation material. The contour material is stainless or galvanized steel.
The design has a cylindrical shape, as it is considered optimal in terms of aerodynamics. The layers are fastened together with a special adhesive, the thickness of the thermal insulation may be different depending on the specific operating conditions. The modules are connected to each other according to the method of sewer pipes, so one end is made in the form of a socket, and the other has a narrowing.
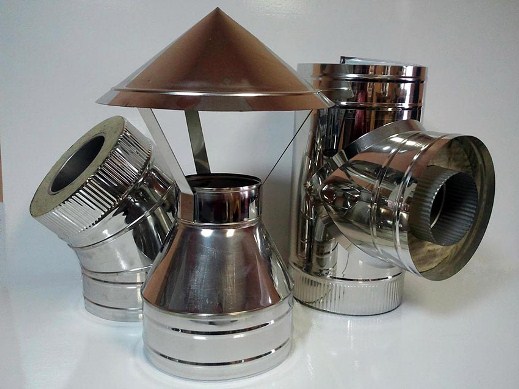
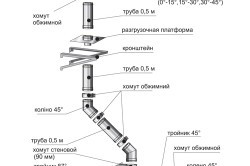
In addition to straight sections, sandwich chimneys are equipped with a tee for tapping into a vertical section, a condensate drain assembly and fasteners. If necessary, the kit can be supplemented with the same insulated bends at an angle of 90 or 45 degrees in order to make channel turns, and even ready-made nodes for passing through ceilings (cuts) and roofs (roofs). The advantages of three-layer systems over other chimneys are as follows:
- quick and easy installation: the construction of any other pipe with insulation will take much more time;
- excellent performance and durability;
- outside the chimney sandwich pipes have a low temperature and are therefore fireproof;
- products are aesthetically pleasing.
Note. Many manufacturers offer sandwich kits with outer powder coating almost any color.
Before choosing three-layer pipes, a chimney installation diagram must be drawn. Ideally, such important parameters as the diameter and height of the chimney are calculated by specialists, but homeowners rarely turn to them for help, trying to save money and solve all issues on their own. To make it as easy as possible for them, we will give a few recommendations in this regard.
The diameter of the chimney pipe can be selected according to the outlet pipe of the boiler installation. The rule is simple: the cross section of the sandwich should not be less than that of this pipe. More is allowed. As for the height, you can get a guaranteed result if you take its value at least 6 m. Moreover, the height is measured from the grate of the solid fuel boiler to the upper cut of the pipe.
If the boiler is gas, diesel or pellet, then it is necessary to measure the height of the chimney from the burner. At the same time, it is necessary that chimney, or rather, its cut, did not fall into the zone of wind backwater, otherwise the natural thrust will be very weak. To avoid this, the following scheme is used in the calculations:
In order to reduce the resistance of smoke channels, it is not recommended to do big number turns, maximum - 3. And then, we must strive to use elbows everywhere at an angle of 45º, and not 90. The length of the horizontal section to the tie-in is no more than 1 m. Following these recommendations, it is necessary to draw a wiring diagram and mark the places on it fixing the flue to building structures.
When the scheme is ready, you can safely pick up sandwich chimneys. There are a few caveats here related to the quality of the products and the presence of a large number of fakes on the market. The first moment: high-quality stainless steel alloyed with chromium does not attract a magnet at all. This fact must always be verified by taking with you a magnet wrapped in cloth. The latter is needed in order not to scratch the shiny surface of the metal during the check and not create a reason for conflict with the seller. If the magnet is even a little attracted, then you have a poor-quality product.
Pay attention to the thickness of the steel from which the chimney sandwich is made. For example, quality products Russian production, sold under the VOLCANO brand, are made of metal 0.5 mm thick. When you come across a thinner stainless steel, know that it will burn out just as quickly, be guided by a thickness of at least 0.5 mm when choosing.
Well, the last. Carefully examine the tee where the horizontal section cuts. For convenience, ask the seller to attach a condensate collection unit to it. Then the opposite end of the tee, where the chimney sandwich pipe is connected, should have a socket, not a narrowing. If this is not the case, you should refuse such a purchase.
Note. When connecting three-layer modules of the gas duct, the inner contour of the upper section enters the socket of the lower one, and the outer one, on the contrary, is put on the lower pipe. Therefore, on a tee, the socket must be observed from above, in the inner contour. You'll get more information about choosing sandwich chimneys by watching the video:
How to assemble a sandwich chimney
First, a little about the scheme according to which the chimney is correctly installed from sandwich pipes. There are two of them: for smoke and for condensate, and the first one is wrong. This is easy to figure out by looking at the figure:
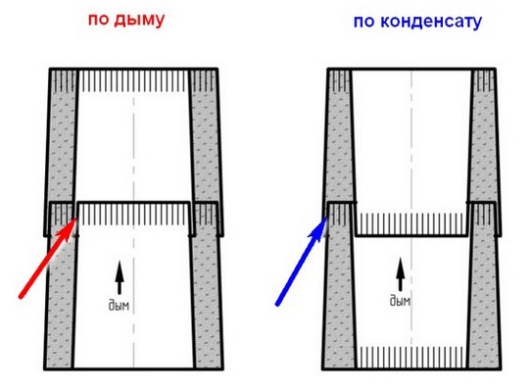
On the left, the red arrow shows how, when assembling “through the smoke”, the condensate flowing down the walls safely enters the sandwich through the gap with an incorrect connection. The worst thing is that during operation you will not see these streaks, as on a conventional single-walled chimney. All condensate will go into the insulation, and then, when it freezes, it will gradually break the pipe, separating the upper circuit. That is why it is so important to pay attention to this fact when choosing pipes, as we said above.
The figure on the right shows the correct assembly of sandwich chimneys - "by condensate". The latter in this case successfully flows over the joint and rushes down into the condensate collector. The same thing happens outside, precipitation flows down the pipe without flowing inward and without soaking the insulation.
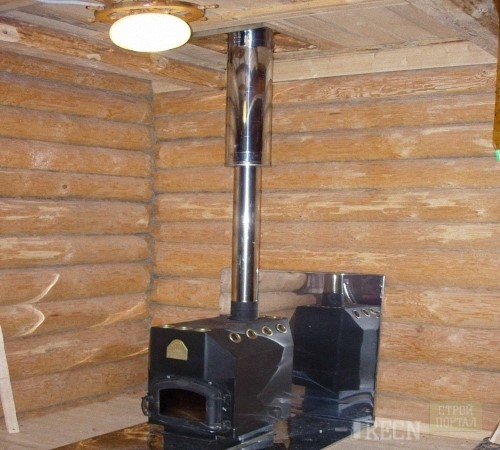
Pipes for the removal of combustion products are of two types: internal and attached. The first one joins the boiler and goes outside inside the house, bypassing the floors and roofing.
Such chimneys are often used for baths. The second type differs in that the pipe from the boiler immediately goes out, and then rises to the required height. This method is preferable because:
- does not take up space inside the house;
- does not require additional passage nodes through the ceiling;
- much easier to install and cheaper;
- more convenient to maintain.
External attached chimney
In any case, the installation of a sandwich chimney starts from the boiler. First, a horizontal section is connected, whose length cannot exceed 1 m. During installation, a slight slope away from the boiler installation to the vertical channel is observed. The goal is to prevent condensate from entering the heating unit.
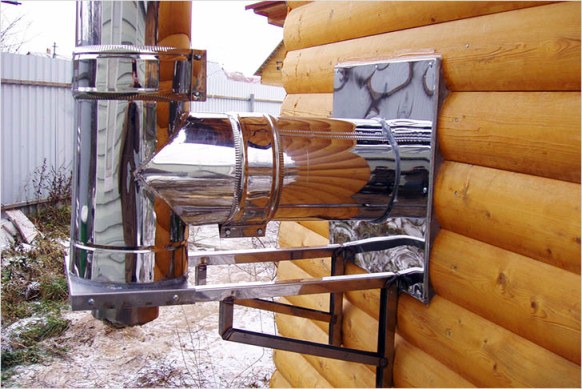
The next step is to go through the outer wall. If it is made of non-combustible material, then three-layer chimney pipes are passed through a sleeve made of asbestos or metal. The easiest way is to make a sleeve from a pipe of a larger diameter, and the gap between it and the gas duct must be sealed with asbestos cord or basalt fiber. The tie-in to the tee is located outside, a condensate drainage unit is attached to its lower branch pipe.
When making a passage through the wall, it is necessary to ensure that there is no junction of two sections in this place.
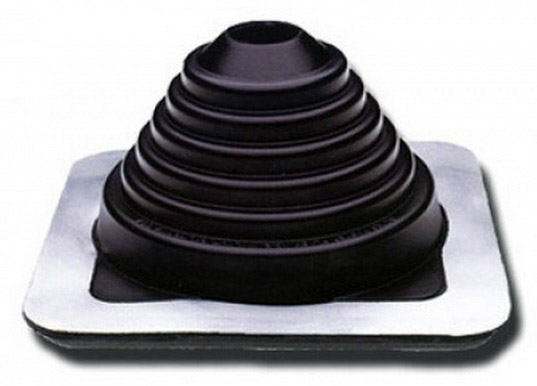
If the wall is wooden, then it will be necessary to provide a gap between it and the pipe of at least 200 mm. Usually, for this, a square opening of the required size is cut out in the wall, where a special metal passage assembly is inserted, shown below in the photo. The flue is laid through it, and the gap is filled with basalt fiber.
The installation of the vertical channel is carried out from the bottom up, using clamps and heat-resistant sealant to seal the mates. Along the way, the chimney is fastened to building structures on steel brackets. The latter are placed in such a way that the mounting clamp does not get into the junction of the two sections of the pipe. A nozzle or umbrella is installed on the cut of the sandwich pipe.
Chimney inside the house
By and large, there is not much difference in the sequence of work here. There are only additional operations when it is necessary to install additional elements of the chimney in places where it crosses the ceiling and roof.
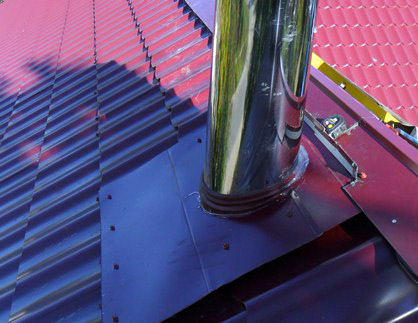
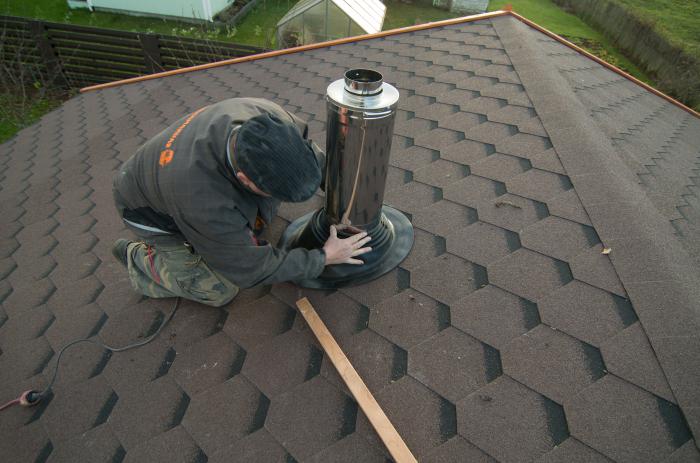
These places must be chosen so as to maintain a distance from the walls and at the same time not to lay a pipe in the middle of the room. The passage of the floor is similar to the crossing of the outer wall, described above, but the passage through the roof is more difficult to arrange.
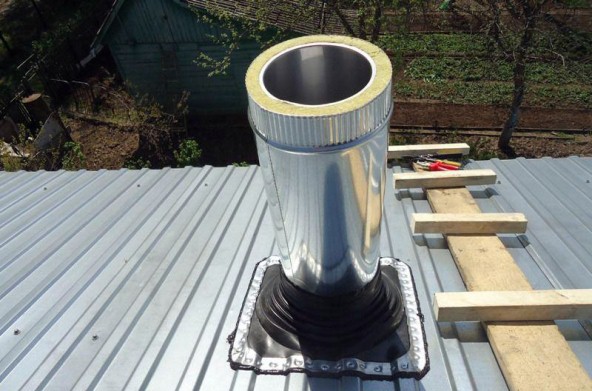
Well, when the roof is flat. Then you can use a simple galvanized element, part of which should be brought under the coating to prevent water from leaking. But most often the roof is covered with corrugated board, metal tiles or slate. Then the installation of the pipe and the sealing of the passage is done using a special elastic element called a lid.
Conclusion
It should be noted that the process of assembling a modular sandwich kit is not very difficult. Do-it-yourself chimney installation is quite within the power of homeowners with a head and hands. It is important to calculate everything correctly, draw a diagram and prepare materials. The rest is just painstaking work that requires attention and patience.
The chimney in the organization of heating systems plays three main functions. All of them can be achieved by installing a chimney with your own hands.
The main functions of the chimney
- First of all, the chimney is designed to remove combustion products that are extremely harmful, and often fatal to the body of the inhabitants of your home.
- In addition, the chimney must also have insulating properties and protect the building structures of floors and roofs from fire.
- And, finally, a beautiful chimney has an aesthetic function and decorates the roof of your house.
You can easily install the chimney yourself by following simple instructions.
The main types of chimneys
Depending on the material of manufacture, chimney systems can be divided into those made of metal various types(for example, cast iron or stainless steel), brick and ceramic. A modern chimney can be made of composite materials and have a multilayer structure.
You can choose the modification of the chimney that will most closely match your building.
So, for example, the cheapest option - a metal chimney is best suited for arranging heating systems for boiler rooms or baths, that is, non-residential premises. However, such an economical approach is hardly advisable to use in a home. The metal structure has poor sealing of the joints, as a result of which you will not be able to get rid of the penetration of smoke into the room. Also, the metal does not have the most attractive service life, as it is extremely unstable to atmospheric moisture.
A pipe consisting of composite multilayer materials is more reliable and resistant to aging. But between the layers of such a pipe is placed a heat-insulating fire-resistant material. Due to unjustified savings, many manufacturers place a low-quality insulator in the intermediate layer, which, after a while, may begin to crumble. So when buying such a pipe, carefully follow the reputation of the manufacturer.
The cheapest option is to build a chimney from thin-walled stainless steel. The light weight of such a pipe allows it to be fixed in the structure even with the help of minimum quantity fastening material. Also, a stainless metal pipe is very easy to process - it can be cut with ordinary metal scissors.
A ceramic chimney is very difficult to install, since its installation can only be done together with the whole house. In this regard, it is extremely rarely used, because in order to build it in a finished dwelling, the construction team will need to dismantle part of the floors.
Tools needed for a chimney
In order to install a chimney in your home with your own hands, you will have to stock up on the following minimum set of tools:
- grinder for cutting metal and a drill for drilling holes
- spatula, chisel and trowel
- a screwdriver, preferably with hex bits and a jigsaw, can be electric,
- small hammer and Phillips screwdriver
- protective gloves and goggles
What you need to remember when installing a chimney with your own hands
According to the method of construction, chimneys can be divided into internal or external. Let us consider in more detail in which case you need to choose one or another option.
So, the internal structure of the chimney can be used for the construction of heating systems based on heating boilers or fireplaces. Such systems are usually installed inside walls. After installation, such chimneys are closed in the thickness of the wall and decorated. As an advantage, it can be noted that such a system is not subject to moisture condensation and is well protected from the influence of atmospheric moisture.
However, the products of combustion passing through the chimney have a high temperature. Consequently, the sections of the walls passing near the internal chimneys become very hot and may catch fire. Thus, internal chimneys are not recommended to be installed in walls built of flammable materials. Also, such systems are not recommended for powerful boilers with a large flow of hot combustion products.
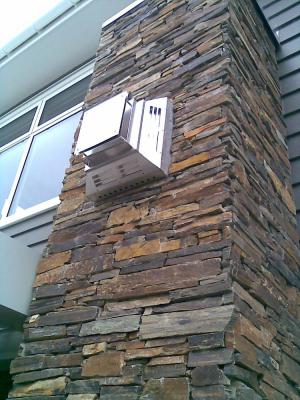
An external chimney is recommended for industrial and large heating systems. Usually they are arranged if the area of \u200b\u200bthe heated room exceeds 500 square meters. Also, such a chimney can be installed if the installation of an internal chimney is associated with significant difficulties. So, in a building with concrete walls and a ceiling, it is easier to break through a slab between floors than to gouge a channel in the wall.
How to install stainless steel and cast iron chimneys
The cheapest and in a simple way chimney device will be the installation of a metal pipe. The entire installation is divided into several successive stages:
- First you prepare the channel for the chimney.
- Then you actually install the chimney.
- And at the final stage, you mount insulation around the pipe.
The channel under the chimney metal pipe should be approximately one and a half times its diameter. In this case, you will have space for isolation.
Actually, the metal chimney consists of the following components: a metal pipe, adapters for mounting tunics, a cap and a condenser. In a number of designs, a gate is installed with a chimney - a unit that increases draft in the system.
Chimney installation steps
On the initial stage chimney installation, you need to adjust the length of the pipes. Further, the resulting structure is placed in a pre-prepared channel. After that, a capacitor and the heater itself (stove or boiler) are connected to the system. At the final stage, the head is installed.
In order to rigidly fix the pipe, it must be fixed to the wall at least every one and a half meters.
When installing steel and cast iron pipes, it is necessary to provide high-quality thermal insulation of the chimney. Only in this case will you be able to avoid the fire of the ceilings and structures adjacent to them due to a suddenly leaky pipe. To isolate a metal chimney, it is best to use the classic method - refractory clay. But in extreme cases, you can use special refractory foam.
Also, with the help of clay, it is possible to decorate the joints of the chimney from a metal pipe with ceilings and a roof.
If you use a metal pipe, then it must be fixed to the ceiling and walls with fasteners every half a meter. This is due to the large weight of such chimney pipes. In addition, the mounting holes are made wider - by about two pipe diameters.
A cast iron pipe will last longer as a chimney, but its installation is fraught with certain difficulties. So you can cut such a pipe only with the help of a grinder.
Do-it-yourself sandwich chimney installation
Sandwich chimneys made of several materials are replacing conventional metal pipes. The multi-layer design allows you to qualitatively isolate the floors from heating by the combustion products of the furnace. When installing such a chimney, additional insulation is not required, as a result of which the mounting holes can be made almost equal to the diameter of the pipe.
During installation metal pipes they fit into each other like nesting dolls and no additional fixation is required to connect the knees of the work. In sandwich chimneys, the pipe elbows must be connected to each other using a special construction adhesive. In addition to fixing the knees, construction adhesive also prevents smoke from entering the premises.
Sandwich pipes are very sensitive to the formation of condensate from atmospheric moisture, therefore they are not recommended for use in the installation of external chimneys. Inside the building, such a pipe can last up to 70 years.
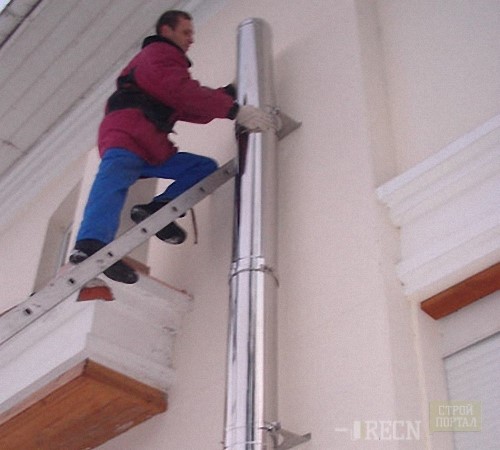
Do-it-yourself installation of an external chimney
The most optimal material for the manufacture of an external stove chimney will be a pipe made of stainless steel. It weighs a little and is well processed by the simplest tools.
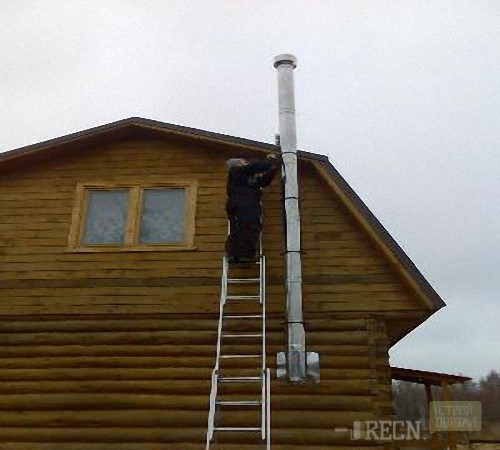
In order to mount an external chimney from stainless pipe carry out the following work:
- Punch a hole in the pipe adjacent to the boiler. It should be located no lower than half a meter from the top of the boiler.
- Place fasteners on the outer wall a meter apart.
- Connect the chimney inlet to the heater.
- Move the bent pipe elbow out of the room.
- Mount the capacitor.
- Fix the pipe to the wall.
- Install the cap and chimney guard.
Do-it-yourself chimney installation: instructional video
Add to bookmarks
Sandwich pipes for chimneys
Sandwich pipes for chimneys - correct installation
DIY sandwich chimney
If the house has a fireplace, and a bathhouse is built on the site, then the chimney device is an integral part of the construction. Modern manufacturers offer a large number of options for creating heating systems, but each owner gives the choice to the most optimal option, which can be done with your own hands.
Sandwich chimney is one of the most popular materials in the construction of stove heating. This is explained by the fact that the sandwich pipe has a large number of advantages, the main of which is safety.
The sandwich chimney got its name due to the fact that it has characteristics design, which is the main element of such a device. Sandwich chimneys consist of outer and inner pipes, between which there is a heat-insulating layer.
Many manufacturers use basalt fibers (mineral wool) as heaters. Their properties are similar to asbestos fibers.
Mineral wool is very resistant to various influences. chemical elements And high temperature. It also has excellent sound and heat insulation properties.
The thickness of such a layer of mineral wool is 25-60 millimeters. The inner tube of the sandwich construction is made of stainless steel. The outer is made from various kinds of material. Most often, external elements are also made of stainless steel, but there are also brass, copper, etc.
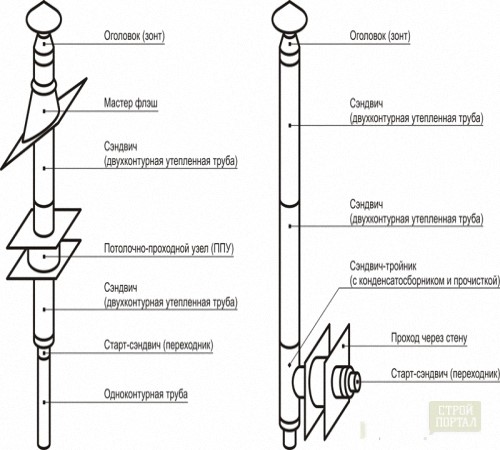
Scheme of the device sandwich chimney
Sandwich pipes are produced in various types, they differ in diameter and thickness of heat-insulating layers and are intended for use under different temperature conditions.
The main requirement for connecting a chimney sandwich is tightness. The connections themselves are different in type - flanged, "cold bridge", bayonet, etc.
The sandwich chimney has significant advantages over a single-shift chimney:
- practically no condensate;
- much less soot accumulates.
All this helps to ensure long and reliable operation of stove chimneys, during which they require almost no maintenance.
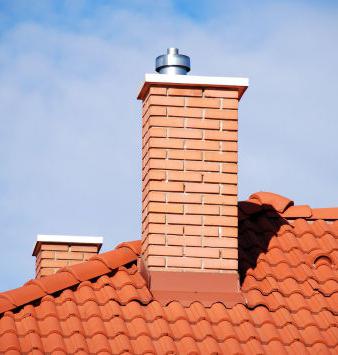
Sandwich chimneys compare very favorably with their brick counterparts.
Firstly, such stove chimneys have a more aesthetic and attractive appearance,
Secondly, they are made of refractory materials and at the same time weigh much less than brick chimneys.
This means that it is not required to build a special foundation (foundation), therefore, this method is more economical and profitable, especially for those who make repairs with their own hands. In addition, the installation of a sandwich chimney is a guarantee that the pipe will not be subject to corrosion and will provide reliable gas and vapor tightness.
It must be remembered that it is forbidden to use a sandwich pipe as the one that will be located directly above the furnace accessory.
In order to avoid the risk of fire, the following recommendations are mandatory: when passing through the most fire hazardous area (roof, beam, wooden wall and ceiling) an additional thermal insulation layer is required.
The installation of this type of pipe is carried out in the same way as the installation of other types - according to two principles.
- "Through the smoke." This means that tees for condensate outlets must be fixed in the system.
- "By condensate". In this case, tees are not needed in chimney systems. It is necessary to fix it in this way: after the tees - “by condensate”, before the tees - “by smoke”.
If you use solid fuels, then it is mandatory to install a sandwich pipe made of heat-resistant stainless steel.
Preparatory installation work
In order for the chimney to pass safely between floors, it is necessary to follow the correct sequence during installation work. The device of passages through the ceilings can be done by hand using special nozzles.
Before the pipe is installed, it must first be prepared. An insulating layer of material is installed along the walls of the pipe. For these purposes, mats are used that are made of basalt fibers (mineral wool). Then isolate the inner, as well as all adjacent parts of the pipe.
The next step is the installation of the ducts. This requires, first of all, an accurate determination of the place in the ceiling where the sandwich pipe will be located. This is followed by markings, along which an opening in the ceilings is cut out. In places where the pipe and the ceiling touch, an insulating layer of mineral wool is applied.
On the this stage the ceiling is already ready for the installation of a sandwich chimney. The pipe elements are passed through the ceiling slab. In this case, the parameters of the pipe are calculated in such a way that they allow the chimney to pass completely, and there is no place for contact with the ceiling. In such places, elements cannot be joined.
To provide additional heat removal between the pipe and the nozzle elements, an air gap device is left. After passing through the ceiling, installation of nozzle protection elements is required. Here it is necessary to check the verticality of the chimney shaft.
Chimney installation It is most convenient to consider the example of two-circuit systems. Elemental installation is carried out from the bottom up, i.e. from heating equipment. The inner pipe of the sandwich during installation must go inside the previous pipes. The outer pipe is put on with your own hands on the previous ones. In this way, it is possible to ensure reliable protection of the thermal insulation layer from the ingress of condensate.
The inner pipe sandwich for furnace chimneys is installed “by condensate”, which will allow the flowing water to avoid an obstacle in the form of a seam on the pipe, which means that there will be no leakage.
To ensure maximum reliability and durable sealing, the installation of the chimney is carried out using sealants with a working temperature of at least one hundred degrees.
Tee, elbow, pipe joint and other elements are fastened with their own hands using clamps. The tees must be fixed with a support bracket, and for every 200 cm, brackets for fixing to the walls must be installed.
On the next steps important details to consider:
- in the chimney there should be no horizontal sections exceeding a length of one meter;
- pipe channels should not touch the gas pipeline, electrical wires and any other communications;
- when passing a sandwich pipe through any type of ceiling - a wall, roof, ceiling, pipes insulated with a heater must be installed (insulation must be carried out taking into account all fire safety requirements);
- for regular cleaning of the pipe for a sandwich chimney, you need to install a revision (special holes with doors) or glasses (removable parts). Emphasize that the pipe needs professional cleaning, carried out in the required time and in compliance with all norms.
If available detailed instructions, necessary tools and materials, then it is quite possible to do the installation of a sandwich pipe with your own hands. Installation of sandwich pipes guarantees a long and reliable service of the chimney.