Those who are going to acquire a gazebo in the near future are thinking about how to make it more attractive. One of the most popular decorative elements of a garden building is a lattice. It does not take long to make it, and the benefits are enormous. The grill for the gazebo is able to protect from the scorching sun, bad weather and prying eyes.
Technical features and benefits
The design of the lattice implies the presence of a frame and intersecting elements that fill it. Frames are attached to the pergola from all sides. Depending on how many faces the gazebo has, so many gratings will be needed. This will make the structure more rigid and durable, giving it a complete look. To make a frame with your own hands, you can use ready-made drawings.
In modern gazebos, gratings are made of metal, plastic and stone. But the most popular material is wood. It is easier to work with, and the design itself looks more attractive. Wooden crate is often used as a base for a climbing plant.
Its main advantages:
- reinforces the main structure;
- serves as an additional decoration for the building;
- does not interfere with the free access of air to the pergola;
- protects from sunlight.
For joining the bars in the lattice, a spike connection is often used. But it will be difficult to do it with your own hands for those who are not familiar with the carpentry craft.
Materials and tools
For work, you will need the following materials:
- wooden blocks;
- slats;
- self-tapping screws 60 and 70 mm.
The following tools will be used:

Preparation
If you plan to make a grate made of wood with your own hands, then first you should prepare the parts for the frame:
- A careful measurement of the openings that are planned to be closed with grilles is carried out.
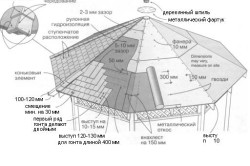
- Trim the bars to match the dimensions of the opening. It is recommended to take bars with a section of 40 × 60 mm or 20x45 cm if you want to make the structure more airy. The frame of the frame will be made up of them.
- Planks with a section of 10x20 mm of the required length are prepared, cutting them off at an angle of 45 degrees.
- All wooden elements are treated with an antiseptic.
Manufacturing
The process of making a grate for a gazebo with your own hands is as follows:
- Marks are made on the bars that make up the frame of the frame using the drawings. It is very important to correctly calculate the distance between the planks. It largely depends on how beautiful the product will turn out to be.
- The bars are connected to each other with glue and 60 mm self-tapping screws.
- If this is a closed-type decorative frame that does not have a rebate, then the slats should be stuffed with an allowance for the outer edge of the frame. The ends of the strips, which will protrude beyond the contours of the product, are simply cut off at the end.
- You need to make two such frames and then connect them so that the strips cross beautifully. The pattern of the rails must match.
- At this stage, you can also equip the openings with mosquito nets by attaching it between the frames.
- The decorative grille needs protection from the adverse effects of precipitation, therefore it is recommended to open it with varnish before installation.
- Install the frame in the opening, securing it with 70 mm self-tapping screws. They are screwed to the supporting beams through the sides of the frame. The caps of the self-tapping screws must be well sunk into the wood so that they can then be masked with putty.
If the grille is supposed to be painted, then it is best to do this while it is still disassembled. This decorative element can also be used in the manufacture of railings and railings on the stairs to the gazebo. If the structure is made more massive, then you can use it as a pergola lathing instead of walls.
- Required tools
- Lattice making
- Decorative finishing
Do-it-yourself terraces or gazebos have been built on many summer cottages. This is a place where it is pleasant to take a break from the sultry sun and breathe in the fresh air. In the gazebos you can read, eat, play various board games, just admire the scenery.
A gazebo with wooden lattices not only looks beautiful and rich, but also allows air to pass through, thanks to which the gazebo is always fresh and pleasant.
In order for the gazebos to look light and elegant, they are equipped with gratings.
A grid for a gazebo with your own hands can be made without a lot of money and time. She will add grace to the gazebo, and self-satisfaction to the manufacturer.
Required tools
You can buy decorative grilles for the gazebo in the store. The cost of such a product with dimensions of 1x1 m is up to 20% of the cost of the entire gazebo. This money will be enough to build a dozen of these gratings with your own hands. Of the tools you will need:
- hacksaw;
- chisel;
- ruler;
- hammer;
- screwdriver;
- nails;
- self-tapping screws;
- decorative coating;
- mosquito net;
- waterproof glue;
- sanding paper.
To this list you need to add the required number of 20x45 bars and 10x20 mm strips.
Back to the table of contents
Lattice making
Any lattice is a double frame, which gives the structure additional rigidity. Inside, it consists of overlapping elements. For the manufacture of the frame, you can use 20x45 or 30x50 mm bars. Connect them with a spike connection or "on the mustache" using a plug-in rail. For the lattice you need to make 2 frames. If you do not have special carpentry skills, then you need to do this:
- saw off the bars to fit the frame;
- carefully make samples at the ends of each bar half of their thickness;
- dock the parts and fix them with glue;
- you can additionally connect the bars with nails with pre-bitten off caps;
- screw a self-tapping screw into each corner for reliability;
- repeat all operations to make another frame;
- make a fold on the frames from 10x20 mm slats stuffed on the sides;
- fill the inner space between the folds with the same slats. Reiki should be placed diagonally at an equal distance from each other;
- treat surfaces with wood stain, varnish or paint;
- fold the frames so that the slats cross;
- fix them with self-tapping screws.
A gazebo with lattices is one of the most common types of country pavilions.
A mosquito net can be inserted between the halves of the double frame. Such a grill can be installed anywhere in the gazebo. It looks pretty smart and serves as a protective screen. This screen protects against the entry of insects and rodents, but does not impede air circulation. The mesh can be changed as needed.
You can make the lattice more massive from slats of a larger section without using a double frame structure. It is attached directly to the frame of the gazebo. For manufacturing, strips of 20x40 mm are suitable. The frame itself will be assembled from them, and then the filling. All parts must be well sanded.
The rectangular frame is assembled by imposing horizontal bars on vertical ones. The joints are glued. The adhesive used is waterproof. Grill strips must be cut at 45 °. Diagonal strips are flush mounted onto the frame. It is convenient to control the distance between them with a template. Then the frame must be turned over and the planks must be stuffed on the other side. Crossings can be additionally reinforced with self-tapping screws. It remains to apply a decorative coating to the frame.

Most often, wood or metal is used for the frame of the gazebo gratings.
The elements of filling can be tree rods. They are attached to the frame with small nails or self-tapping screws. The places of their intersection when connecting the frames can be tied with twine. Window glazing beads are also a good material for filling the grille. For training, you can first make a small lattice, which can later be used as a wall panel.
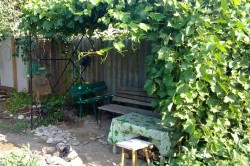
The trellis is often used as a support for plants. It can be beautifully wrapped around grapes and other climbing plants.
- Types of wooden lattices for a gazebo or veranda
- Tools and materials
- Getting started - making the frame
- Assembling the grille
- Lathing "in the pot" - another assembly option
- Conclusion on the topic
Do-it-yourself wooden lattice for a gazebo is a fun and simple activity for a home craftsman. In addition, it is still beautiful and inexpensive.
It will not be difficult for the master to make a wooden lattice for the gazebo, and decorating the territory of the building will delight all family members.
In today's world, we strive to make our life more comfortable. To do this, you need to not only give up addictions and use the right one, healthy diet... You should think about spending time comfortably in the fresh air for the benefit of the whole family. The best way out is a gazebo in your backyard or summer cottage, which can protect you from the exhausting sun, bad weather and wind. You can make a nice and comfortable gazebo on your own.
It is not only functional, but also really attractive. And if you add to it a kind of decorative lattice, which will play the role of not only a visual fence, but also decorated building elements, then your neighbors, acquaintances and friends will envy you. How to make wooden lattices for a gazebo or veranda on your own, with your own hands?
Many people call such decorative elements trellis. You can make such products for the gazebo or from such structures to assemble decorative partition walls for the garden braided with beautiful plants or cute small fences around flower beds.
Sometimes it is allowed to insert plastic elements into the decorative structure, which can also bring originality to the final look of the product.
Types of wooden lattices for a gazebo or veranda

The design of the gazebos with lattices depends both on the functionality of the product you plan and on the design of the gazebo itself. It can only be limited by your imagination: there are no limits to the variety of designs that can be realized by making gazebo gratings with your own hands.
Depending on the appearance gazebos, the lathing can be arched, filling the upper part of the gazebo spans, or completely fill the openings. Even instead of the roof of the gazebo, you can make an openwork and lightweight structure that saves you from the scorching sun in summer. To make the decorative design of the gazebo beautiful, it will not be superfluous to first draw its intended appearance and make drawings of the lattice, according to which it will be easy to assemble structures in the future.
The decorative slats themselves, bearing the main design theme of the gazebo, can be connected in 2 ways: simply overlapping, forming a cruciform structure, and also overlapping, but with the obligatory production of grooves. In the latter case, the lattice turns out to be more aesthetic, made, as it were, from 1 solid sheet of wood.
The elements of the lattices can also intersect at right angles, you can embody the design of the product in the form of rhombuses, you can make different distances for increasing between the slats, etc.: it all depends on your taste and imagination. The lattices, made not just of rectangular bars, but made with cuts and grooves in certain places, look more artistic and elegant.
Back to the table of contents
Tools and materials
A decorative lattice for a gazebo requires very few materials and tools to make. This is a budget option that will give your gazebo a nice and aesthetic look. You will need:
- Hacksaw for wood.
- Nails.
- Self-tapping screws.
- Impregnation.
- Varnish for wood.
- Bars.
- Reiki.
You need to very carefully select the lumber for the lattice. Slats and planks should not have cracks and chips: such wood will not work for you, do not buy it.
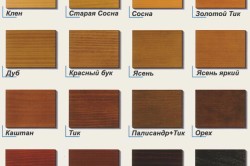
Today wooden lattices are the most popular and demanded design element. garden gazebos... Usually the best types of wood are selected for their manufacture:
- beech, the wood of which has a pleasant pink tint;
- oak is a very strong and durable material with a clearly defined structure;
- larch is a material that is not afraid of decay, an excellent wood for use in conditions of external influence;
- ash is a durable material with an excellent light-colored structure;
- pine that is perfectly processed.
Other types of wood can be used if the structure of the wood is not important and the structure will be covered with a layer of paint, and not with a transparent varnish, which manifests and enhances the structural effect of the wood product.
Back to the table of contents
Getting started - making the frame

For the manufacture of gratings, oak, larch, pine, etc. are used.
For the manufacture of the frame, you will need 4 bars with a section of 20x45 mm. The overall dimensions of the assembled frame should allow it to be inserted into the opening that we want to decorate with a decorative lattice. It is best to connect the bars to each other using a “comb” system of grooves and tenons, or a more complex “dovetail” system. If you don't have the right experience for carpentry work, you can connect the blocks by simply sawing their ends at a 45 ° angle and using glue and self-tapping screws or nails to connect them.
Next, along the inner perimeter of the frame, we install strips with a section of 10x20 mm. For 1 frame, you will need 8 such strips. They will visually close the ends of the lattice itself, while performing the role of a fold for its laying. It is possible not to install seam strips on 2 sides if you do not need to cover the ends of the grill slats. One decorative grille requires 2 frames of the same size.
It should be noted that all details of the future product must be treated with an impregnation designed specifically for wood, which increases the durability of the material.
Back to the table of contents
Assembling the grille
Let's start filling. To do this, you will need the same slats as for the fold. They need to be placed diagonally at an arbitrary, but equal distance. To maintain the exact distance between the slats, it is convenient to use a wooden template. Accuracy and thoroughness of this stage of work will give the product beauty and grace, emphasizing the correct geometry of the elements.
We connect the 2 frames made in this way to each other so that the lattice slats intersect crosswise and tightly press against each other. We fasten the frames together with glue and self-tapping screws or nails.
If you decide to make a more massive trellis for the base of climbing plants, and even more so if you decide to completely block the opening or several openings of the gazebo with lattices, then the frame does not have to be made: the lattice itself is already a frame, giving the structure the strength and required rigidity from the installation by intersecting fragments between each other. Having chosen larger bars with a section of 20x40 mm, they can be attached directly to the main frame of the gazebo, carefully trimming and adjusting the dimensions of the bars in place.
After the grill is assembled, if necessary, its surfaces are processed with sandpaper, and then the entire grill is varnished. Very often, the grates on the gazebo are perfectly combined with the surrounding landscape and buildings with a different color. Therefore, instead of varnish, you can use any weather-resistant paint for wood.
Each owner of his own gazebo wants to give it an aesthetic look and at the same time not spend much money. For this, a lot of various forms and types of finishes are sorted out.
As for the forms, those that are more complex than the quadrangle are time consuming and often require the help of specialists in the installation, which costs accordingly. There are more variations with finishes. This article will discuss one of them - the crate.
Distinctive features
What is so remarkable about this cladding? Why is it worth using it for arranging gazebos? Let's take a look at its benefits.
pros
- Beautiful appearance... By creating an uncomplicated pattern, it gives the building a certain elegance and even aristocracy.
- Harmonious compatibility with other cladding materials... For example, it is successfully combined with wood clapboard. This is very convenient if, in order to save money, you use everything that remains from previous construction or repair work as an exterior finish.
- Ability to scatter light... This allows the use of cross bars instead of glazing in order to save money.
Decorative strip instead of glass
- Low price. Buying the right planks won't hit your budget hard.
Tip: With a limited budget, you can increase the size of the cage at your discretion. Then the consumption of the rails will be much less.
- It is a way to decorate other less aesthetic material. A planed board may well be complemented by a checkered pattern.
- Ease of DIY installation. All work is quite feasible on their own without the help of professionals.
- Increase in the bearing strength of the wall.
- The ability to plant climbing plants that will give the building a unique green view, bringing harmony with the garden to perfection and creating absolute protection from the sun's rays.
Advice: if you plan to plant vines, then you can use cheaper and easier to install reinforced nets. This will further reduce waste.
As you can see, this finish provides many advantages for low cost... But, if you dwell on it, then you should have an idea of its negative sides.
Minuses
- Weak wind protection.
- Lack of thermal insulation properties.
This only tells us that the crate is not suitable for implementation. But for the summer it is almost ideal.
Mounting
The lathing on the gazebo is installed monotonously, but not difficult. First of all, you need to acquire everything you need.
Materials and tools
The list is not very long, but it is obligatory:
- Reiki. The dimensions depend on which part you are going to sheathe and on the dimensions of the gazebo itself. For example, if you have a two-meter-high wall and a solid finish, then you should purchase three-meter products. Thickness and width at discretion, but preferably not thicker than one centimeter, preferably about five millimeters.
Advice: it is better to take the number of planks with a margin. Because it is not known how much will be corrupted and translated as a result of cropping.
- Nails or screws.
- A hammer or screwdriver, depending on the chosen fastening method.
- Electric jigsaw or hand saw for cutting.
- Tape measure, pencil and spirit level for marking and level control.
Work progress
For example, let's take the sheathing of a solid wall of a building.
The instruction will help you to do everything correctly:
- Along the perimeter of the wall on the vertical and horizontal piles of the frame, we apply marks every 15 cm. This step determines the size of the cells, you can use any other of your preference.
- We start at the top left corner. We measure the distance between the first marks from it on the horizontal and vertical beams.
- We measure the resulting segment on a bar and cut it off with an electric jigsaw. In this case, we make the edges at 45 degrees for greater aesthetics. For greater accuracy, you can use a clamp.
- We nail or fasten the rail diagonally at the measured place.
- We check its evenness with a spirit level. In our case, it will be 45 degrees, but you can make diamond-shaped patterns and then the angle of inclination will be correspondingly different.
- Next, we measure the distance between the next marks, which will turn out to be larger, and similarly cut and fix the bar.
Tip: in the case of covering an equilateral surface, for convenience, you can cut two products to the same size at once, since the opposite strips will have the same lengths, and this will simplify your work.
- So we fill the entire plane with parallel slats, regularly checking the correctness of the angle of inclination, otherwise the slightest deviation will then be significantly striking during visual inspection.
- After complete filling, go to the upper right corner, measure the distance between the marks nearest to it on the piles, cut off the rail and mount it perpendicular to the previous ones.
- We sheathe the wall to the end and enjoy the result of the work done. external decoration on your own gazebo, you can choose a simple, elegant and inexpensive way: installation of the lathing. The work itself is done easily without assistance. The result is a beautifully breathable build.
You can either patch up the entire wall, or only part of it, combining with other materials or leaving open openings. The size and shape of the cells can also be selected according to personal preference. All this makes it possible to satisfy design wishes by making the gazebo more individual and unusual.
The video in this article will acquaint you with additional information related to this topic.
If you plan to use the gazebo only in the warm season, then sheathing it with crate will be the ideal solution to save money and achieve a really beautiful appearance ().
Gazebos in the garden serve not only for relaxation, but also for decorating the garden. They are different in shape, built from different materials, but they must all fit into the overall ensemble of the site. The easiest way to achieve this is during construction. wooden arbors, the walls of which are decorated with laths made of planks.
Such trellises can be used to divide individual areas of the garden, to arrange barriers and decorative walls from them. Together with the gazebo, all this will create a single ensemble.
A bit of history
Lightweight, but durable structures made of wooden planks appeared long ago, they were used at first only to support heavy grapevines, facilitating the work of growing and harvesting grapes.
Later, lightweight structures made of wooden planks began to be used in landscape gardening design. Structures made of openwork lattices with climbing plants began to be called pergolas.
With their help it was possible:
- divide individual areas of the garden into zones;
- close structures that are unsightly for the general view, for example, a barn;
- connect various buildings on the site into a single ensemble;
- decorate alleys, paths, entrances and exits;
- create cozy corners in different parts garden.
Using the lattice of the same design to decorate the gazebo and pergola in the garden, it is possible to design the space design in a single style solution. A lightweight decorative lattice made of wood for the gazebo allows you to create an airy atmosphere in it, and climbing plants will additionally decorate it.
Gazebo grates
You can build a gazebo with a lattice panel fence with your own hands. The plating process itself is not complicated. The main thing is that work on the arrangement of the roof and floor must be completed in advance.
Materials (edit)
Overhead lattices made of wooden slats are the most common element today. They are made from wood of the best grades, which guarantees excellent performance of the products.
Let's take a closer look at what types of wood are suitable for the manufacture of decorative lattices.:
- oak is a durable wood with an expressive texture;
- beech is an interesting material with a pinkish tint, slightly inferior in strength to oak;
- ash - wood that slightly surpasses oak in strength, practically white with a bright texture;
- larch - wood that is not afraid of decay, which is very important for outdoor use;
- pine is a more flexible wood.
Wooden decorative lattice for the gazebo is made of bars and slats of various sections. It all depends on what design and pattern you choose yourself.
Step-by-step manufacturing instructions:
- to make a frame, we take bars of 20x40 mm in size, we cut off the blanks we need in size, which we need 8 pieces, four of each size;
- we connect the bars in the way that is more convenient for you, you can use metal corners, you can use a mustache connection, or you can, having previously chamfered one of the bars to be connected, fasten them with glue along the edge, for reliability with any connection, it is recommended to wrap in the corners self-tapping screws;
- we make two identical frames;
- to fill the frame, we take slats, for example, with a section of 10X20 mm;
- on the outer edge of the frames, we fill a fold from these slats, it is possible with small carnations;
- we begin to fill the grille by laying the slats diagonally at equal intervals from the seam strip on one side to the seam strip on the other side;
- fill in the second frame in the same way, after placing it on the first, fold up and exactly repeat the drawing of the first;
- turn over the second lattice with fixed slats and apply it to the first, fold to fold, while the slats on the second frame should be crossed with the slats on the first, which will create our drawing;
- we glue the frame, you can connect both halves and fix them with carnations with pre-bitten off caps;
- if necessary, trim and sand the perimeter, tint where necessary.
Important. The grille must be well treated with a wood preservative.
This is best done prior to assembly so that there are no hidden hidden spots left.
After final assembly, you can paint the entire grille one more time.
Summary
Gazebos with walls made of decorative lattices will be a decoration for any garden. An important distinguishing feature of such lattices is their versatility, they can be used for fencing gazebos, such as pergolas or trellises to support climbing plants.
In the video presented in this article, you will find additional information on this topic.