Summer meetings with friends, family holidays in nature and picnics are always accompanied by barbecuing or grilling fish and vegetables. For this, many structures have been created that make outdoor recreation more pleasant, and cooking is more convenient and faster: barbecues, outdoor fireplaces and stoves, barbecue.
It is barbecue that has recently been especially popular among summer residents. In addition to its functional features, this structure fits perfectly into the country landscape. You will learn how to build a barbecue oven for a summer residence on your own in this article.
DIY brick barbecue
 You can build a barbecue oven with your own hands; its construction will not take much of your time and effort. It is enough to study the order, drawings and step-by-step instructions for building a barbecue from bricks.
It is much more pleasant to cook on a stove built with your own hands, and the food cooked in it seems even tastier and more aromatic. You can make your oven more functional by having built a cauldron for her.
Selection of materials and project development
In the store, you can often find a summer cottage barbecue made of metal. Such structures are more mobile and lightweight, they do not need a foundation, you can put them in any place you like on your site. However, metal barbecues have some disadvantages:
- the quality of cooking meat is lower than when using brick barbecue;
- short service life (burnout in 1–2 years);
- when the coating is damaged, rust forms on them;
- higher price.
Stationary brick ovens more profitable - they have a long service life, have an aesthetic appearance, harmoniously fit into the country landscape. It is not difficult to build such a furnace, it is enough to have some knowledge and scheme-order... You don't need to be a professional to build a barbecue with a cauldron yourself. The main thing is to keep in mind some of the nuances:
- location of the structure;
- its parameters;
- stages of construction.
Since a brick barbecue oven is a stationary option for outdoor ovens, it is necessary to determine its location in advance. Choose a place away from home, baths and other household buildings. This will allow eliminate the ingress of smoke inside and avoid possible fire.
In addition, you need to ensure that the barbecue area is located close enough to the kitchen for convenient food and grocery delivery. Think about the surrounding landscape of the area.
Typically barbecue located in the recreation area, where it is customary to meet guests, gather the whole family or just relax alone. Therefore, it is desirable that a beautiful scenic view of the garden, alpine slide or reservoir opens from the barbecue area.
Before starting construction, you must plan all work by making a project. It is important to consider the following nuances:
In order to lay out the barbecue with a cauldron correctly, need to develop a project... Drawings and all kinds of ordering methods will help you in developing the project. Having chosen the best option corresponding to the characteristics of your site and your desires, you can start construction.
Building a brick barbecue oven
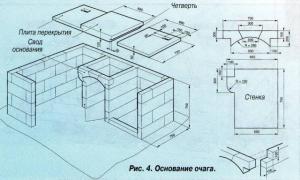
The most popular outdoor barbecue today is the oven, which has dimensions: height 1.6, width 1.6, depth 0.8. Construction of a structure begins with the preparation of the base, that is, pouring concrete. To do this, it is necessary to dig a pit that has a depth of 10–20 cm.
The pit should have the same parameters as that of the future structure. Tamp the hole thoroughly and complete the formwork around the perimeter, if it is necessary for the foundation to rise above the ground. Pour with concrete and allow the base to dry and harden.
After the concrete base has completely hardened, start laying bricks... Lay the first row dry and mark the location using pegs and cord. Next, remove the bricks and apply masonry mortar to the mark.
Perform masonry sequentially from the bottom row according to the design and ordering diagram, regularly check the vertical and horizontal using a level. Laying should be done with an offset of half the brick. As a result, you should get a pattern that imitates a chessboard. This method of masonry makes the structure the most durable and reliable.
When you reach the fifth or sixth row, start laying out bricks across the masonry in order to form small protrusions. They are necessary in order to subsequently place plywood or a piece of metal on them. Thus, there will be space at the bottom for storing coal, firewood or necessary things.
Continue the next rows in the same way with an offset. The ninth or tenth row must be performed across to form protrusions. The ledge will pallet or grate installed... Lay out the other three rows in the usual order.
Erection of a barbecue with a cauldron
For a stove with a cauldron, more solid and solid foundation... Consequently, such a foundation will require a deeper pit - about 50 cm. The laying will be carried out in a similar order, but without protrusions. Also, a barbecue with a cauldron will require stronger walls, so the number of bricks in a row should be increased.
For a visual representation of the assembly of a barbecue with a cauldron, ordering schemes are presented, as well as construction stages:
An important rule: a barbecue chimney with a cauldron must be installed only after the solution of the rest of the structure has finally hardened. The chimney can be built not only from bricks.
It is much easier and faster to build a certain analogue of a brick chimney... To do this, it is necessary to construct a frame using steel rods or boards, form a formwork and fill it with concrete.
Build the structure mainly for yourself and adapting to your desires and goals. So, the stove, in addition to the basic devices, can have convenient shelves and niches for storing dishes and household utensils, a countertop, a space for storing firewood or other fuel, a canopy or even a roof.
Construction height determined based on the location of the main barbecue element - the grill. It is on the wire rack that meat, fish and vegetables are fried. The ideal solution is a height of 9 or 10 regular or refractory bricks. If a tabletop is provided for the structure, it must be placed on a side post 10 cm above the grate.
Do not mount the grate or cauldron too low. This is quite inconvenient, in addition, due to the constant need to bend over, you can get problems with the lower back. Position the brazier high also not recommended... It is fraught with the risk of burns and is also very inconvenient. It is optimal to place the brazier at the level of the arms bent at the elbow.
In advance define a building project of the future structure, independently drawing a diagram and designating all additional elements: the location of the shelves, pallets, table and both grates, taking into account the place for coal and storage of dishes.
Currently, hardware stores have everything you need to build outdoor barbecues, ovens and barbecues. You can purchase a ready-made barbecue kit with the necessary additional functions: grill grate, cauldron, spit, fasteners, metal pallets, etc. Sometimes these sets include additional grates and skewers. However, all these elements can be do it yourself.
The dream of every summer resident is to build a gazebo on his site, and in it to install a beautiful stove with many functions, such as a brazier, a brazier, a stove, an oven and others. And I want and at the same time scary. And suddenly it does not work out. In fact, there is nothing complicated here. The most important condition is that you have a passionate desire to build a barbecue oven and the availability of the necessary building material for the construction of this oven.
Any work starts with a project. The simplest thing is to sit down yourself and draw the order of your future masterpiece on a piece of a notebook in a box. There is nothing complicated here. The most important thing is to remember a few basic conditions:
- combustion chamber height - takes 4 rows of masonry
- barbecue height - 3 rows of masonry
- fireplace height - 6 rows of masonry
- the casing, in which the chimneys are combined, occupies three rows of masonry in height.
In addition, the barbecue is installed outside, which means there is no need to monitor the correct passage of the chimneys for better heat transfer. It is enough just to discharge the exhaust gases into the pipe. And straighten all chimney passages as much as possible.
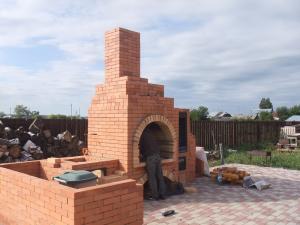
The photo above is what we need to build as a result of our actions. And the beginning of these actions was once drawn on a piece of paper.
Preparation of materials
The barbecue oven will be located on the street, albeit under a roof, but, nevertheless, it is this fact that makes it necessary to use a brick of a brand not lower than M-250 during its construction. The fact is that sometimes these devices are operated at an air temperature below -25 degrees, and this is a gigantic "physical stress" for brick structures - rapid heating and then rapid cooling.
The total amount of this brick, taking into account the laying of the pipe, is 1500 pcs. Fireclay (refractory) brick - must be used when laying fireboxes and in other places where there is contact with the flame from the combustion of firewood. This brick can withstand a burning temperature of 1000 degrees, and an ordinary brick is not more than 450 degrees. By the way, you yourself can determine the temperature of the body heating by the color of the heated surface, and decide which brick to use. If the iron bar at the top of the flame turns dark red - the temperature is 350 ° C, Red - 400 ° C, if its color is bright red - 450 - 500 ° C, if the red turns into a white shade - 550 and above. Usually, this color occurs when the air is forcedly pumped in the furnaces of the melting crucibles, and if it is dazzling white - 700 0С and higher.
As you can see from these data, an ordinary brick will not stand in the firebox for longer than several seasons, and if the stove is laid out on the street, then even less. As a solution, we will use an aqueous solution of an oven mixture of two types - the usual one for laying walls and a refractory one for laying fireboxes, barbecue and fireplace walls.
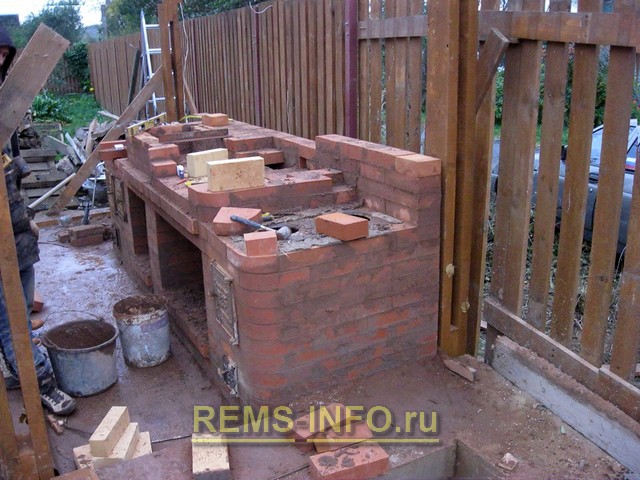
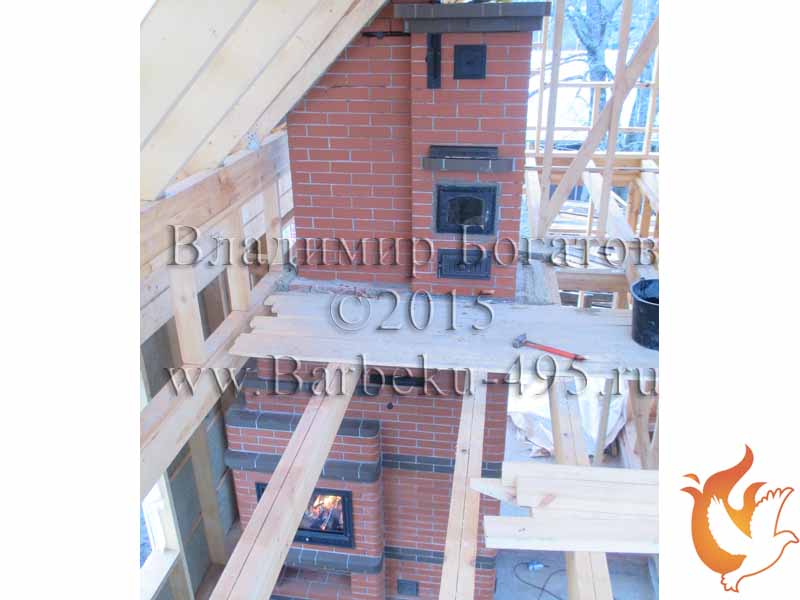
We spread the barbecue oven
The entire area of the street gazebo will be located on a monolithic concrete slab reinforced with a reinforcing bar. Therefore, it makes no sense to lay out an additional foundation. It is enough for us to spread a sheet of roofing material across the width, folded twice for waterproofing and start laying.
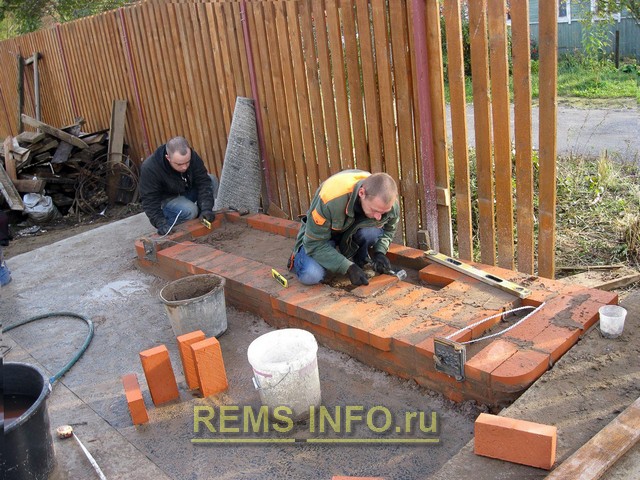
The linear dimensions of the barbecue are 250 cm long and 80 cm wide.
We lay out the starting row in order to identify deviations in the horizontality of the future design of the furnace. In the second row, we correct the errors by leveling with a solution, and on the third row we plan to lay ash pans for the furnace chambers, both for the melting pot and for the cauldron.
Furnace work is a rather dirty process, so we keep all consumables on special pallets.
For the normal maintenance of the masonry process, it is necessary to have water, the required amount of furnace mixture and the required electricity supply to turn on the electrical appliances necessary for construction work.
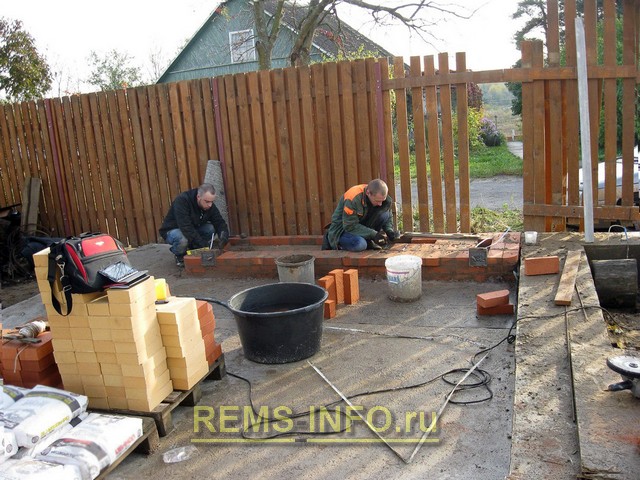
We will fix the barbecue fittings using an oven fixing tape, by laying it in the masonry and fixing it with self-tapping screws.
The blower door was installed in place, the lower row of tapes was laid in the ordering masonry, the upper one was straightened and will now be fixed.
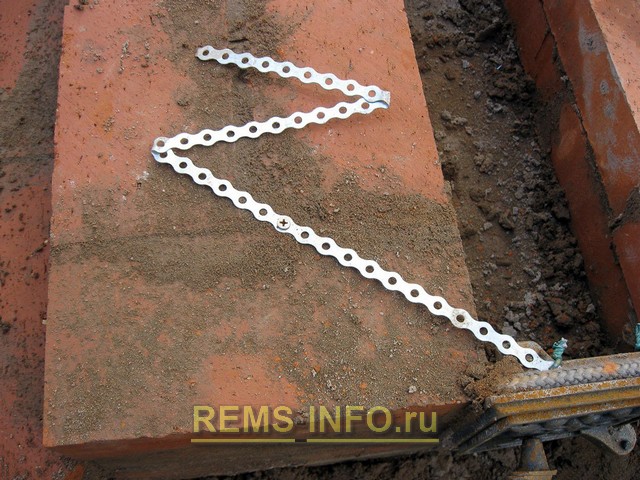
Simple but very effective method fixing the tape in the masonry. The next one will lie down "in a runaway" and the seam will be covered by the middle of the next row of bricks and the self-tapping screw will firmly press into the masonry.
They decided not to make the sides of the barbecue rectangular. They look much more impressive if they are rounded. This process is rather dirty, so it is advisable to do it before starting work, having prepared in advance the required amount of bricks - blanks for corners and other decorative elements.
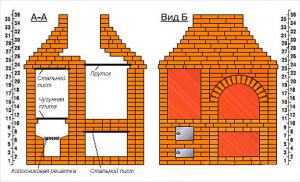
Pay attention to the corners of the stove - they are made of stained ceramic bricks, and to the organization of the ash pan. The corners of the brick are cut at an angle of 45 degrees. This greatly simplifies the natural shedding of ash into the ash pan.
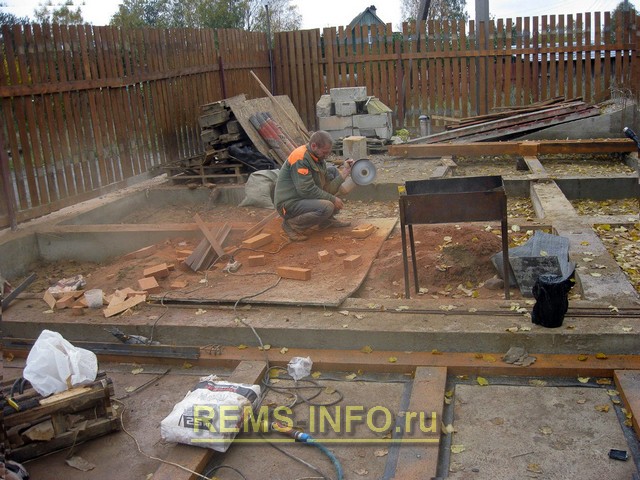
All bricks are cut to size with a cutting wheel for ceramics using a "grinder", but in no case are they cleaved with a pick.
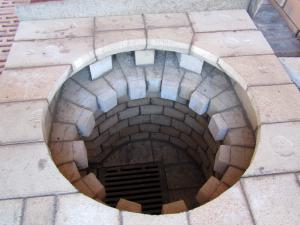
The right ash pan for the combustion chamber is ready. The queue for his twin brother - an ash pan for the furnace under the cauldron.
In parallel with the ash pan, niches are laid out for storing firewood and for storing a working tool for serving a barbecue. To make it decorative, we decided to push ¼ part of the brick outward.
The grate will be laid on two metal corners, placed in grooves - in the front in the masonry seam, and in the back in a special slot.
Shrinkage of bricks is carried out only with a rubber mallet. This tool does not damage the masonry and at the same time gently sits the brick into place.
Pay attention to the air gap between fireclay and ceramic bricks in the masonry of the combustion chamber. This place is intended for basalt cardboard and reliable thermal insulation against overheating of ceramic bricks. The thickness of the basalt cardboard must be at least 5 mm.
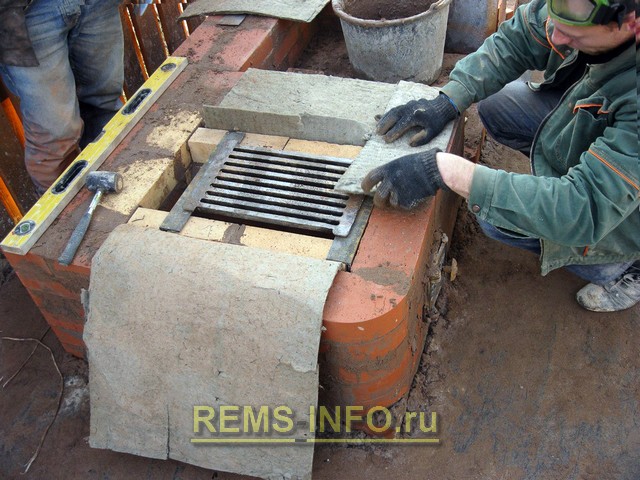
We put the basalt cardboard in the groove and after that we put the grate in place.
Basalt cardboard should be equal in height to the height of the combustion chamber, therefore, so that it does not interfere with the process of lifting the walls of the firebox, we slightly press it out. There is a very high chance of crushing it. Then it will lose its thermo-protective properties, and will not perform the functions assigned to it.
Next to the firebox for the cauldron, we will install a special chamber for obtaining coal for the barbecue. This is an iron, homemade box in which logs are laid, set on fire and the door of the firebox restricts air access to them, and so in a simple way producing coals both for the barbecue and for cooking food on the furnace for the cauldron.
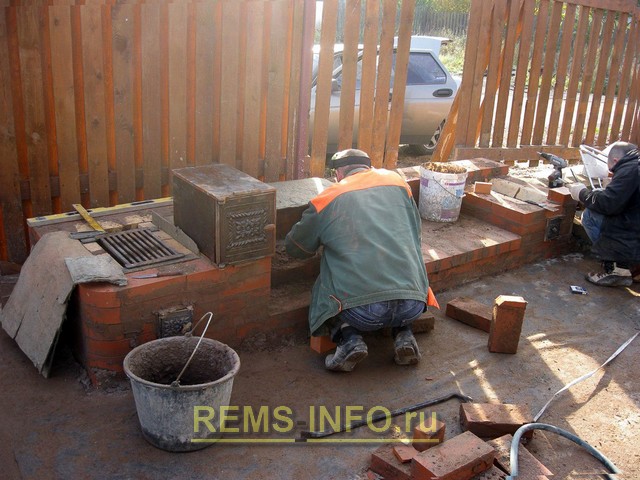
The chamber is being tried on to receive the coals.
All doors in the barbecue can be opened with the left hand. Because the right one is much more convenient to use a poker and a scoop. If you are left-handed, then think about this little thing in advance, which can then turn into big problems.
It is imperative to wrap a metal box for coal with basalt cardboard in order to protect ceramic bricks from contact with it during its operation.
When laying fittings, be sure to measure their verticality using a special building level for oven work. It is magnetic and attaches to iron surfaces, freeing your hands from the need to hold it.
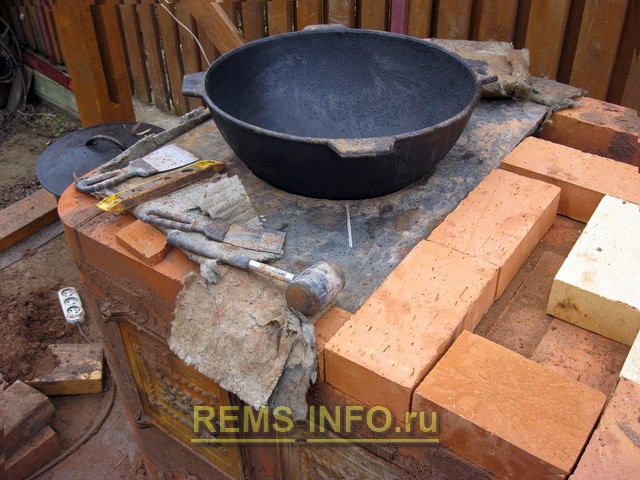
The cauldron, which we are going to use for preparing various dishes of oriental cuisine, has a volume of 22 liters. It is very large in diameter, so we did not find a finished slab with such an opening for it and decided to make the slab ourselves. As a surface, they took a metal sheet 10 mm thick, marked it out, found the middle and drew a circle with a compass. Cutting steel of this thickness is easiest using an autogen. To do this, we just went to an auto repair shop, where they do bodywork and tin work, and there, in 20 minutes, they cut a hole in the center according to our dimensions, as well as along the perimeter of the sheet.
![]()
The hob under the cauldron is ready, it will withstand all the incidents of cooking. There is a huge disadvantage - an excessively large mass.
It is necessary to install such a massive thing only on the masonry, which has already grabbed, and as further actions showed, the premature operations with its installation led to the remaking of part of the barbecue masonry.
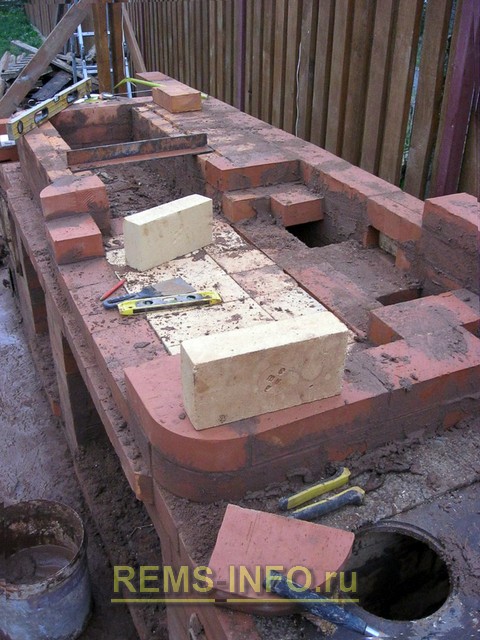
We start laying the stove insert
The main task is to lay out fireclay bricks in the inner space of the combustion chamber. In order not to reduce the volume of the firebox, I recommend laying refractory brick on the edge. This will make less use of the internal space of the firebox and thereby speed up the cooking process.
It started raining outside, and we covered the newly laid firebox.
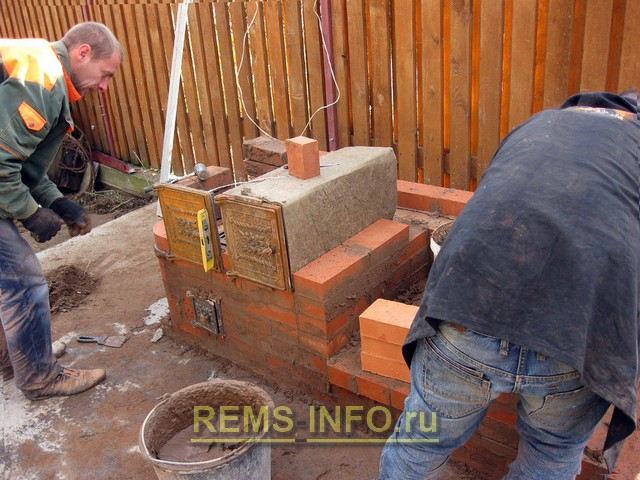
We install the door on the firebox and fasten it according to the same principle as the door of the blower, only we do not use a twist from wire, but fasten the stove fastening tape to the turnkey bolts for 8. I especially recommend this procedure for the upper fasteners of the door. It is they who experience very high heating temperatures when burning wood.

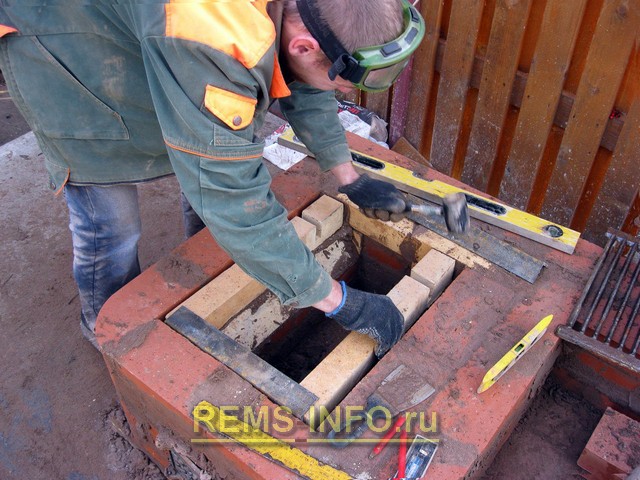
Despite the desire to finish the construction of the barbecue oven faster, it is better not to work in the dark. Flaws in the ordering masonry are not visible.
The next day, we began to install the ceiling over the firebox and a place for the tool. If this part of the furnace does not experience thermal stress, then the best option is to use paired metal corners with a cross section of 50 mm. This width allows the brick to be laid so that it protrudes above the edge of the corner and thereby provides the ability to masonry without defects.
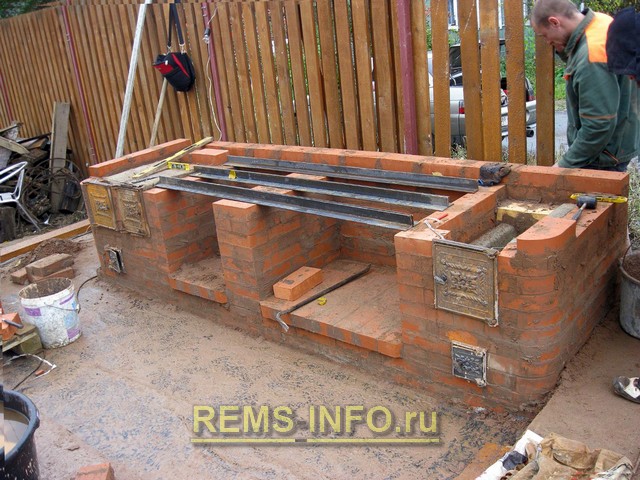
We lay the corners in such a way that on the vertical racks there is an overlay on the masonry of at least 5 cm at each corner.
A prerequisite for paired corners is to grab them by welding to each other. During the period of ground movements, there is a possibility that the concrete slab can "play" and if the corners are not stuck to each other, then part of the overlap may come off, and some will remain. The first row of masonry lies on the corner with one side, the second and third lie on two corners, and the last one, like the first, only on one corner.
The total length of the overlap rows must be adjusted so that the bricks do not protrude beyond the edges of the overlap. The easiest way to cut the length of a brick is with a cut-off wheel. In addition, the outer row of bricks will protrude ¼ part, forming a decorative protrusion.
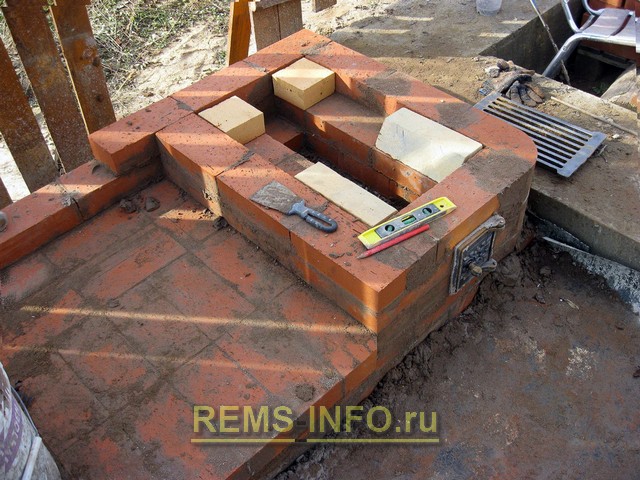
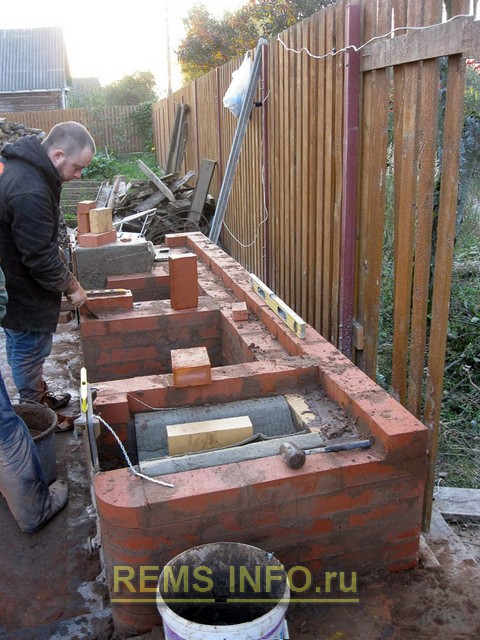
After the overlap is laid out, we proceed to the formation of the "hearth" of the barbecue and the corner laying of the base under the slab for the cauldron.
We lay out "UNDER" the barbecue with a jab of fireclay bricks. Look at the left side of the photo. On the bricks with a construction pencil, grooves are drawn for laying the slab for the cauldron.
We lay the bricks for the slab dry, after drawing out the place for the groove, remove them and use a cutting wheel to make a groove 15 mm deep. 10 mm is necessary for planting a metal plate and 5 mm is necessary for laying basalt cardboard. After the bricks for the slab are prepared, we put them on the mortar, lay the basalt cardboard and then, together with a partner, lay the slab itself. Carefully, we spread the slab into the groove with a rubber mallet.

Laying the slab into the groove. It is necessary to upset with the utmost care, the masonry has not yet set.
We install the cauldron, check the tightness of the installation and then "dry" lay out a row of bricks on the right edge of the plate. We measure the required length of the brick cut for the row. Only after that we lay the row on the mortar.
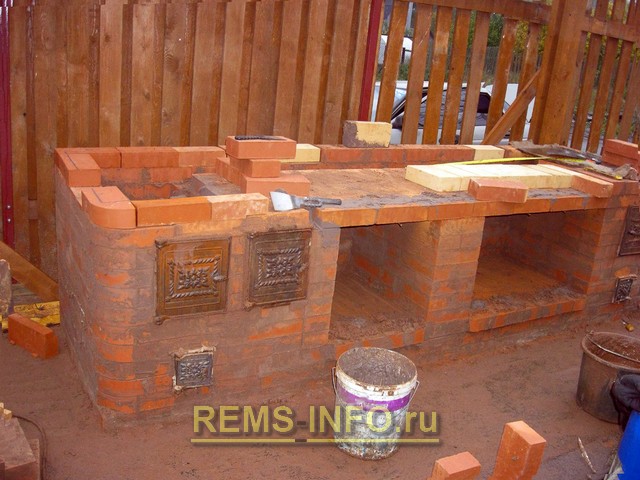
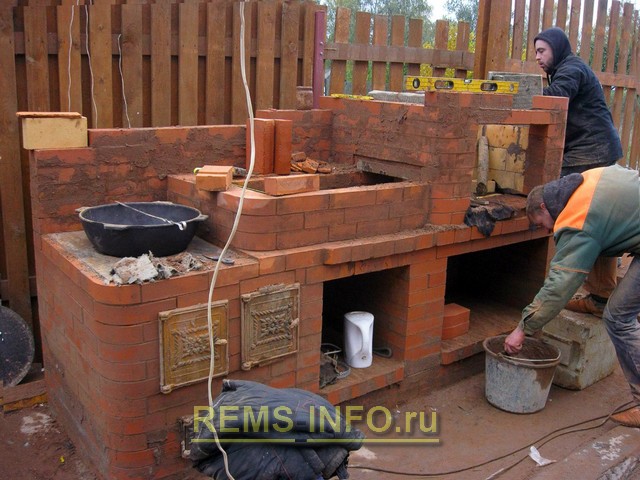
After this procedure is completed, we proceed to laying the back wall of the barbecue. She plays two roles. The first is to impart lateral rigidity to the entire structure, and it is also a kind of screen from prying eyes from the street.
In the same way as we laid the stove for the cauldron, we lay out the hob in the same way.
We raise the walls of the barbecue. Its width is 30 cm. There will be no open flame, only coals, so it is enough to lay out the “under” of fireclay bricks, and raise the walls from ordinary ceramic bricks. At the same time, we lay out the base of the fireplace. All chimneys run along the back wall of the barbecue, it is above the fireplace that they will converge into one chimney.
We lay out "POD" and the walls of the fireplace from fireclay bricks, there will be an open flame, so this part of the barbecue cannot be put in from ceramic bricks.
We lay out the inner walls of the fireplace, placing the brick on the edge. Masonry mortar should be made only from a special thermal mixture that can withstand temperature extremes.

All defects of the walls can be corrected right on the masonry, but done with the utmost care.
The overlap for the fireplace can be made using a metal corner. And then make a harness for strength.
Do not forget the rule - be sure to lay basalt cardboard between fireclay and ceramic bricks. This is a prerequisite for the longevity of the fireplace.
The fireplace has no upper arch. Its role is played by the masonry tapering on each row (1/4 brick minus). Also, behind the third row of fireclay bricks, chimneys come out from below and then the air flow goes into the chimney.
The finished barbecue oven in the photo at the beginning of the article. It turned out autumn is beautiful and functional!
Regardless of the type, the following materials will be needed for construction:
- solid brick, as well as fireproof, it will come in handy when arranging a firebox. If you use a non-refractory one, then it will simply crack after a couple of months of operation;
- grates - there will be firewood on them, and air from the blower will pass between them;
- doors for the firebox and blower;
- a metal plate - it is a cooking surface, it is simply placed on top of the firebox;
Important! Since ordering a barbecue grill with a kettle with your own hands involves the use of a cauldron, you will have to make a cutout in the stove. You can also purchase a sheet of metal with a ready-made seat, you just need to choose the appropriate size for it.
- steel corners;
- mortar, and it is desirable to use a heat-resistant mixture, the cement mortar simply will not withstand big number heating / cooling cycles.
Construction technology
The entire construction process can be conditionally divided into 2 stages - the construction of the foundation and the construction of the aboveground part. Ordering drawings can be found in the public domain.
Erection of the foundation
Regardless of how massive the building will be, you can advise a slab foundation or a strip foundation with a reinforced concrete slab on top of it. The base device technology is as follows:
- a pit is being dug, for small buildings its depth is about 10-20 cm, for massive complexes - up to 50-70 cm;
- a sand and gravel cushion is poured at the bottom;
- fittings are laid so that the rods do not disperse when pouring concrete, they can be tied with wire;
- concreting is in progress, it is advisable to raise the foundation cut above the ground by about 5-7 cm;
- the concrete surface is leveled, then smoothed.
Important! In order for the concrete not to crack, it is necessary to provide normal hardening conditions. In hot dry weather, it is advisable to cover the concrete with a film so that the water does not evaporate too quickly.
(Photo 2. The diagram shows the foundation for a massive building, broken brick can be used for the device of a drainage layer. A knitted reinforcing cage (bar reinforcement A III) is used, the distance between the bars should not interfere with the uniform distribution of the concrete mixture during pouring)
Ordering a simple stove
The ordering drawing for a simple homemade barbecue with a kettle provides for the use of only one kettle. The building can also be used as a stove with a small hob.
The main feature of the proposed design is a firebox with a round cross-section. It is most convenient to lay it out from trapezoidal pieces, if the shape of the firebox is ideal, then it can be used as an analogue of an Asian brazier (tandoor).
Ordering assumes such an arrangement of the main elements:
- 1 row is laid out along the contour;
- 2 - installation of the blower door (additionally fixed with wire);
- 3-4 - installation of grate bars and start of work on the firebox;
- 4-5 - outlet for connecting a chimney;
- 5-12 - layout of the fuel chamber;
(Photo 3. It is convenient to lay out the fuel chamber from trapezoidal scraps. The smaller the scraps, the closer the shape of the fuel chamber will be to the circle. A small gap is left between the refractory and ordinary bricks)
- 12 - removal of combustion products;
- 13 - installation of corners and cast iron plate.
Important! Due to different temperature deformations, it is forbidden to bandage simple and refractory bricks.
(Photo 4. Ordering of the future building. In this example, there are only 13 rows, the output is a building that resembles a small cabinet with a firebox, a blower and a hob with a circular cutout)
Preparation for operation
The proposed ordering of the simplest home-made barbecue oven with a cauldron at the exit gives a curbstone with a seat for a cauldron. After the work is completed, you should check if it will work normally:
- a sandwich chimney can be connected to the outlet for removing combustion products to improve draft. It makes sense to check the thrust itself simply by lighting a low fire, the intensity of fuel combustion is regulated by opening the ash pan door;
(Photo 5. Sandwich chimneys are often used to remove smoke from stoves. It can also be used for outdoor barbecues. The first section should not have a layer of insulation, it will be sintered due to the too high temperature of the gases)
- during normal combustion, it should not consume too much fuel;
- the diameter of the cauldron should be such that it fits into the slab by about 2/3 of its height;
(Photo 6. Most of the boiler should be in the fuel chamber. Due to this, the walls of the pot will warm up more evenly and the food will cook better. 5-7 cm remains from the stove to the handles, this is enough to remove the cauldron from the fire after completion cooking)
Important! You just need to measure its diameter at the widest part and cut out a circle with a diameter of about 1.5 cm less.
- if cladding is planned, then you can speed up the drying of the mortar on which the tiles are planted simply by lighting a fire. An intense fire is not needed; it is sufficient to simply maintain a constant temperature.
Roof structure
The considered option has one drawback - the absence of a roof allows you to cook on it only in dry weather (or place it in a gazebo). But even at the design stage, you can choose an ordinal drawing of a barbecue woman with a do-it-yourself cauldron, which provides for a roof device.
Indoor construction
With this design, in addition to the possibility of placing the pot, they also provide for a separate hob, brazier, oven, tangyr, etc. Additionally, such a complex is equipped with:
- cutting board;
- a place for storing dishes and other kitchen stuff;
- compartment for storing firewood.
Important! If several furnaces are provided, then the channel for the removal of combustion products must be separate for each of the furnaces.
The order is given up to about 37-40 rows. At this level, the narrowing ends and then it remains to either extend the masonry to the desired chimney height, or use a chimney sandwich.
(Photo 7. Ordering of a more complex structure. The diagram is shown to the end of the narrowing of the building, the height of the chimney is determined individually)
Indoor oven device
The order drawing of a homemade barbecue with the possibility of installing a pot provides:
- placement of the blower door on the 2nd row;
- on 6 and 7 - the grates and the door of the fuel chamber are stacked, respectively;
- 8 - fixing a steel sheet, it will separate the space for storing firewood, you can also put a brazier on it and calmly cook barbecue in rainy weather;
- 11-12 - a metal sheet with a cut out circle is placed under the cauldron;
- approximately on the 16th row, the laying out of the arch framing the oven begins;
- the arch ends on the 22nd row, and on the 23rd the cast-iron sheet is laid, separating the space in which the cauldron will be placed;
- further, the top gradually narrows, the work is finally completed by about 37 row.
Important! In the proposed design, the fuel chamber can be either cylindrical or rectangular. The main thing is not to bandage different types of material.
How to build an arch
Most often, an arch and a vault are provided when installing a stove. For this, a thick plywood template will be used (a sheet thickness of 10-15 mm is sufficient). For this you will need:
- template for determining the parameters of the heel. With its help, the angle at which it is necessary to cut off part of the brick of the heel is determined, while taking into account the arrow of lifting the arch;
- several circles (outwardly they look like a segment of a circle), as well as a split formwork, which will unite these circles into one whole.
Important! When designing a vault, its width should be such that the vault is formed by an odd number of bricks.
When designing, the width of the seam is also taken into account. If during normal laying it is constant, then in the case of an arc, the outer width is taken equal to 20-30 mm, and the inner 5 - 10 mm, due to this, a smooth arc is obtained.
You can proceed to the vault device after you have reached the row on which the heels are located. Since they will perceive a significant load, it is advisable to reinforce the heels.
(Photo 8. In the photo you can see a circled and laid out arc. The circles were raised to the required height due to the placed bricks)
The circles are inserted into special wooden racks with cuts for them, the position of the racks themselves in height can be adjusted. For greater rigidity of the frame, it is recommended to additionally combine the circles with slats. After completion of assembly, they must not touch the walls of the fuel chamber.
(Photo 9. Placing the formwork under the vault, fix it at the desired height using a wooden peg, or by placing several stones of suitable thickness under it.)
Summarizing
A homemade barbecue oven with a kettle will not only allow you to cook food in the fresh air, but will also become the pride of any homely owner. In addition, this will allow you to save a lot on the work of a specialist.
2 main mistakes made during the construction of a combined complex cauldron brazier
Why did I select a bunch of grill oven with a cauldron in a separate article? Because this type of complexes is most popular with customers. Most of the customers need a barbecue area for cooking meat and fish dishes on charcoal and the second section - a cauldron oven, which is also a cooking stove. This is the part of the complex where you can cook practically anything: heat water for tea, heat up and cook food in a frying pan, saucepan - exactly as you would use it on a regular electric or gas stove... Well, the main thing is the preparation of the traditional preparation of Middle Eastern and Asian dishes on an open fire - pilaf.
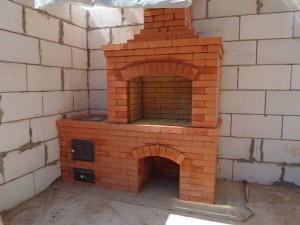
Classic brick grill
The subtleties of building a furnace with a brick cauldron
The peculiarity of the complex with Kazan No. 1
The peculiarity of the complex with Kazan No. 2
Brick grill
Brick grill from a professional stove-maker - the service that we provide most often. To begin with, I would like to illustrate with a few of my works what such a complex looks like. Often a small countertop is added here - it is absolutely easy and you can fit a cutting table into any complex, even into a street grill with a cauldron.
Brazier with a brick cauldron
Despite the seeming simplicity of the design, it is not difficult to fold the barbecue area, but a professional will fold it so that it does not smoke. You will find the orders of the cauldron in several copies on free sites. However, not everything is so simple in the laying of the barbecue area and the brick cauldron.
I would like to dwell on the main critical points, after reading which you may think about all the disadvantages of self-construction and invite a specialist. After all, you must agree that if the stove is folded by you personally without taking into account my notes, then it will have to be redone, and this is too much time.
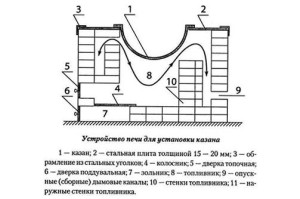
Stove under the cauldron
A classic cauldron oven schematically looks like this. I draw your attention to the fact that this scheme takes into account only one direct chimney from the cauldron firebox. In our complex, under a barbecue with a cauldron, there is a different chimney scheme.
Diagram of a furnace with a cauldron
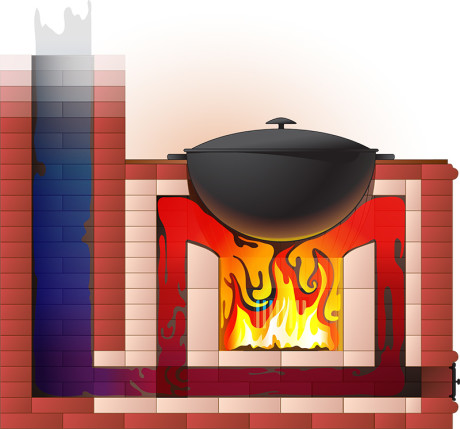
In the photo you see a cauldron stove in a section - a firebox, flue gas outlet, a pipe. However, it looks and is built quite simply if your complex has only one section - a cauldron (or barbecue area). If the customer wants to build a brazier stove from a brick with a cauldron, then the next question arises. How to avoid smoke in the cauldron firebox?
Kazan brazier
I rejected all appeals to me over the past few years with a request to repair the smoking furnace of the cauldron - firstly, the customer saved on a good craftsman, finding a beginner or even a builder of all trades, who would take care of the finishing and fold the stove. This means that such a customer will allocate a little money, if at all, for my inspection and consultation.
And most stove-makers will not repair the smoking zone of the cauldron stove, not only for this reason. We'll have to disassemble part of the whole complex, the lower rows to study the channel diagram, which was folded by the previous stove-maker. All these are additional difficulties, for the customer it looks like "minor repairs, the stove is already folded down - you adjust it there, and business," but in fact it is much easier for me to fold the stove with a brazier again.
In such a complex, your oven under the cauldron brick will function, that is, you can cook food, pilaf, etc. To the majority of amateurs and non-professionals it is quite simple to explain to the customer why the cauldron firebox smokes - they sin on bad brick, bad mixture, they say that when the stove dries up, it will not smoke. They calmly take the money and you will not hear it again. However, I want to assure you: your cauldron stove should not smoke already at the first fire.a brick brazier at the stage of a finished complex - it is impossible!
At the stage of the first furnace, in principle, you may not notice this drawback, and most of the customers can even decide that this is how it should be!
So, the main disadvantage of amateur brick stoves with a cauldron is that in such a complex the brazier and cauldron cannot work in parallel, due to the fact that when the brazier zone is working, the flue gases from the cauldron will simply not be drawn out, and the cauldron firebox will first smoke, but then it will go out altogether, since an insufficient amount of oxygen will not allow the burning of wood to continue. And as usual - the stove-maker is not to blame for anything, does everything work? “So what, what separately - why do you need it all together, cook the barbecue first, and then the pilaf” - the builder will tell you. And customers often agree. However, a professional builder has a different view of the functionality of the complex. oven grill
A beginner's mistake: sections of a street barbecue with a cauldron can and should work simultaneously with the correct planning of the complex!
But I have to build much more functional complexes, which also include other sections - a smokehouse, a Russian stove. And what are heating stoves with several furnaces? After all, if we allow the slightest possibility of smoke, then no customer will accept such a stove: smoke when both chambers are fired up simultaneously for fuel combustion can be life-threatening!
two fireboxes in a complex in one chimney - Russian stove + barbecue

But back to the complexes: imagine that in a brick street complex, consisting of a smokehouse, a Russian stove, a barbecue area and a cauldron, food will be prepared, and in each section separately. Yes, it will take the cook at least a whole day to heat each section separately and prepare food in each - and most importantly, all food will cool down for dinner.
Therefore, you can use all my stoves - heating or outdoor - as a fully functional building: simultaneous heating of all sections, simultaneous cooking of all types of dishes. Agree, this seemingly not noticeable advantage at first glance turns out to be much more important than even a smoke-free firebox?
The most complicated stove in three fireboxes - only two are visible in the photo, the third is on the other side
Basic Tips
1. The furnace of the cauldron should never smoke
2. All sections of the street complex can and must work independently, in parallel with each other!
Probably everyone who has tried a dish cooked over an open fire at least once will agree that its taste is much better than that of a similar food from a conventional oven. This is explained by the fact that the dishes are saturated with the aroma that is released when burning wood or wood briquettes. And to be able to feast on delicious dishes, you should just build a stove under the cauldron on the street if you are the owner of a summer cottage.
Is it possible to build a structure with your own hands
It is quite easy to build a brazier and a stove under a brick cauldron with your own hands, if you carry out this event in stages and adhere to the recommendations of qualified specialists. Anyone who has at least a little mastery of construction skills and understands this process can create such a structure.
Before making a kitchen complex on the street, you will need a diagram of the future structure, which is easy to draw on your own, or you can turn to experienced specialists for help.
For the masonry of the structure, you will need the following building materials and tools:
- brick base, which belongs to the refractory category;
- sand mixture, which is based on a chamotte powdery substance;
- construction tools for mixing cement mass;
- doors in duplicate for the future oven. One will need to be used for the blower, the other for the future firebox;
- grate bars in several copies.
It should be remembered that when constructing the base, the correct size of the vent should be chosen so that the fire can evenly warm up the stove or barbecue. This is quite simple to do if you know what size cauldron will be used.
Phased furnace construction
 There is a certain construction scheme that helps to build a kitchen facility with your own hands:
- On a personal or summer cottage, the most suitable place for the future stove is selected. The selected area is leveled, all plants with roots are removed from the surface of the ground, the base is thoroughly moistened with plain water.
- A mixed solution is laid out on a moistened and even surface, which is based on cleaned sand and a powdery chamotte mixture. For kneading, you need to take one part of sand and three parts of a powdery mixture. Such an amount of ordinary water is added to the base so that the mass turns out to be the consistency of thick sour cream. You should not immediately mix a lot of solution, for the first time you need so much substance, which is enough to create a base (approximate thickness is 5-7 centimeters).
- Until the base of the furnace is completely frozen, a fixing grid made of reinforcement should be laid on top of it. The fittings are welded to each other using a welding machine, while controlling the width of the cells (the width should not be more than 13 centimeters). The main purpose of the reinforcement grid is to securely fix the base and give it additional strength.
Furnace masonry process
 The further process of laying the stove is as follows:
- After laying the grating, a refractory brick should be laid on an incompletely solidified base. Such a bond will help to significantly increase the adhesion properties of the brick to the base, the connecting seams will be in an even design;
- when laying bricks, a special scheme is used: an odd row of a brick clack begins with a whole material, and an even row starts with half a brick. It is necessary to "bandage" the base according to all the rules, which you can learn about from the video;
- after the first row of the structure is made, the door for the blower should be installed in the right place indicated in the diagram. It is necessary to leave a small hole in which the chimney will be installed in the future;
- after laying the third row, the building is framed, the basis of which are corners made of durable metal. A metal grate will be welded onto the frame, which will help regulate the air circulation in the oven so that the wood briquettes are efficiently burned, giving the right amount of heat for cooking;
- the next row of brick base is laid out on the installed grate and the door for the firebox is installed. Further brick laying takes place according to the agreed construction scheme. After the last row is laid and the mortar begins to set, processing and joining of the connecting seams should be done;
- the final stage of construction is the selection of the base of the furnace. It is recommended to use a sheet of metal as it, the thickness of which will be more than 1.5 cm. The selected metal base should completely cover the constructed base, in its center a circle should be cut out, the diameter of which corresponds to the size of the cauldron.