Hello everyone!
Today our article is dedicated to all puzzle lovers. Solving problems, crosswords, puzzles, riddles, etc. has always attracted people from young to old. And this is not only a fun pastime, but also benefits for the mind, the development of logical thinking.
Puzzles can be either drawn in any edition or made in the form of objects, often toys. One of these is the famous Rubik's Cube in the 20th century.
Surely there are still fans of this puzzle. Or maybe someone, after reading this article, wants to get acquainted with this already, one might say, an old puzzle toy.
Rubik's Cube (sometimes mistakenly Rubik's cube; originally known as the "magic cube", Hungarian bűvös kocka) is a mechanical puzzle invented in 1974 (and patented in 1975) by the Hungarian sculptor and architecture teacher Ernö Rubik. From Wikipedia.
In the mid-70s of the last century, Hungarian teacher Erne Rubik, in order to somehow help his students learn some mathematical features and understand three-dimensional objects more clearly, made several wooden cubes and painted them in six colors.
Then it turned out that putting them together into a whole cube with sides of the same color is a rather difficult task. Erne Rubik fought for a month until he achieved the result. And so, on January 30, 1975, he received a patent for his invention called "Magic Cube".
However, this name has survived only in German, Portuguese, Chinese and, of course, Hungarian. In all other countries, including ours, it is called the Rubik's Cube.
This puzzle was a hit at the time. It was sold worldwide in the 80s and 90s. only, more than 350 million pieces
What is Rubik's Cube
What is this puzzle? Outwardly, it is a plastic cube. Now it comes in various sizes, and 4x4x4 is considered popular. Initially, it was made in 3x3x3 format. This cube (3x3x3) looks like 26 small cubes with 54 colored faces, which make up one large cube.

The faces of a cube rotate around its three internal axes. By rotating the edges, the colored squares are reordered in many different ways. The task is to collect the colors of all faces in the same way.

There are a lot of different combinations. For example, a 3x3x3 cube has the following number of combinations:
(8! × 38−1) × (12! × 212−1) / 2 = 43 252 003 274 489 856 000.
As soon as this puzzle gained popularity, mathematicians around the world, and not only, set a goal to find such a number of combinations that would be the smallest when assembling it.
In 2010, several mathematicians from all over the world proved that each configuration of this puzzle can be solved in no more than 20 moves. Any turn of the face is considered a turn.
Fans of the cube did not just collect it, but began to organize competitions in high-speed puzzle solving. Such people began to be called speedcubers. The result is not counted for a single assembly, but as an average of five attempts.
By the way, along with popularity, as it happens, opponents appeared who proved (even with examples) that the assembly of a cube, especially a high-speed one, entails dislocation of the hands.

But, be that as it may, the cube not only did not turn away from itself, but attracted more and more people. And the competitions were held both in a separate city and in the country, and international. For example, a participant from Russia won at the 2012 European Championship. The average assembly time was 8.89 seconds.
The cube became so popular that other modifications in shape began to appear. For example, a snake, a pyramid, various tetrahedrons, etc.

How to solve a 3x3 cube, diagram with pictures for beginners
So. Let's start with a simple option for assembling a 3x3x3 cube. It consists of seven stages. But first, about some concepts and designations that are found in the diagrams.
F, T, P, L, V, N- designations of the sides of the cube: front, rear, right, left, top, bottom. In this case, which side is the facade, rear, etc. depends on you and on the diagram on which these symbols are applied.
The designations F ', T', P ', L', B ', N' speak of the rotation of the edges by 90 ° counterclockwise.
The designations Ф 2, П 2, etc. indicate a double rotation of the face: Ф 2 = ФФ, which means to rotate the front face twice.
Designation C - rotation of the middle layer. In this case: С П - from the side of the right side, С Н - from the side of the bottom, С'Л - from the side of the left, counterclockwise, etc.
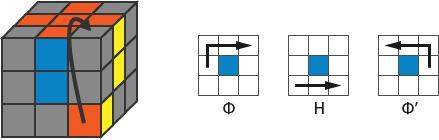
For example, such a notation (Ф 'П') Н 2 (ПФ) means that you must first rotate the front face counterclockwise by 90 °, then the right face as well. Next, rotate the bottom edge twice - this is 180 °. Then rotate the right edge 90 ° clockwise, and also rotate the front edge 90 ° clockwise.
In the diagrams, this is indicated as follows:

So, let's start the assembly steps.
At the first stage, it will be necessary to collect the cross of the first layer.
We lower the required cube downward, turning the corresponding side face (P, T, L) and bring it to the front face by turning H, H ’or H 2. We finish everything by turning the same side face back.
On the diagram, it looks like this:

At the second stage, we arrange the corner cubes of the first layer.
Here we need to find the required corner cube, which has the colors of the faces F, B, L. In a similar way for the first stage, we bring it to the left corner of the selected front face.
The dots on the diagram show the place where you need to place the desired cube. Repeat the same operation for the other three corner cubes.

As a result, we get the following figure:

At the third stage, we will collect the second layer.
We find the required cube and initially bring it down to the front face. If it is located at the bottom, then we do this by rotating the bottom edge until it matches the color of the facade.
If it is located in the middle belt, then we lower it down using the formula a) or b). Next, combine the color with the color of the front edge and do a) or b) again. As a result, we will have already assembled two layers.

Let's move on to the fourth stage. Here we will collect the third layer and the cross.
Things to do here. Move the side cubes of one face, which do not violate the already assembled order in the layers. Next, select another face and repeat the process.
This will put all four dice in place. As a result, everything is in its place, but two, or even all four, may be oriented incorrectly.
First of all, you need to see which cubes sitting in their places are incorrectly oriented. If there is none or one, then we rotate the top face so that the cubes on the adjacent faces fall into place.
Here we will apply such turns fv + pv, pv + tv, tv + lv, lv + fv. Next, we orient the cube as in the figure and already apply the formula written in the same place.

We pass to the fifth stage. Here we unfold the side cubes of the third layer.
The cube that we will unfold must be located on the right side. In the figure, it is marked with arrows. The dots in the same place mark all possible cases when the cubes may be oriented incorrectly (Figures a, b and c).
Figure a). Here it will be necessary to make a turn B 'in order to bring the second cube to the right side. Next, finish by turning B, which will return the top face to its original position.
Figure b). Here we do as in case a), only we turn B 2 and finish in the same way B 2
Figure c). we perform turn B three times after the flip of each cube, after which we also end with turn B.


We proceed to the sixth stage, placing the corner cubes of the third layer.
It should be simple here. We set the corners of the last face according to the following scheme:
First, a straight turn, with which we rearrange the three corner cubes clockwise. Then the reverse one, with which we rearrange the three cubes already counterclockwise.

And finally, the last stage, during which we orient the corner cubes.
At this stage, the sequence of PF'P'F turns is repeated many times.
The picture below also shows four options where the cubes may be incorrectly oriented. They are marked with dots.
Figure a) we first make a turn B and end with a turn B ',
Figure b) here we start with B 2 and end with it.
Figure c) turn B must be performed after turning each cube correctly, and then making turn B2,
Figure d) we first make a turn B, which is also performed after we correctly orient each cube. We also finish by turning B.
As a result, everything is collected


Assembly diagram for children

This scheme is also divided into several stages.
- The assembly starts with a cross on the top side. Collecting it is almost easy. Moreover, you can ignore the arrangement of the colors of the other sides of the cube, but only for now.
It is usually advised to start assembling with yellow. But you can choose any.

- We continue to collect the cross. Here it is necessary to take into account that all the top elements of the mating sides must have the same color as the central elements located on the same faces. If something does not match somewhere, we try to follow this algorithm:
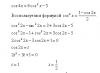
A. if two adjacent sides do not match in color: P, V, P ', V, P, V 2, P', V
B. if opposite sides differ: F 2, Z 2, N 2, F 2, Z 2
- At this stage, we place the corner cubes. Thus, we will collect one side completely. Let's examine these corner cubes and see that the cubes of the color that we have chosen as a base, in particular yellow, are in three versions: top, left or right. For each, we apply the appropriate combination:
For what is on top - P, V 2, P ’, V’, P, V, P ’
For that on the left - F ', V', F
For the one on the right - P, V, P '
As a result, we get one fully assembled side, and the top layers of the adjacent sides and their center have the same color.

- Now we have to collect the second layer. To do this, turn the assembled side up. Next, twist the bottom edge so that the color of the side element matches the color of the side, forming the letter "T". In order to move the side cube from the bottom layer to the middle one and at the same time its two colors must match the colors of the adjacent sides, you must do the following:
A. Rotate the cube to the left - N, L, N ', L', N ', F', N, F
B. Move the cube to the right - N ', P', N, P, N, F, N ', F'

- We collect the third layer. Let's start by turning the cube with the unassembled side up. If the selected color was yellow, then now we need to make the top white. Now we collect white cubes according to these formulas:
A. White cube in the center + two opposite sides - Ф, П, В, П ', В', Ф ',
B. White cube in the center + two adjacent sides - F, V, P, V ', P', F
C. Only one white cube in the center - we use any combination, or A, or B
- Collect the remaining layer completely. An assembly diagram with two possible options is shown below. If you did not succeed in any of the above, use any.
A. Colors match when rearranged counterclockwise - P, V, P ', V, P, V 2, P',
B. Colors match when swapped clockwise - P, V 2, P ', V', P, V ', P',

- At this stage, we place the corner cubes. This will be somewhat more difficult. However, practice and you will succeed.
A. The side cube with the color of the top edge is on the front side -
P ', F', L, F, P, F ', L', F
B. The side cube with the color of the top edge is on the side -
F ', L, F, P', F ', L', F, P
- Last thing. Here you need to rotate the corners correctly. Again, we need two options:
A. Clockwise - P 2, B 2 ', P, F, P', B 2 ', P, F', P
B. Counterclockwise - P ’, F, P’, V 2 ’, P, F’, P ’, V 2’, P 2
If you need to change the corner cubes crosswise or the corners that are opposite, you can use either of these two options.
As a result, the puzzle will be completely assembled.

Video master class on the cube
And finally, a short video
Instructions "how to solve Rubik's cube 3x3" with pictures for beginners. The easiest and simplest scheme, but it will require care and accuracy from you. This is the second (improved, more complete and convenient) edition of the Rubik's cube assembly instructions, it takes into account the wishes of our readers.
Step 1. Collect the first side of the Rubik's cube
This step describes in detail how to collect one (first) side of the Rubik's cube with the first belt. There are many possible options at this step, so it is difficult to describe all of them. It is recommended not to memorize the formulas, but to understand their essence, then you will be able to cope with any situation.
Step can be skipped
If you can solve one side of the Rubik's cube and the upper belt (Fig. 1-1c) without formulas and outside help, go to.
1.1. Volumetric cross of the first side
On one side of the cube, make a cross, the colors of which correspond to the central squares of the other sides (Fig. 1-1b).
Step 1. Find the matching edge cube (Fig. 1-2) and rotate the front side so that the cube moves up (Fig. 1-3). Then go to step 2. Repeat steps 1 and 2 as many times as necessary.

If the rotation "breaks" the already assembled cube, move the found cube to another plane (Fig. 1-4a, b). If the cube is not already at the top, go to step 1 again.

If moving to another plane also "breaks" the already assembled cube, use the appropriate formula (Fig. 1-4c).
The figure (Fig. 1-4c) shows only one of the possible options - proceed by analogy.

Step 2. When the found cube is moved up, use one of the formulas.


1.2. Side and belt
To place the corner cubes and complete this step (Figure 1-1c), you will need the following formulas.


Use formulas to remove an incorrect corner cube.


If the cube is “hidden” at the bottom, then we move it to the lower belt, in order to then move it to its place using the formulas above.

Step 2. Collect the second belt
The second belt is easily assembled using two formulas. Find a suitable cube in the third belt to match both colors (twist the third belt if necessary), and move it diagonally to the second belt using the formulas.
Formula: (N'P'NP) (NFN'F ')

Formula: (NLN'L ') (N'F'NF)

If there is no suitable cube
If there is no suitable cube, using the same formulas, move any cube from the third belt to the second - the required cube will appear.
Step 3. Cross on the opposite side
Now you need to collect the cross on the opposite side of the Rubik's cube. The cross is assembled without taking into account the colors of the third belt (Fig. 3-1). In other words, at this step only the cross is assembled, and the cross is coordinated with the colors of the third belt in the next step.

Your Rubik's cube now has one of four combinations: a, b, c, d - see Fig. 3-2. The transition from one combination to another occurs with a single formula: F P V P "V" F. You need to repeat this formula 1-3 times, depending on which combination you have.
If the cross is already assembled (Figure 3-2d), skip this step. If you only have one central square (Figure 3-2a), then you need to repeat the formula 3 times. If the angle (Fig. 3–2b) - 2 times. If the line (Fig. 3–2c) - 1 time.

Formula: F P W P "W" F "
note
Before each execution of the formula, the Rubik's cube must be positioned exactly as shown in the figures.
Step 4. Agreed cross
As a result of this step, we will get a cross that matches the colors of the belt (Fig. 4-2c).
Rotate the top chord until the 2 colors of the cross match the middle squares of the top chord (Figure 4-1). Only two combinations are possible: the colors coincide with the line Fig. 4-2a) or the colors matched the angle (Fig. 4-2b).

The formula for the coincidence of the line: P V P "V P VV P"
Move the incorrectly placed cross cubes opposite each other (two opposite ends of the cross).

After completing this formula, rotate the top chord again until the 2 colors match the middle squares of the top chord (Figure 4-1). Please note that even now the two ends of the cross will not fall into place, but the combination will change to “the colors coincided at an angle” (Fig. 4-2b).
The formula for the coincidence of the angle: P V P "V P VV P" V
Change the places of the incorrectly placed cross cubes, located diagonally relative to each other (two adjacent cross cubes).

After completing this formula, the cross will be assembled and its side colors will match the colors of the upper belt (Fig. 4-2c). If the result is not achieved, then repeat this step again, having previously correctly oriented the cube.
Step 5. Placement of corner cubes
Corner cubes are arranged in two formulas. After applying these formulas, the corner cubes will stay in their places (in their corners), but may not be rotated correctly. In Fig. 5-1 the black point marks the cube, which is placed in its place (in its corner), but turned around incorrectly. Cubes unfold at the next step.

Right turn formula: (P'F'L'F) (PF'LF)

Left pivot formula: (F'L'FP ') (F'LFP)

Step 6. Turning the corner cubes
The rotation of all corner cubes is performed by a simple P'N'PN formula performed many times. Before you start, read the entire section carefully to the end and make sure you have no questions left.
note
After the start of the formula, the Rubik's cube will "collapse" and finally be collected only after all the corner cubes are correctly deployed. In other words, all corner cubes unfold in one operation, which will require your attention and endurance.
Let's find a corner cube that needs to be turned (counterclockwise or clockwise - it doesn't matter), see Fig. 6-1.

Take the Rubik's cube as shown in the picture below and follow the formula.
note
1) The formula (of 8 moves) must be performed 1 or 2 times, until the corner cube turns over to the correct position (Fig. 6-2b).
2) When the corner cube turns to the correct position, the Rubik's cube will "collapse" - do not worry, the Rubik's cube will only be collected when you finish with all the corners.
3) Do not change the position (do not flip) the Rubik's cube in your hands until the end of this step.

When the first corner cube is already correctly positioned (Fig. 6-2b), rotate the top layer (Fig. 6-3a) so that the next corner cube will move to the upper right corner (Fig. 6-3b). If the next corner cube is already rotated correctly (does not require a turn), make another turn of the top layer (Fig. 6-3a).

Again, follow the formula of 8 moves (1 or 2 times) and follow all the above recommendations. These actions must be repeated until all corners are turned correctly - until the Rubik's cube is completely collected.
I wish you patience and success!
Hello everyone. If you decide to learn how to solve a 3x3 Rubik's cube, then at one of the stages of the assembly it will be very difficult for you to do without formulas. It is not at all difficult to read the formulas for assembling a 3x3 cube. Below for you are collected all the notation with which you can read the formulas for assembling the cube.
The language of rotation of the sides of the cube 3x3
Since the Rubik's cube has 6 sides, we will have 6 basic designations.
F - front - front side
B - back - back side
L - left - left side
R - right - right side
U - up - top side
D - down - bottom side
If there is nothing after the letter, then we twist this side clockwise once, as if we were looking at the face in the face.
If after the letter there is a stroke ‘(stroke), then we need to twist once counterclockwise, as if we were looking at the face in the face.
If there is a 2 after the letter, then the indicated side must be twisted 2 times (180 degrees).
Rotation of the main sides of a 3x3 cube with symbols in the pictures (for clarity)


In addition to the basic values, there are others, you need to study them if you want to learn complex formulas for speedcubers.
Letter + w:
Fw- frontal together with the middle layer
Bw- back together with the middle layer
Lw- left together with the middle layer
Rw- right together with the middle layer
Uw- top, together with the middle layer
Dw- bottom together with the middle layer
Fw ’- frontal together with the middle layer counterclockwise
Bw ’- back together with the middle layer counterclockwise
Lw ’- left together with the middle layer counterclockwise
Rw ’- right with middle layer counterclockwise
Uw ’- top with middle layer counterclockwise
Dw ’- bottom with middle layer counterclockwise
Fw2 - frontal with 180 degree middle layer
Bw2 - back with 180 degree middle layer
Lw2 - left along with the middle layer 180 degrees
Rw2 - right along with the middle layer 180 degrees
Uw2 - top with a middle layer 180 degrees
Dw2 - bottom with middle layer 180 degrees
Note: Previously, such movements in a 3x3x3 cube were indicated by small letters (r, l, b, etc.). However, some time ago, due to confusion with the language of rotations of large cubes (there, small letters denote rotations of only the inner layers), the worldwide association of the cube switched to the notation Rw, Lw, etc. Therefore, it is now correct to designate the movements of any external face together with the adjacent internal index w. Small letters remain only for the 4x4x4 cube and denote the rotation of only one inner layer adjacent to the outer one.
Rotations of the middle layers
M- the middle layer between the left and right layers

S- the middle layer, located between the front and back layers

E- the middle layer, located between the upper and lower layers

In 1975 the sculptor Erne Rubik patented his invention called "The Magic Cube". For over 40 years, all rights to the puzzle have belonged to the company of a close friend of the inventor - Tom Krener - called Seven Towns Ltd. The British firm controls the production and sale of the cube all over the world. In Hungary, Germany, Portugal, and retained its original name, in other countries the toy is called the Rubik's cube.
Varieties of the puzzle
The classic Rubik's cube measures 3 by 3 squares. Over time, they came up with a huge number of shapes and sizes for toys. No one will be surprised anymore with a pyramid-shaped puzzle or a 17x17 cube. However, humanity never stops there.
Obviously there is no beginner's build scheme for this cube. The process of assembling and solving a puzzle can take years. Recently, interest in the cube has been growing not only in Asia and Europe, but also where the toy was not very popular, for example, in the USA. One of the fans of the Rubik's cube filmed the assembly of the puzzle 17 by 17. The total length of the video is 7.5 hours, the shooting was carried out during the week.
Growing demand creates supply. Sometimes the models sold are incredible and it is not always clear how they will look when assembled. Each country has its own favorite varieties of toys.
What is speedcubing?
Fans of the game arrange real competitions in the speed of the cube assembly. There are special "speed" puzzles on sale. The mechanism of rotation of such Rubik's cubes is very high-quality, and rotations of faces and rows can be done with the movement of one finger.
The World Cube Association (WCA) is a non-profit organization supporting the speed cube movement. The WCA regularly hosts competitions around the world. There are representatives of the organization in almost all countries. Anyone can become a participant in the speedcubing event, you just need to register on the website and meet the assembly standards. The most popular discipline in such competitions is the high-speed 3x3 Rubik's cube. The standard for participation is 3 minutes, but even if a person cannot solve the problem in the allotted time, he will still be admitted to the event. You can sign up for any discipline, but you need to come with your own puzzle.

The record for the 3x3 Rubik's cube assembly belongs to the Sub1 robot, created by engineer Albert Bier. The machine is able to solve the puzzle in a split second, while it takes a human 4.7 seconds (Mats Valk's achievement in 2016). As you can see, the participants in the speedcubing movement have someone to look up to.
What are the algorithms for solving the 3x3 Rubik's cube?
There are many ways to solve the famous puzzle. Variants of 3x3 Rubik's cube assembly schemes have been developed for both beginners and advanced people with complicated schemes: 4x4, 6x6 and even 17x17.

The 3x3 puzzle variation is considered a favorite classic by most fans. Therefore, there are much more instructions on how to solve a 3x3 Rubik's cube than any else.
What should the puzzle look like?
You can assemble a toy according to the scheme only from a previously prepared position. If the patterns on the edges of the cube are located incorrectly, then it will not work for beginners to solve it through the 3x3 Rubik's cube assembly algorithm. There is a set of such positions for different solutions.

The picture shows or just a "cross" - the starting point of the easiest way to solve a 3x3 Rubik's cube. It is recommended to disassemble and fold the toy correctly.
Designations of schemes and methods of cube rotation
Before proceeding with the disassembly of the 3x3 Rubik's cube formulas, it is worth learning the notation used in speedcubing. All puzzle movements are indicated by capital letters. The absence of an apostrophe above the symbol means that the rotation is clockwise, if there is a sign, then it should be rotated in the opposite direction.
The first letters of English (or Russian) words denoting movement are considered generally accepted:
- front - F or Ф - rotation of the front side;
- back - B or T - back side rotation;
- left - L or L - rotation of the left row;
- right - R or P - rotation of the right row;
- up - U or B - rotation of the top row;
- down -D or H - rotation of the bottom row.
Pointers can also be used to change the position of the cube in space - the movement of the interception. Here, too, everything is simple, from the school geometry course everyone knows the coordinate axes X, Y and Z. Movement X means that the cube must be turned by face F in place of face U, when shifting Y - F, it must be in place L, and when rotating Z - F moves to R.
The following group of designations is rarely used, it is used when drawing up patterns of patterns:
- M - turn of the middle row, between right (R / P) and left (L / L);
- S - turn the middle row, between the front (F / F) and back (B / T);
- E - turn of the middle row, between the top (U / B) and the bottom (D / H).
Why do they collect patterns on the edges of the cube?
At speedcubing meetings, they compete not only in solving the puzzle, but also in the ability to make various patterns on the 3x3 Rubik's cube. They do this in order to quickly and easily collect the cube in the desired position.
There are a huge number of schemes for assembling a variety of patterns: "dots", "chess", "dots with chess", "zigzag", "meson", "cube in a cube in a cube" and many others. There are more than 46 of them for the classic puzzle alone. Masters of speedcubing consider it shameful to disassemble a toy. Also, drawing patterns on a 3x3 Rubik's cube is a great way to train and improve your skills.

The figure shows variations of the different patterns of the puzzle. Below are some more formulas for assembling the most interesting patterns from the cross position:
- chess - M 2 E 2 S 2;
- zigzag - (PLFT) 3;
- four z - (PLFT) 3 B 2 H 2;
- Plummer's cross - TF 2 N "P 2 FNT" FN "VF" N "L 2 FN 2 V";
- cube in a cube in a cube - V "L 2 F 2 N" L "NV 2 PV" P "V 2 P 2 PF" L "VP".
Algorithm for solving Rubik's cube 3x3 for beginners
Although there are many ways to solve the puzzle, simple and straightforward schemes for beginners are not easy to find. With each passing stage of the assembly, the 3x3 Rubik's cube formulas become more complicated. It is necessary not only to correctly change the pattern, but also to save what was done before. Below is one of the options for how easy it is to solve a 3x3 Rubik's cube.
Conventionally, the whole process can be divided into the following stages:
- Assembling the cross at the top of the cube.
- Correct compilation of the entire top edge.
- Work on the middle layers.
- Correct assembly of the ribs of the last row.
- Assembling the cross of the bottom face.
- Correct orientation of the corners of the last face of the cube.
Puzzle solution - preparation work
The first stage is the easiest. Beginners can try their hand at drawing up cube patterns according to the instructions provided, but this process will take a long time.

You need to choose the top edge and the color that will be collected first. The 3x3 Rubik's cube solving algorithm for beginners is developed from the "cross" position. It is not difficult to make it, you need to choose a central color, find 4 edge elements of the same shade and raise them to the selected face. The colored arrow in the picture indicates the part you are looking for. The options for the location of the desired element may be different, depending on this, 2 sequences of actions A and B are described. The difficulty lies in continuing the cross along the sides of the cube. You can take a closer look at the final appearance of the stage in the image above.
Solving the puzzle - working on the middle row

At this stage of the 3x3 Rubik's cube assembly scheme for beginners, it is necessary to find and assemble the corner elements of the upper face. In the end result, the face with the cross and the top row of the puzzle must be completely solved.

The image shows three possible edge patterns. Choosing one of the methods A, B or C, it is necessary to collect all 4 corners of the cube. By memorizing rotation algorithms and practicing them, skills and mastery of puzzle assembly are acquired. It is pointless to consider formulas and represent the process, it is much easier to take a cube and try all the methods in practice.

The third stage seems simple, but it is only an appearance. To solve it, two situations of patterns are described and, accordingly, two rotation formulas are drawn up. When applying them, it is worth remembering to maintain the previously achieved results. The masters constantly keep in mind the last 3-4 spins in order to return the cube to its original state in case of failure.

To solve the puzzle, you need to rotate it along the coordinate axis in search of the necessary elements and work with them. Such movements are rarely displayed in formulas, only in special cases. It is recommended to start assembling the edge faces from the elements of the lower rows, after such rotations, all the necessary cubes will go down from the middle to the lower row.
Puzzle solution - making the second cross

At the fourth stage, the toy is turned upside down. Solving the last face is the most difficult part of the 3x3 Rubik's cube for beginners. Rotation formulas are long and complex and will require special care. The purpose of the actions is to place the edge elements in their places for further drawing up the cross. The orientation of the rib parts may not be correct. There is only one formula of cube movements and it should be applied until the goal of the stage is achieved.

The rotations of the fifth stage are aimed at turning the elements on the right side. Its peculiarity lies in the fact that the same rotation formula is applied for all three patterns in the figure, the only difference is in the orientation of the cube itself.
The formulas for stage 5 movements are as follows:
- (PS N) 4 V (PS N) 4 V "- option" A ";
- (PS N) 4 V "(PS N) 4 V - option" B ";
- (PS N) 4 V 2 (PS N) 4 V 2 - option "B".
CH is the clockwise rotation of the middle row, and the exponent above the bracket is the number of repetitions of actions in brackets.
Puzzle solution - last spins

In the sixth stage, as in the fourth, the required cubes are placed in their places, regardless of their orientation. The puzzle should be rotated so that the element that is already in the right place is located in the far left corner at the top of the cube. The options proposed for solving the formula mirror each other. It is necessary to repeat the rotation until the desired result is achieved.

The seventh stage is the most solemn and most difficult. When the cube rotates, violations in the already assembled rows are inevitable. You will need to fully focus on the movements, otherwise the result of the assembly may be irrevocably ruined. As in the fifth stage, the sequence of movements is only one, but repeated 4 times. First, rotations are performed to orient the element, then reverse - to restore the broken rows.
Do not forget about recording movements using the characters of the English alphabet. The formulas for the movements of the faces and rows of the cube of this stage are as follows:
- (RF "R" F) 2 U (RF "R" F) 2 - option "a";
- (RF "R" F) 2 U "(RF" R "F) 2 - option" b ";
- (RF "R" F) 2 U 2 (RF "R" F) 2 - option "c".
В - rotation of the upper face by 90 degrees, В "- rotation of the same face counterclockwise, and В 2 - double rotation.
The complexity of the stage is in the correct assessment of the location of the elements and the choice of the required rotation option. It can be difficult for beginners to immediately identify the pattern correctly and match it to the correct formula.
Rubik's cube and children
A tricky puzzle is interesting not only for adults, but also for children. Teenagers became world champions in solving the Rubik's cube. In 2015, Colin Burns, then only 15 years old, assembled the toy in 5.2 seconds.
A simple but addicting toy continues to interest the younger generation for 5 decades already. Children's hobby often develops into a profession. There are mathematical ways to evaluate the solution to Rubik's cube problems. This section of mathematics is used in the compilation and writing of algorithms for solutions for automated computers. Robots that really look for ways to solve the cube, and do not follow a pre-hammered algorithm of movements, solve the puzzle in 3 seconds, for example, CubeStormer 3.
The human intellect needs constant training no less than the body in physical exertion. The best way to develop, expand the abilities of this quality of the psyche is to solve crosswords and solve puzzles, the most famous of which, of course, is the Rubik's cube. However, not everyone manages to collect it. Knowledge of schemes and formulas for solving the assembly of this intricate toy will help to cope with this task.
What is a puzzle toy
A mechanical cube made of plastic, the outer edges of which are composed of small cubes. The size of the toy is determined by the number of small elements:
- 2 x 2;
- 3 x 3 (the original version of the Rubik's cube was exactly 3 x 3);
- 4 x 4;
- 5 x 5;
- 6 x 6;
- 7 x 7;
- 8 x 8;
- 9 x 9;
- 10 x 10;
- 11 x 11;
- 13 x 13;
- 17 x 17.
Any of the small cubes can rotate in three directions along the axes presented in the form of protrusions of a fragment of one of the three cylinders of a large cube. So the structure has the ability to rotate freely, but at the same time small parts do not fall out, but hold on to each other.
Each face of the toy includes 9 elements, painted in one of six colors, opposite each other in pairs. The classic combination of shades is:
- red opposite orange;
- white opposite yellow;
- blue opposite green.
However, modern versions can be painted in other combinations.
Today you can find Rubik's cubes of different colors and shapes.
It is interesting. The Rubik's Cube even exists in a version for the blind. There, instead of color squares, there is a relief surface.
The goal of the puzzle is to arrange the small squares so that they form the face of a large cube of the same color.
History of appearance
The idea for the creation belongs to the Hungarian architect Erna Rubik, who, in fact, did not create a toy, but a visual aid for his students. In such an interesting way, the resourceful teacher planned to explain the theory of mathematical groups (algebraic structures). It happened in 1974, and a year later the invention was patented as a puzzle toy - the future architects (and not only them) became so attached to the intricate and vivid manual.
The release of the first series of the puzzle was timed to coincide with the new year 1978, but the toy entered the world thanks to entrepreneurs Tibor Lakzy and Tom Kremer.
It is interesting. Since the inception of the Rubik's Cube ("magic cube", "magic cube"), about 350 million copies have been sold worldwide, which puts the puzzle in the first place in popularity among toys. Not to mention dozens of computer games based on this assembly principle.
Rubik's Cube is an iconic toy for generations
In the 80s, the inhabitants of the USSR got acquainted with the Rubik's cube, and in 1982 the first world championship in the assembly of the speed puzzle was organized in Hungary - speedcubing. Then the best result was 22.95 seconds (for comparison: in 2017, a new world record was set: 4.69 seconds).
It is interesting. Fans of collecting a colorful puzzle are so attached to the toy that they are not satisfied with the assembly competition alone. Therefore, in recent years, there have been championships in solving the puzzle with closed eyes, with one hand, with feet.
What are Rubik's Cube Formulas
To assemble a magic cube means to compose all the small details so that you get a whole face of the same color, you need to use the God's algorithm. This term denotes a set of minimum actions that will allow you to solve a puzzle that has a finite number of moves and combinations.
It is interesting. In addition to the Rubik's cube, the God algorithm is applied to such puzzles as Meffert's pyramid, Taken, Tower of Hanoi, etc.
Since the magic Rubik's cube was created as a mathematical tool, its assembly is decomposed by formulas.
The Rubik's cube assembly is based on the use of special formulas
Important definitions
In order to learn to understand the schemes for solving the puzzle, you need to get acquainted with the names of its parts.
- A corner is a combination of three colors. In a 3 x 3 cube there will be 3 of them, in a 4 x 4 version - 4, etc. The toy has 12 corners.
- The rib indicates two colors. There are 8 of them in a cube.
- The center contains one color. There are 6 of them in total.
- The edges, as already mentioned, are simultaneously rotating puzzle pieces. They are also called "layers" or "slices".
Values in formulas
It should be noted that the formulas for the assembly are written in the Latin alphabet - these are the schemes that are widely presented in various guides for working with the puzzle. But there are also Russified versions. The list below shows both options.
- The front face (front or front) is the front face, which is the color towards us [Ф] (or F - front).
- The back face is the face that is the center from us [З] (or B - back).
- Right Face - the face that is on the right [P] (or R - right).
- Left Face - the face that is on the left [L] (or L - left).
- Bottom Face - the face that is at the bottom [H] (or D - down).
- Top Face - the face that is at the top [B] (or U - up).
Photo Gallery: Rubik's Cube Parts and Their Definitions
To clarify the designations in the formulas, we use the Russian version - this will be more understandable for beginners, but for those who want to go to the professional level of speedcubing, an international notation system in English is indispensable.
It is interesting. The international designation system is adopted by the World Cube Association (WCA).
- The central cubes are indicated in the formulas by one lowercase letter - f, t, n, l, v, n.
- Corner - in three letters according to the names of the faces, for example, FPV, Flni, etc.
- Capital letters Ф, Т, П, Л, В, Н denote elementary operations of rotation of the corresponding face (layer, slice) of the cube 90 ° clockwise.
- Designations Ф ", Т", П ", Л", В ", Н" correspond to the rotation of the edges by 90 ° counterclockwise.
- The designations Ф 2, П 2, etc. indicate a double rotation of the corresponding face (Ф 2 = ФФ).
- The letter C denotes the rotation of the middle layer. The subscript indicates which side to look from in order to make this rotation. For example, С П - from the right side, С Н - from the lower side, С "Л - from the left side, counterclockwise, etc. It is clear that С Н = С" В, С П = С "Л and etc.
- Letter O - rotation (turnover) of the whole cube around its axis. О Ф - from the side of the front face in a clockwise direction, etc.
Recording the process (Ф "П") Н 2 (ПФ) means: rotate the front face counterclockwise by 90 °, the same - the right face, rotate the lower face twice (that is, by 180 °), rotate the right face 90 ° along clockwise, rotate the front face 90 ° clockwise.
Unknownhttp://dedfoma.ru/kubikrubika/kak-sobrat-kubik-rubika-3x3x3.htm
It is important for beginners to learn to understand formulas
As a rule, in the instructions for assembling a puzzle in classic colors, it is recommended to keep the puzzle with the yellow center up. This tip is especially important for beginners.
It is interesting. There are websites that visualize formulas. Moreover, the speed of the assembly process can be set independently. For example alg.cubing.net
How to solve the Rubik's puzzle
There are two types of schemes:
- for newbies;
- for professionals.
Their difference is in the complexity of the formulas, as well as in the speed of assembly. For beginners, of course, instructions corresponding to their level of puzzle skill will be more useful. But even after some practice, they will be able to fold the toy in 2-3 minutes.
How to build a standard 3 x 3 cube
Let's start by building a classic 3 x 3 Rubik's cube using a 7-step diagram.
The classic version of the puzzle is Rubik's cube 3 x 3
It is interesting. The reverse process used to solve certain incorrectly placed cubes is the reverse sequence of the action described by the formula. That is, the formula must be read from right to left, and the layers must be rotated counterclockwise, if a direct movement was specified, and vice versa: direct, if the opposite is described.
Step-by-step assembly instructions
- We start by assembling the cross of the upper face. We lower the required cube downward by turning the corresponding side face (P, T, L) and display it on the front face with the operation H, H "or H 2. After that, we carry out the operation a) or b) of the first stage. In case a) the cube came out on the front face so that the color of its front face coincides with the color of the facade. In case b) the cube must not only be moved up, but also expanded so that it is correctly oriented, standing in its place.
Collecting the top line cross
- The required corner cube is found (having the colors of the faces Ф, В, Л) and, by the same technique described for the first stage, is displayed in the left corner of the selected front face (or yellow). There can be three cases of orientation of this cube. We compare our case with the figure and apply one of the operations of the second stage a, beat c. The dots on the diagram mark the place where the required cube should be. We find the other three corner cubes on the cube and repeat the described technique to move them to their places on the upper face. Result: the top layer is matched. The first two stages hardly cause any difficulties for anyone: it is quite easy to follow your actions, since all attention is paid to one layer, and what is done in the remaining two is completely unimportant.
Selecting the top layer
- Our goal is to find the required cube and first bring it down to the front edge. If it is at the bottom - by simply turning the lower edge until it matches the color of the facade, and if it is in the middle layer, then it must first be lowered down any of the operations a) or b), and then match the color with the color of the facade edge and perform the operation of the third stage a) or b). Result: collected two layers. The formulas given here are mirrored in the full sense of the word. You can clearly see this if you put a mirror to the right or left of the cube (with the edge facing you) and do any of the formulas in the mirror: we will see the second formula. That is, operations with the front, bottom, top (not involved here), and back (also not involved) faces change their sign to the opposite: it was clockwise, it became counterclockwise, and vice versa. And the left side changes from the right, and, accordingly, changes the direction of rotation to the opposite.
We find the required cube and bring it down to the front face
- Operations that move the side cubes of one face, which ultimately do not violate the order in the assembled layers, lead to the goal. One of the processes that allows you to select all side edges is shown in the figure. It also shows what happens in this case with other cubes of the face. By repeating the process, choosing a different facade face, you can put all four cubes in place. Result: The ribs are in place, but two of them, or even all four, may be mis-oriented. Important: before proceeding with this formula, we look at which cubes are already in their places - they may be incorrectly oriented. If there is none or one, then we try to rotate the upper face so that the two located on two adjacent side faces (fv + pv, pv + tv, tv + lv, lv + fv) fall into place, after that we orient the cube like this , as shown in the figure, and we carry out the formula given at this stage. If it is not possible to combine the parts belonging to the neighboring faces by turning the upper face, then we carry out the formula at any position of the cubes of the upper face once and try again by turning the upper face to put in place 2 parts that are on two adjacent side faces.
It is important to check the orientation of the cubes at this stage.
- We take into account that the unfolded cube should be on the right side, in the figure it is marked with arrows (cube pv). Figures a, b, and c show possible cases of the location of incorrectly oriented cubes (marked with dots). Using the formula in case a), we perform an intermediate turn B "to bring the second cube to the right side, and the final turn B, which will return the top face to its original position, in case b) an intermediate turn B 2 and the final turn B 2, and in case c) intermediate turn B must be performed three times, after turning each cube and also completed with turn B. Many are confused by the fact that after the first part of the process (PS N) 4 the desired cube is turned around as it should, but the order in the collected layers is violated. confused and makes some people to throw an almost completed cube halfway. After completing an intermediate turn, not paying attention to the "breakage" of the lower layers, we perform operations (PS N) 4 with the second cube (the second part of the process), and everything falls into place. Result: the cross is assembled.
The result of this stage will be the assembled cross
- We put the corners of the last face into place using an 8-way process, convenient for memorization - a straight line, rearranging three corner pieces in a clockwise direction, and a reverse, rearranging three cubes in a counterclockwise direction. After the fifth stage, as a rule, at least one cube will sit in its place, albeit incorrectly oriented. (If after the fifth stage none of the corner cubes has sat down, then we apply either of the two processes for any three cubes, after that exactly one cube will be in its place.). Result: All corner bricks are in place, but two of them (and maybe four) may not be oriented correctly.
Corner cubes sit in their places
- Repeat the sequence of turns of the PF "P" F many times. We rotate the cube so that the cube that we want to unfold is in the upper right corner of the facade. An 8-way process (2 x 4 strokes) will rotate it 1/3 turn clockwise. If the cube is still not oriented, we repeat the 8-move again (this is reflected in the formula by the “N” index). We do not pay attention to the fact that the lower layers will come into disarray. The figure shows four cases of the location of incorrectly oriented cubes (they are marked with dots). In case a) an intermediate turn B and a final B "are required, in case b) - an intermediate and final turn B 2, in case c) - a turn B is performed after turning each cube to the correct orientation, and the final B 2, in case d) - an intermediate turn B is also performed after turning each cube to the correct orientation, and the final turn in this case will also be turn B. Result: the last face is assembled.
Possible errors are indicated by dots.
The formulas for correcting the position of the cubes can be shown as follows.
Formulas for correcting incorrectly oriented cubes in the last step
The essence of Jessica Friedrich's method
There are several ways to assemble a puzzle, but one of the most memorable is the one developed by Jessica Friedrich, a professor at the University of Binghamton, New York, who develops techniques for hiding data in digital images. While still a teenager, Jessica was so carried away by the cube that in 1982 she became the world champion in speedcubing and subsequently did not abandon her hobby, developing formulas for quickly assembling the "magic cube". One of the most popular cube folding options is called CFOP, after the first letters of the four assembly steps.
Instructions:
- We collect the cross on the upper face, which is made up of cubes on the edges of the lower face. This stage is called Cross - cross.
- We collect the lower and middle layers, that is, the face on which the cross is located, and the intermediate layer, consisting of four side parts. The name of this step is F2L (First two layers) - the first two layers.
- We collect the remaining edge, not paying attention to the fact that not all the details are in their places. The stage is called OLL (Orient the last layer), which translates as "orientation of the last layer."
- The last level - PLL (Permute the last layer) - consists in the correct arrangement of the cubes of the top layer.
Video instructions on the Friedrich method
The speedcubers liked the method proposed by Jessica Friedrich so much that the most advanced amateurs develop their own methods to speed up the assembly of each of the stages proposed by the author.
Video: speeding up the assembly of the cross
Video: collecting the first two layers
Video: working with the last layer
Video: the last level of assembly by Friedrich
2 x 2
A 2 x 2 Rubik's cube or Rubik's mini cube is also stacked in layers, starting from the lowest level.
Mini-cube is a lightweight version of the classic puzzle
Easy assembly instructions for beginners
- Collect the bottom layer so that the colors of the last four cubes coincide, and the remaining two colors are the same as the colors of the neighboring parts.
- Let's start arranging the top layer. Please note that at this stage, the goal is not to match the colors, but to put the cubes in their places. We start by defining the color of the top. Everything is simple here: it will be the color that did not appear in the lower layer. Rotate any of the top cubes so that it is in the position where the three colors of the element intersect. Having fixed the corner, we place the elements of the remaining ones. We use two formulas for this: one for changing the diagonal cubes, the other for the adjacent ones.
- Finish the top layer. We carry out all operations in pairs: we rotate one corner, and then another, but in the opposite direction (for example, the first one is clockwise, the second is counterclockwise). You can work with three corners at once, but in this case there will be only one combination: either clockwise or counterclockwise. Between the rotations of the corners, we rotate the upper face so that the worked corner is in the upper right corner. If we work with three corners, then set the correctly oriented one at the back left.
Angle Rotation Formulas:
- (VFPV · P "V" F ") ² (5);
- В²Ф · В²Ф "· В" Ф · В "Ф" (6);
- FVF² · LFL² · VLV² (7).
To rotate three corners at once:
- (ФВПВ "П" Ф "В") ² (8);
- FV · F "V · FV² · F" V² (9);
- V²L "V" L²F "L" F²V "F" (10).
Photo gallery: 2 x 2 cube assembly
Video: Friedrich's method for a 2 x 2 cube
Collecting the most difficult cube versions
These include toys with parts ranging from 4 x 4 to 17 x 17.
Cube models with many elements usually have rounded corners for easy manipulation with the toy.