The chimney takes one of the first places in the heating system in terms of importance: not only the exterior of the building depends on its correct choice and installation, but above all the efficiency of removing combustion products. Mistakes can lead to fire or carbon monoxide poisoning. Therefore, the installation of chimneys requires a comprehensive and detailed study: before starting work, you should familiarize yourself with the recommendations of specialists.
Usually, the installation of a system for the removal of exhaust gases is carried out during the construction of a house along with the device of a fireplace or stove. Previously, this was done with the help of bricks: a material tested by more than one generation, which has sufficient strength and retains heat well. But today more and more developers are leaning towards choosing modular systems made of ceramics and stainless steel. There are several reasons for this: the high cost of the services of professional stove-makers, the duration of the masonry, and most importantly, the incompatibility of brick chimneys with modern heating devices. The latest developments in the field of creating modular systems allow you to build a chimney with your own hands.
However, whatever the chimney, the basic requirements for it have not changed. This concerns service life, the ability to operate with the least condensation and soot build-up on the inner walls. The tightness and low thermal conductivity are also important: the materials with which the flue pipes come in contact should not be heated to critical temperatures.
The installation of chimneys must be carried out in compliance with the following rules:
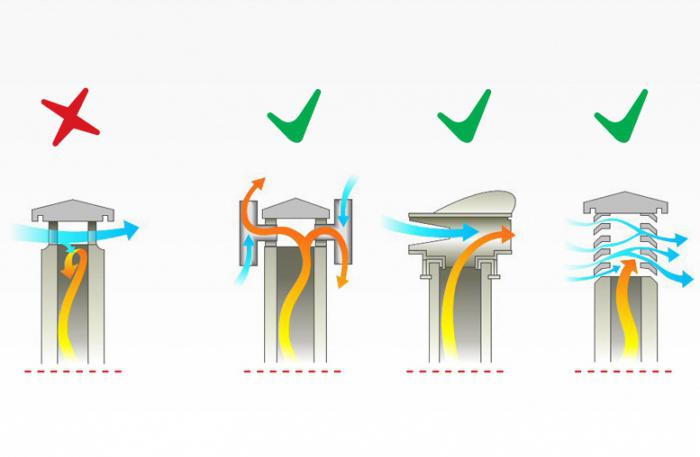
- above a flat roof, the pipe must rise by at least 0.5 m;
- when the pipe exits at a distance of 1.5 m or more from the ridge (for pitched roofs), its height should also not be less than 0.5 m, and when the distance from the ridge exceeds 3 m, the minimum pipe height must reach the conditional line drawn from the ridge down the floor at an angle of 10 degrees with respect to the horizon;
- when installing a roof made of combustible materials, the chimney must rise above it by at least 1.5 m;
- in the place of passage through the ceiling, thermal insulation is necessarily performed.
The chimney must be matched to the heating equipment that is installed in the house
Design options
There are many factors to consider before making a chimney. The selection of its diameter, height and traction force (these are the main characteristics) must be carried out on the basis of the principle of a mandatory proportional increase in thrust with increasing height. The first place in choosing the optimal design is given to efficiency and safety, and only then the issues of appearance and combination with the rest of the exterior elements of the building are considered.
An important role for the choice of the system design is played by the installation site of the heating equipment and the features of the room. Distinguish between internal and outdoor installation chimney. The internal one involves the placement of pipes directly in a heated room, while grooves, a protective casing and supports must be installed. There is no need to insulate such a chimney: devoid of thermal insulation, it will give off heat to the living space, which will not be superfluous. The only exceptions are unheated attics. Such a design carries certain risks associated with the danger of gas poisoning in the event of a depressurization of the system, as well as the likelihood of fire.
Combustible materials close to the pipe must be treated with fire retardants: this applies to walls, partitions, and where the pipe exits. In addition, such a chimney is difficult to install and maintain. Docking modules should be located outside the interfloor or attic floors, so that there are no obstacles for inspection and access to the internal surfaces.

The "sandwich" type chimney is recognized as the best option in terms of quality / price ratio.
The outdoor flue system consists of a flue that connects the outlet of the heating device with a pipe located outside, pipe sections and revisions. Such a chimney is much safer, it is easy to install and repair. Its advantages include independence from the features of the interior of the premises. But in this case, external insulation is necessarily provided.
The best shape is a cylinder: less condensation collects on the walls of such a pipe, and good draft is provided. The configuration should be as simple as possible so that less soot will be deposited. Horizontal sections, if one cannot do without them, should not be longer than a meter: this is also a prerequisite for the normal functioning of the entire system.
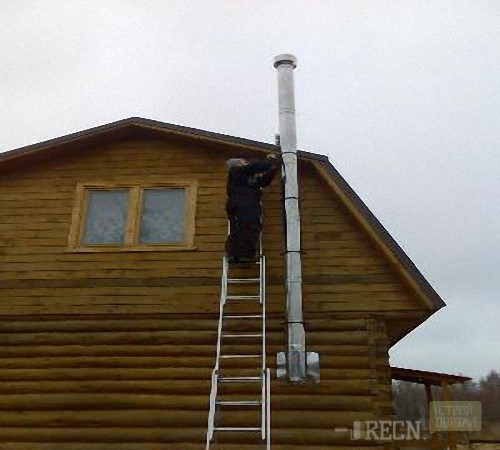
Installation of an internal chimney
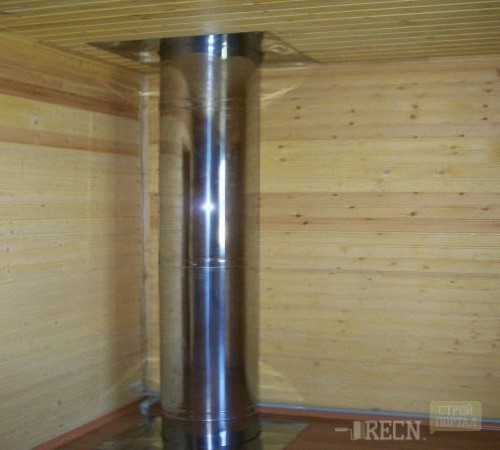
A chimney of any type is always assembled from the bottom up. Everything starts from the outlet of the stove: the next part must fit tightly into it: no gaps are allowed. It is better to install a ready-made factory-made chimney: this will speed up its assembly and provide an effective appearance better than homemade options. The links are joined sequentially: each next section is partially included in the previous one. This prevents condensation from leaking out, and also prevents moisture from entering from the outside, keeping the insulation dry. Additionally, a sealant is used to seal the joints. Over the joints, they are fixed with clamps. Every 1.5 m, the brackets are screwed to the wall, which are necessary for fixing the pipe.

Internal chimney installation diagram
All sections (both vertical and horizontal) must be isolated from the electrical wiring and run at a proper distance from the gas pipeline. An inspection door is installed in the lower part of the structure, which is necessary for cleaning the system. Deflectors or weather vanes should be installed to protect the top of the pipe to prevent debris, leaves and rain moisture from entering.
Installation of an external chimney
It is a vertical pipe installed outside the walls of the building. It is connected to the stove itself through one of them, using a short horizontal link (no more than a meter in length). Such a structure is installed most often in cases where a heating unit, previously not provided for, must be installed in an already finished room.
There are chimneys of two systems. Double-circuit consists of two concentric pipes with heat-insulating material between them. The single-circuit is not equipped with a heater and therefore it must be additionally fastened to avoid the formation of condensation.
Installation of the outer pipe starts from the bottom, first attaching a tee or elbow to a horizontal branch pipe coming out of the wall. At the bottom of it, there should be a door for cleaning the pipe. The vertical pipe is fixed every 1.5-2 m to the wall using brackets. In the event that the weight of the pipe is significant, a special support is installed under the knee.

External chimney installation diagram
The top of the pipe should rise above the roof by at least half a meter. If it is not possible to mount the smoke exhaust system with brackets, use braces with clamps and ears, to which the cables are attached, previously fixed at the bottom with anchor bolts. The tension of the cables is carried out using lanyards.
In some cases, the assembly of the pipe is mostly done on the ground and then the structure is lifted. To install it in place, a specially made hinge is temporarily screwed onto the pre-attached tee. The lower part of the pipe is attached to the same hinge by lifting it with a winch and installing temporary supports in several places.
The lifting of the pipe itself is carried out with the help of several people who control the process with the help of stretch marks, as well as a special spear of the required diameter. With a long-handled horn, the pipe is supported from below. After the chimney takes a vertical position, the hinge is dismantled, the docking point of the modules is tightened with a clamp, stretchers or brackets are attached.
![]()
An external chimney saves space, which is especially true for small houses
All joints must be sealed, and areas prone to corrosion must be treated with special enamel. A deflector should be reinforced at the top.
Correct installation of the chimney is the key to reliable, efficient, and most importantly - safe operation of the entire heating system. Mistakes in this matter can lead to irreparable consequences. Therefore, this work should be done by experienced professionals.
When organizing heating systems, the chimney plays three main functions. All of them can be achieved by installing a chimney with your own hands.
The main functions of the chimney
- First of all, the chimney is designed to remove combustion products, which are extremely harmful and often destructive for the body of the inhabitants of your home.
- In addition, the chimney must have insulating properties and protect the building structures of floors and roofs from fire.
- And, finally, a beautiful chimney carries an aesthetic function and decorates the roof of your house.
You can easily carry out the installation of the chimney yourself, following simple instructions.
The main types of chimneys
Depending on the material of manufacture, chimney systems can be divided into different types of metal (for example, cast iron or stainless steel), brick and ceramic. A modern chimney can be made of composite materials and have a multi-layer structure.
You can choose the chimney modification that most closely matches your building.
So, for example, the cheapest option - a metal chimney is most suitable for arranging heating systems for boilers or baths, that is, non-residential premises. However, such an economical approach is hardly advisable to use in a home. The metal structure has poor sealing of the joints, as a result of which you cannot get rid of the penetration of smoke in the room. Also, the metal does not have the most attractive service life, since it is extremely unstable to atmospheric moisture.
A pipe consisting of composite multilayer materials is more reliable and resistant to aging. But between the layers of such a pipe, a heat-insulating fire-resistant material is placed. Due to unjustified savings, many manufacturers place a low-quality insulator in the intermediate layer, which, after a while, may begin to crumble. So when buying such a pipe, carefully monitor the reputation of the manufacturer.
The cheapest option is to build a chimney made of thin-walled stainless steel. The low weight of such a pipe allows it to be fixed in the structure even with the minimum amount of fastening material. Also, a stainless steel pipe is very easy to process - it can be cut with ordinary metal scissors.
The ceramic chimney is very complex in the device, since its installation can only be carried out together with the whole house. In this regard, it is extremely rarely used, because in order to build it in a finished dwelling, the construction team will need to dismantle part of the floors.
Tools required for the chimney device
In order to install a chimney in your home with your own hands, you will have to stock up on the following minimum set of tools:
- a grinder for cutting metal and a drill for drilling holes
- spatula, chisel and trowel
- a screwdriver, preferably with hexagonal nozzles and a jigsaw, can be electric,
- a small hammer and a Phillips screwdriver,
- protective gloves and goggles
What you need to remember when installing a chimney with your own hands
According to the construction method, chimneys can be divided into internal or external. Let us consider in more detail in which case you need to choose one or another option.
So, the internal structure of the chimney can be used for the construction of heating systems based on heating boilers or fireplaces. These systems are usually installed inside walls. After installation, such chimneys are closed in the thickness of the wall and decorated. As an advantage, it can be noted that such a system is not susceptible to moisture condensation and is well protected from the influence of atmospheric moisture.
However, the combustion products passing through the chimney are hotter. Consequently, the sections of the walls passing next to the internal chimneys become very hot and can catch fire. Therefore, it is not recommended to install internal chimneys in walls made of flammable materials. Also, such systems are not recommended for powerful boilers with a large flow of hot combustion products.
It is recommended to install an external chimney for industrial and simply large heating systems. Usually they are arranged if the area of the heated room exceeds 500 square meters. Also, such a chimney can be installed if the installation of an internal chimney is fraught with significant difficulties. So, in a building with concrete walls and ceilings, it is easier to punch a slab between floors than to chisel a channel in the wall.
How to install stainless steel and cast iron chimneys
The cheapest and in a simple way chimney device will be the installation of a metal pipe. The entire installation is divided into several sequential stages:
- First, you prepare a duct for the chimney.
- Then you actually install the chimney.
- And at the final stage, you install insulation around the pipe.
The channel under the chimney metal pipe should be approximately one and a half times larger than its diameter. This leaves you with space for isolation.
The actual metal chimney consists of the following components: a metal pipe, adapters for mounting tunnels, a cap and a condenser. In a number of structures, a chimney is installed with a chimney - a unit that increases the draft in the system.
Chimney installation steps
At the initial stage of installing the chimney, you need to fit the pipes in length. Further, the resulting structure is placed in a previously prepared channel. After that, the condenser and the heating device itself (stove or boiler) are connected to the system. At the final stage, the head is installed.
In order to rigidly fix the pipe, it must be fixed to the wall at least every one and a half meters.
When installing steel and cast iron pipes, it is necessary to provide for high-quality thermal insulation of the chimney. Only in this case will you be able to avoid the fire of the floors and adjacent structures due to a suddenly leaky pipe. To insulate a metal chimney, it is best to use the classic method - fire-resistant clay. But in extreme cases, you can also use special refractory foam.
Also, with the help of clay, you can also decorate the joints of the chimney from a metal pipe with ceilings and a roof.
If you use a metal pipe, then it must be fixed to the ceiling and walls with fasteners every half a meter. This is due to the large weight of such chimney pipes. In addition, the mounting holes are made wider - by about two pipe diameters.
A cast iron pipe will last longer as a chimney, but its installation is fraught with certain difficulties. So you can cut such a pipe only with the help of a grinder.
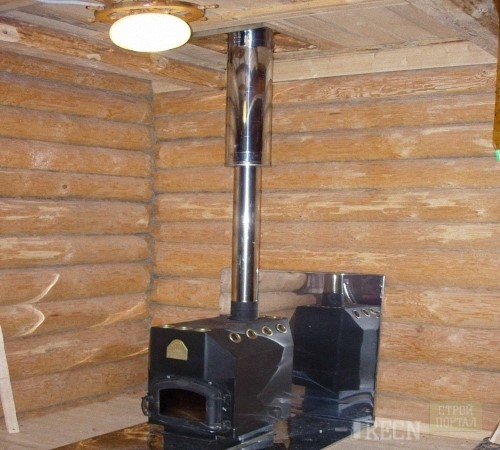
DIY sandwich chimney installation
Sandwich chimneys made of several materials are replacing conventional metal pipes. The multilayer design allows to qualitatively isolate the floors from heating by the combustion products of the furnace. When installing such a chimney, additional insulation is not required, as a result of which the mounting holes can be made almost equal to the diameter of the pipe.
During installation metal pipes they fit into each other like nesting dolls and no additional fixation is required to connect the knees of labor. In sandwich chimneys, pipe bends must be connected to each other using special construction glue. In addition to fixing the knees, building glue also prevents smoke from entering rooms.
Sandwich pipes are very sensitive to the formation of condensation from atmospheric moisture, therefore they are not recommended for use when installing external chimneys. Inside a building, such a pipe can last up to 70 years.
DIY external chimney installation
The most optimal material for the manufacture of an external chimney will be a pipe made of stainless steel. It weighs a little and works well with the simplest tools.
In order to mount an external chimney from stainless pipe carry out the following work:
- Punch a hole in the pipe adjacent to the boiler. It should be located no lower than half a meter from the top of the boiler.
- Place the fasteners on the outside wall about a meter apart.
- Connect the chimney inlet to the heater.
- Move the bent pipe elbow out of the room.
- Mount the condenser.
- Fix the pipe to the wall.
- Install the chimney cap and protection.
Do-it-yourself chimney installation: training video
Installation of double-circuit sandwich pipe
Very often, in country houses, heating is carried out using a fireplace or a full-fledged stove, to which the piping and all the necessary heating equipment are connected. Such equipment needs a properly assembled chimney. It will ensure the removal of combustion products and carbon monoxide.
It is not so difficult to mount it without the involvement of specialists if you choose to install a chimney sandwich with your own hands. After all, the installation process is similar to working with a designer. The service life of the device is quite long, and maintenance is practically not needed. Correct installation of a sandwich pipe implies the observance of some important technical nuances. It is necessary:
- Competently calculate all the parameters and dimensions of the pipes.
- Know which length to choose.
- Determine how to position the chimney in relation to the ridge.
- Have an idea of how to assemble a structure.
- Know how to pass ceilings, insulate the branch pipe and lead the pipe to the roof.
All this will be discussed.
Basic parameters and dimensions
It is not so easy to assemble a chimney operating in accordance with all the rules. First you need to decide on the cross-sectional diameter of the pipe and the length of the chimney. To do this, you need to use the existing norms of SNiP. The diameter of the chimney is selected taking into account the heat output of the heating equipment:
- If this figure is not more than 3.5 kW, then the pipe section should be 14 cm.
- With a heating power from 3.5 kW to 5.5 kW, the diameter increases to 20 cm.
- With a heat output from 5.5 kW to 7.5 kW - 27 cm.
The chimney length is calculated according to the following rules:
- The minimum height capable of creating the necessary traction is 500 cm.
- You can also navigate by the ridge of the roof - the chimney must be at least half a meter higher than the ridge.
- Pay attention to the roofing material. If it is made of flammable components, the pipe above the roof should rise by a meter, or better by one and a half.
Important! If there are technical buildings next to the house, the height of which is greater than that of a residential building, then the chimney should be located 1 meter higher than the top point of the roof of the extensions.
Pipe height depending on its location
When deciding on this parameter, it is important to take into account the location of the chimney in relation to the ridge of the roof. Here, too, everything is simple:
- If there is only 1.5 m from the ridge to the pipe, then the upper part of the pipe should rise half a meter above the ridge.
- If the chimney is located 3 meters from the ridge, then its height may be at the same level with it.
- If the distance between the chimney and the ridge is more than 3 meters, then its height may be at the level of the contour drawn at an angle of 10 degrees from the ridge horizon.
Assembling the structure

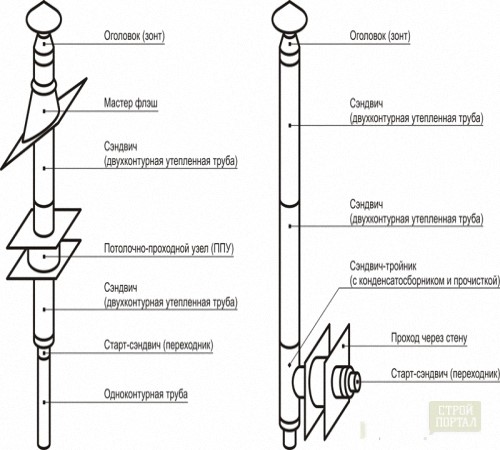
Installation of a chimney through the staircase
A conventional sandwich chimney is a structure that is assembled from separate segments. Each is a pipe, inside of which there is another one, but of a smaller diameter, and between them there is a dense heat-insulating material. The casing - the outer layer - is made of stainless steel. The inner layer is also made of steel with a protective anti-corrosion coating. There are other designs, such as copper, brass and aluminum. Copper is expensive, brass is also more expensive than stainless steel.
Aluminum is a cheap material, and its use significantly reduces the cost of the chimney. But during operation, when heated, it expands, and when it cools, it narrows again. As a result, the tightness of the chimney may be compromised. Therefore, experts advise purchasing sandwich works in which both iron parts are made of steel. Basalt insulation is located in the middle between them.
Its use has many advantages. Basalt wool is not afraid of temperature extremes, chemical and physical influences, and also has excellent thermal insulation properties. Different manufacturers have different thicknesses of insulation. The minimum value is 25 mm and the maximum is 60 mm. How is the installation going? (3)
Installation is carried out as follows:
- The size of one sandwich segment is 1 meter. During installation, one is simply inserted into the other. Moreover, it is necessary to collect from the bottom of the oven, gradually moving upward. We take the first pipe element and connect it to the pipe branch of the furnace. We cover the junction with a special plug that covers the insulation. Next, we insert individual meter segments into one another.
Note! One end of the pipe is always tapered. It is this that we insert into the next pipe. All links must be assembled in such a way that the condensate that will accumulate during the operation of the chimney can flow down.
- Docking is done in such a way that the upper casing and the inner chimney pipe fit tightly into each other. It is rather difficult to do it right away with your own hands. Therefore, you can resort to one trick. The inner pipe must be pulled out 15 centimeters, one pipe inserted into the other, and only then the outer casings must be connected.
- The joints additionally need to be reinforced with clamps, which are included in the standard package. We start and tighten them around the joints with ordinary steel wire. You first need to treat the joints with a sealant, especially since there are compounds on sale designed specifically for furnace equipment.
The chimney can be located inside the house, or it must be taken out and attached to the wall.
How to ensure the stability of the structure when taking it out?

Installation of steel chimneys
Every 2 meters during external assembly, the chimney is attached to the wall with brackets. If a tee or a squeegee is provided, each such part is also fixed to the wall. This allows you to keep the structure in an upright position and prevent it from collapsing in a strong gust of wind. And this also reduces the load on the connecting elements. In this case, it is imperative to observe a certain interval between the wall and the pipe.
Stove-makers call it a retreat. Its value is strictly calculated. The calculations take into account the wall thickness of the boiler equipment or furnace, the presence of an open or closed furnace, as well as the degree of combustibility of the materials with which the walls are finished. So, for example, if the thickness of the boiler wall is 6.5 cm, there is a closed firebox, and the wall is not protected from fire by anything, the offset will be 50 cm.And if the thickness of the furnace is 12 cm, and the wall is well protected from fire, the offset can be equal to 20 cm.
Note! Some manufacturers pack their products in plastic wrap. Before starting the assembly of individual elements, it is imperative to remove it.
What if you need to install a chimney between two walls or inside a box?
In this case, you need to make 2 windows on the outer wall. The size of each is 150 sq. cm. It is advisable to place one hole at the bottom, and the other at the top. With a closed retreat option, it is imperative to assemble the floor covering from non-flammable materials.
How to cross overlaps?

Chimney installation
Sometimes it is necessary to lead the pipe out through the ceilings. This can be done using a box with a hole inside. A branch pipe is inserted into it - a special element used for the described purposes. The thickness of the box should be 7 cm greater than the thickness of the slabs. This is the only way to protect the roof from fire. But in order to ensure the safety of using the chimney, it is necessary to very firmly attach the box to the ceilings and connect it to their structures.
In this case, the branch pipe should not have joints. This is a very important point. Before you install the dividing box with your own hands, you need to make the correct markup with a marker. At this stage, the saying that you need to first measure 7 times and only then cut off is very relevant. It is possible to make holes in the ceilings only when the appropriate box is selected and the pipe is correctly positioned.
How to make pipe insulation
After installing the duct and branch pipe, this chimney element must be carefully insulated. For these purposes, use foil mats on a basalt base, treated with refractory mastic. It is also advisable to insulate the hole in the roof. In this case, it is worth using mineral wool insulation. It is advisable for them to lay all the holes that are in contact with the branch pipe.
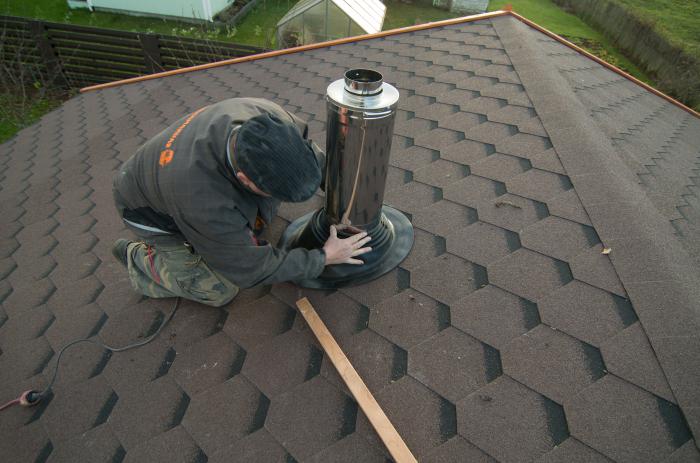
Chimney outlet to the roof

Roof chimney installation
A special link allows you to bring the sandwich pipe to the roof. Stove-makers call it rooftop cut. This element is selected taking into account the slope of the roof. Knowing him, it will be easy to do this stage of work with your own hands. It consists of three operations:
- A marker is applied to the inside of the roof.
- With your own hands, a hole is cut out, the diameter of which corresponds to the diameter of the chimney pipe.
- Isolation is being carried out. To do this, a galvanized steel sheet is attached to the roof from the inside. A hole for the chimney is pre-cut in it, and the pipe is brought out. A roof cut is installed on top. On top of it, as many links are assembled as necessary to achieve the planned height. And then an umbrella is fixed on top to protect the chimney from precipitation.
Note! In this section of passage through the roof, the chimney pipe should not have joints.
Features of the chimney operation
Sandwich pipes are a new generation product. They have a prefabricated structure, which greatly simplifies the installation of a reliable chimney. But during its operation, soot accumulates inside. It must be cleaned twice during the heating season. Otherwise, there is a high risk of a decrease in the useful cross-sectional area of the pipe, which leads to a decrease in thrust.

How to properly operate a pipe
Therefore, you will have to constantly clean the chimney. To facilitate the task, a special glass is installed in its lower part, or a door is attached, which provides access to the inside of the sandwich pipe. There are rules that can be followed to prevent the formation of a soot layer. Here are the main ones:
- To fire a stove or fireplace, it is necessary to use firewood from coniferous trees as rarely as possible. When burned, they release resins, which very quickly settle on the inner walls of the sandwich pipe.
- The same result can be obtained by throwing raw wood into the oven. Stove-makers warn that wet fumes are just as dangerous to the chimney as tar.
- Do not burn household waste in the oven every time.
- If a wood-burning stove or fireplace appears in the house, take care and prepare hardwood firewood in advance. Buy well-dried wood.
- As an effective preventive measure, throw an armful of aspen wood into the stove at the end of the firebox. They burn out very quickly and give a high flame, which burns out the soot well in the chimney.
Generalization on the topic
As you can see, assembling a sandwich pipe with your own hands is a laborious task, but it can be easily implemented by first studying the material and watching several video tutorials posted on the site. Before deciding on such an experiment, you need to carefully assess your own capabilities and decide whether such a task is within your power.
Observing all the above rules, you can take risks and implement the installation. T - Do-it-yourself chimney sandwich installation - the main stages of installation D - Do-it-yourself correct installation of a chimney sandwich is a laborious process. It requires compliance with strict fire safety rules and regulations. Knowing the specifics of each stage of installation greatly simplifies the task. K - do-it-yourself installation of a sandwich pipe chimney
The heating system in any building includes two elements. This is the installation of the heat generating unit itself - a boiler operating on gas, liquid or solid fuel, and a system that facilitates the removal of combustion products. The installation of these elements requires close attention. The supply of heat in the house and the safety of people depend on the operation of the system as a whole.
In the article, we will look at how to properly install an external chimney with our own hands, we will present a number of wizard's tips for arranging a chimney. If the chimney is improperly mounted outside the house, this can lead to unpleasant consequences: backdraft of the exhaust system (ingestion of combustion products into the room), this can cause a fire and people may be injured. There may also be insufficient heating. If you come to the conclusion that an outdoor chimney is fine for you, there is an opportunity to make it yourself, without resorting to outside help, and save a significant amount of money.
Currently, insulated outdoor chimneys are popular, they are usually called "sandwich" (see Installation of a sandwich chimney).
They have their own advantages:
- Good draft (helps to increase the efficiency of the thermal installation).
- Rapid overcoming of the condensation threshold.
- Minimal soot build-up on the walls.
- Durability of the structure.
- The external chimney is easy to maintain.
- Minimum weight.
- Allowed installation in wooden houses.
- Complies with fire safety standards.
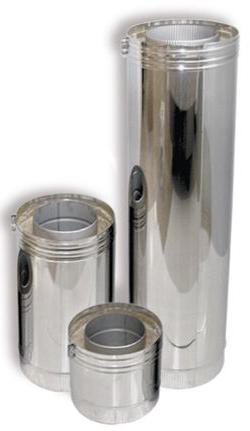
The chimney sandwich has three components:
- outer pipe;
- inner pipe;
- thermal insulation layer.
There are three types of connection of such systems:
- flanged;
- bayonet connection;
- type of connection "cold bridge".
Attention: The basic requirement for all types of connections is the same: high tightness. Pay special attention to this.
Structural elements
Before starting the installation with your own hands, you should know the device of the external chimney. The main thing is to decide what elements you need and their quantity. Make a drawing and list everything you need.

- Any aggregate t for heat production - boiler.
- Bends- regulate the movement of exhaust gases. The knee name contains information about the angle of inclination. The bends are welded using argon welding or a tungsten electrode in an argon atmosphere. It is possible to install various types of dampers and viewing windows in them.
- Dampers to be installed in bends, pipes, tees and transitions.
- Tee stand, is made from a square stainless tube. Fastening to the wall is done with dowels. The correct tee support is required for correct installation of the chimney. Be sure to specify the distance between the chimney and the wall when ordering.
- Tee 45 heat-insulated, stainless steel, required for connecting the boiler to the bottom of the chimney, vertical direction. Condensate drain pipe and inspection window can be installed on the side of the structure, or at the bottom of the tee. To comply with all the requirements for the installation of chimneys, after assembly, the inspection window door should be seated on silicone. There are straight-through, one-piece and prefabricated tees, connections to them are made at different angles.
- Brackets are made of stainless steel tube. Be sure to indicate the distance from the wall to the chimney when ordering it (to comply with fire safety rules).
- The external chimney must be thermally insulated. Chimney , together with thermal insulation, is placed in a protective casing and thus forms a so-called sandwich. The standard pipe size is half-meter or meter; for the manufacture of the casing, not only stainless steel and galvanized steel are used, but also the customer's material. Ceramic wool or basalt fiber is used for thermal insulation.
- Dowel bracket reinforced, used for reinforced fastening. This helps with lateral loads, with their help, the discharge and expansion bowls are mounted.
- Top, heat-insulating pipe in a protected casing. The diameter of the casing itself gradually decreases and approaches the diameter of the pipe, this helps to protect the insulation from external influences.
- Cap, stainless steel, which is shaped by tungsten welding.
Now you have an idea of the components and will be able to choose the right chimney parts for the heating boiler. Correctly calculate the length and section of the structure.
Attention: At the design stage of the chimney system, parameters such as cross-sectional area and height should be taken into account. The thrust increases with a greater length, the higher the pipe, the stronger the thrust. However, a very high chimney will create a large aerodynamic resistance to the moving combustion products. The placement of chimneys is clearly regulated SNiP 2.04.05-91... The cross section of the chimney is important. As a rule, it is determined: the ratio of the inner diameter of the chimney to the maximum dimensions of the fireplace insert (height / width) will be 10: 1.
When you select the diameter of the smoke channel, it should be noted that according to GOST 9817-95 the area of the smoke channel over the cross-section of the pipe must be at least 8 cm 2 per kilowatt of power of the heating unit (fireplace, boiler or stove). And the calculated value of the velocity of the discharged gases in the boiler itself should have an interval of 0.15 - 0.6 m / s.
Installation of the structure
The external chimney (its main part) is installed outside the building, which is connected by a horizontal pipe through the wall of the building to the heating unit. After installing the heating boiler, it must be connected to the chimney pipe, which will be located outside the building. This is not as difficult as it seems at first glance. However, some rules must be followed.

Work rules
The chimney is installed in all cases from the heating boiler, or rather, from the hopper upwards. The pipe for exhausting gases is always put on the previous one, this avoids the penetration of moisture onto the insulation.
- For the tightness of the structure, a heat-resistant sealant is used, not less than 1000 * С.
- Clamps should be used in waste connections, tees and pipes.
- At an interval of two meters, the external chimney must be rigidly attached to the wall with special brackets. They should also be used when fastening tees.
- Horizontal sections of the chimney pipe are not allowed over one meter.
- Avoid contact gas pipes with chimney ducts and electrical wiring.
- When passing a pipe through a combustible structure, use special fire-prevention pipes.
- Install a removable cleaning door (this must be done twice a season) of the structure, at the base of the chimney.
Installation
When everything is known about the design and the material is ready, you can start the main work.
- We connect the chimney to the heating boiler nozzle using an elbow, pipe or tee (depending on the design).
- We join the pipe with the chimney with the necessary transition unit.
- We treat the joints with sealant and install clamps.
- We carry out the passage through the wall using a special pass-through pipe (docking is prohibited in the place where the wall passes).
Attention: All links of the chimney pipe should be tightly, without gaps, push one into the other, the distance of entry should be at least 0.5 of the pipe section (embedment depth).

- We are preparing the installation of the vertical part of the structure. At the end of the horizontal pipe led out through the wall, we attach a tee with fasteners for a vertical pipe. If we use a knee, it is necessary to create conditions for cleaning the horizontal gap of the connection. When using a tee, the lower outlet is blocked with a plug, which can be removed or we use a tee with a revision. How and what to fix the chimney depends on its location. The pipe is fixed to the wall with wall brackets every 2 meters. If the main pipe is heavy, place the elbow on a support. It often happens that it is impossible to make fasteners to the wall along the entire length of the structure; in this case, stretch marks are used.
- We install the clamp with ears, attach the clamps to the ears and attach the extension cables of the required length to them. In this case, the cable for the guy wires must be at least 3 mm in diameter.
- In the places where the braces are fastened, we install eye-pins or an anchor (we choose based on the fastening surface).

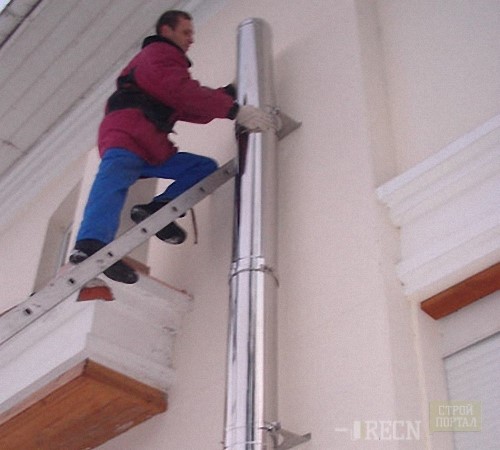
The next step is to lift and secure the entire vertical pipe structure. There is a possibility of installation in parts, but this is unsafe work at height, and sometimes even impossible. As a rule, the pipe is assembled on the ground., fasten all parts with clamps, prepare fasteners for guy wires and brackets.
- To facilitate this process, we use a hinge.
- We select the right elbow for the connection and make the hinge fastener to the edge of the outer pipe, weld it.
- We raise the finished end of the pipe to the level of the junction and also attach the hinge to the end of the elbow.
- We lift the entire structure using attached ropes and a spear. This should be done in good weather; it is unacceptable to do it in gusty winds.
- We carry out fastening in accessible places.
- For stability, we fasten slightly stretch marks.
- We unscrew the nuts that secured the hinge. We cut off the bolts themselves with a grinder and knock out the endings.
- We knock out the hinge and fasten the remaining bolts at the joint.
- We make the full tension of the stretch marks. We adjust the tension with the lanyard screws.
The editing has come to an end. We produce fasteners for the joint and seal the joint. After we carry out the insulation of the vertical pipe, we make insulation (this will avoid the appearance of condensation). Now you can be calm about heating your home.
Today almost everyone a private house equipped with a chimney. And in most cases it has a practical meaning rather than a purely decorative one. This is due to the fact that private houses are very rarely connected to centralized heating, they are heated by boilers, stoves, etc. And the chimney plays a very important role in this whole matter. Through it, steam and smoke are released. It helps any heating system to function properly. Chimney installation is a very complex and painstaking process.
Introduction
The chimney is a complex structure, the purpose of which is to remove heating by-products from the stove into the atmosphere, which protects the house from dampness, burning, tar and burning out of the walls. It is an integral part of almost every country house or summer cottage.
The principle of operation of this structure lies in its ability to create natural draft, which removes steam, tar, etc. Installing a chimney is a very significant process. If you make mistakes during its construction, you may not get the desired result and earn many problems. As an example, we can cite insufficiently powerful traction for a certain type of stove, which is fraught with poisoning.
There are many different chimney configurations that differ both in their installation price and in terms of draft and other characteristics. Each of them has its own disadvantages and advantages. Let's talk about what the different types of chimneys are, what tools are needed to install them, and how to install them correctly.
Tools
We will list the minimum tools that will be needed when performing chimney installation work. This set may vary depending on what kind of system you are installing. So let's get started. You need to prepare the following tools:
- Bulgarian (to her - a set of discs for working on stone and metal).
- Grinder machine.
- A hammer.
- Rotary hammer with a set of drills of various diameters.
- (for convenience, it is better to have a large and a small one).
- A bucket, a trowel, a square, a tape measure are small accessories that will simplify the work.
- Purchase an assembly gun if possible.
Now you can start working. Installing a chimney or erecting it will not seem so difficult if you have your head on your shoulders and hard-working hands.
Materials (edit)
Today there are many different types of chimneys that are constructed from different materials. Depending on the type of construction, a certain set of materials is purchased. So, for example, the installation of a sandwich chimney implies the use of such components in the work:
- pipes of various diameters that are inserted into each other;
- filler (insulating material) with an operating temperature of up to 700 degrees Celsius is what is between the pipes;
- pipe fittings;
- metal screws;
- clamps and brackets;
- pipe elbows - necessary when bending pipes, etc.
For laying a traditional brick chimney, you need cement, a special umbrella to cover the pipe, etc. And here we already see how much different consumables for a particular design are. Thus, having decided on the type of chimney, we begin to search and purchase everything necessary for its installation.
Requirements for a modern chimney
Any modern chimney, whether sandwich or brick, must meet a certain set of requirements and what are these requirements?
- It must be moisture resistant. The condensation process leads to the fact that the walls of the chimneys, both brick and metal, are capable of self-destruction.
- Possessing powerful traction.
- A good chimney can withstand temperatures up to 1000 degrees Celsius.
- It should have excellent chemical resistance.
- Smooth inner surface (it will be much easier to clean such a structure).
Observing the rules for installing the chimney, you can achieve good results and build a really good, high-quality combustion product removal system.
Main varieties
There are many different classifications of chimneys, but today we will talk about such types as:
- Brick chimney.
- Chimney sandwich.
- Coaxial designs.
- Gas heat sink as a type of chimney.
We will talk specifically about them, since they are the most popular among summer residents and owners of country houses. It is worth noting that each of the types has its own advantages and disadvantages, so only you will choose which one is right for you.
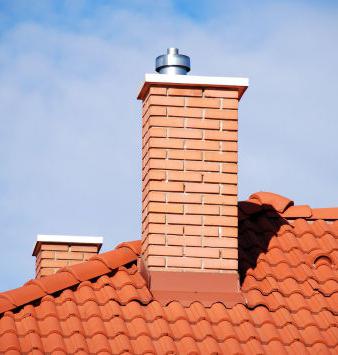
Brick chimney
The installation of a brick chimney, or rather its construction from the base to the visor, is a rather complex process, which includes many stages and rules that must be known and followed. Let's start with the fact that one such structure is designed for a maximum of two ovens, provided that they are on the same floor.
Chimney installation rules are of great importance in this case. In part, they relate to masonry. Each brick should overlap the joint below those lying - this will avoid self-destruction. It is believed that a structure erected by this method is much stronger than any other.
The temperature at the bottom of the oven can be staggering. Especially if the house is heated with coal. To avoid damage to the base of the pipe, a special stainless steel nozzle is placed on the furnace, which is then lined with a double layer of brick. The size of this design depends on the height of the ceilings and the oven itself. For masonry, it is necessary to use only clay mortar with the addition of cement. It is very important to make a special valve that will block the entire hole - it will serve as a regulator for increasing or decreasing thrust.
It is also allowed to build chimneys inside the outer walls, with one condition, of course: if they are made of non-combustible materials. Recently, most of these systems are based on steel pipe, which is further insulated and bricked.
Chimney installation: sandwich technology
Sandwich technology is a complex and expensive structure that can withstand high temperatures no worse than brick. A huge advantage of such a chimney is that it practically does not need to be serviced. The only thing that is needed is to periodically clean it.
The sandwich chimney consists of three main elements. First, the inner and outer tubes are inserted into each other. The seams of each of them must be well welded and wrapped in a protective fire-resistant cloth or fiber. The gap between the pipes is filled with a special fire-resistant and heat-resistant material that does not allow the outer pipe to get very hot. This is the third element.
Installing a sandwich chimney will take a lot of time and effort, but it will be worth it. The final stage of the work is to fix the structure on the outside of the wall of the house. This process is carried out by means of special clamps, fasteners and brackets.
Coaxial chimney
The installation of a coaxial chimney is most often carried out on steam generators, gas boilers etc. This technology is somewhat similar to a sandwich, however, instead of a sealant, spacers are simply installed inside that do not allow the pipes to touch. Such a system, unlike other varieties, can be brought out horizontally through an external wall. The installation is very popular today, and the coaxial type is the most used.
You ask: "Why are they installed only on gas boilers and generators?" The answer is obvious. The thing is that the outlet temperature in such boilers is much lower than that of real stoves. That is why this type is not used anywhere else. Installation gas chimney similar to the installation of a sandwich-type system.
Modular ceramic chimney
Today, modular ones are in great demand, despite their exorbitant prices. This is due to the fact that such structures carry two very important key qualities for a person - they are very easy to install and quite reliable. Such chimneys can be laid even inside wooden walls, it is only necessary to observe the gap between the wall and the ceramics - 5 cm. In addition, they have a very attractive appearance.
The installation of such a chimney is very simple. To do this, it is necessary to connect the already finished sections of the pipe (modules) to each other, fasten well and fill the seams with a special sealing solution, after which this entire structure is fixed on / in the wall.
Chimney for a bath
Almost any owner of a suburban area dreams of having a sauna or bath in the house or nearby. The most important element of the latter is the oven. After all, it is she who creates high temperatures in the steam room. And this requires a high-quality installation of a stove and chimney, which will work, so to speak, in tandem. It is best to use traditional brick structures for such a case.
We have already considered the rules for installing such a chimney above. So there shouldn't be any special questions. As for everything else, the installation of a chimney in the bath is possible both inside and outside the room. It's up to you to decide, as always. But experienced experts advise to build the structure inside. The walls of the chimney are very hot, they can raise the temperature in the room. However, if you are not confident in your abilities, it is best to entrust such work to professionals who will do everything efficiently and quickly.
Problems when installing chimneys
The installation of a chimney pipe can be accompanied by a lot of problems, and an incorrectly built system will simply negate all efforts and add headache... Difficulties can arise in various ways. Incorrectly selected material can be one of the reasons. For example, if you put a bad brick at the base of the stove, then you can be left without a chimney, as it will quickly crack and crumble. In addition, it is necessary to know the design features of such a system in order to prevent the disappearance of thrust. For example, the height of the pipe above the adjacent part of the roof should be at least 0.5 m, and for houses with a combined roof (flat) - at least 2.0 m. And one more important point. The mouths of brick channels to a height of 0.2 m should be protected from atmospheric precipitation with a layer of cement mortar or a cap made of roofing or galvanized steel.
Of course, it's best to learn from other people's mistakes, so as not to make your own. And mistakes in this case are fraught with big trouble. The wrong chimney can destroy your entire home. For example, burnt-out walls will easily cause a fire. Therefore, before starting something, you need to carefully plan and think over everything. Consult with knowledgeable people, to re-read special literature, in the end to play it safe and entrust the installation of such important systems to professionals. There will be fewer problems from this, and you will cope with the work faster.