A brick oven, especially if you can cook dishes in a cauldron on it, is a very useful thing, because we all really love food with a "haze" aroma. Especially if you live in your own house, or equip a summer kitchen in the courtyard of your summer residence, you definitely cannot do without a good stove. Fragrant pilaf in the best oriental traditions - who would deny himself such a pleasure?
Of course, everyone can use a ready-made furnace project and the services of professional bricklayers. However, not every owner will be able to build a brick oven for a cauldron with his own hands.
The photo above clearly illustrates that the stove can not only be useful in everyday life, but also. In this material you will be given detailed instructions about building such a wonderful structure.
Getting ready to build a furnace
First of all, you should determine what is needed to build a brick brazier with a cauldron with your own hands.
These are usually the following things:
- The basis is a building or double silicate brick M-150. The price for the latter is slightly higher, but it can be used as a material only for the firebox, where there will be the highest temperature in the entire structure.
- "Bulgarian" for making the hole under the cauldron rounded.
- Facing material - glazed tile or stone, it does not matter, everyone is free to choose according to their taste how their brazier made of bricks with a cauldron will look like.
- Armature.
- Fireclay powder.
- Sand.
- Capacity for preparing the solution.
- Mixing and masonry tools (spatulas, etc.).
- Cast iron grate of the required size.
- Firebox and blower doors.
- A metal sheet with a thickness of at least a centimeter, the size - depending on the size of the cauldron.
This photo shows a schematic plan of the furnace. Each specific project for a grill-cauldron made of bricks, of course, will differ slightly from another.
Construction process: we act in stages
Important!!!
When creating a project for the device of a stove or barbecue with a brick cauldron with your own hands, recount everything several times!
Consider how many bricks are needed, what kind of masonry will be used.
Be sure to make sure that the stove is built evenly, check everything according to the level.
The cauldron must be heated evenly from all sides, otherwise the dish will not turn out so tasty, and the poor chef will swallow smoke.
Procedure
- Prepare a site for the base of the oven... It should be clean and moistened with plenty of water.
- Put a solution of chamotte powder and fine-grained sand in the base in a ratio of 1: 3 with a layer of 5 cm. The consistency of the solution is not liquid, but plastic, the lumps must be thoroughly beaten. Level the resulting slab.
- The next layer is reinforcement with a grid... The distance between the rods is from 10 to 12 cm. Thanks to this layer, the final structure will be resistant to any temperature drop.
Advice!
Do not wait for the base to dry completely, start laying right now.
This will make the bond even stronger.
For the evenness of the seams, use rack pads, remove the drips of the solution immediately. Be sure to follow the correct laying and dressing of the seams.
- After laying out the first row of bricks, do not forget to install the blower door, and also leave holes for subsequent laying or chimney... The door can be installed using a wire, as shown in the photo.
- After laying out the third row, overlay the hole under the grate with a metal corner... Subsequently, it is on them that the grill is welded.
- Further laying makes sense to lead in a circle, if such is provided by your project.
- Having laid out 1 row of bricks after the grate, it is time to install the firebox door... When installing, you can use the proposed method again.
- After installing the door, raise the structure up to 40-45 cm above the grate... This is enough for the wood to burn perfectly, and the heat is not wasted.
- When the desired level is reached, take the previously prepared metal sheet and the cauldron in which you are going to cook. Cut a round hole in the sheet with a grinder so that the cauldron does not fit entirely into it, but two-thirds.
- Line the surface around the cauldron and the wall of the stove the selected material.
Installing a good chimney is a guarantee of safety
The chimney can be mounted either from an iron pipe or from a brick. It provides better draft and smoke outflow so as not to poison the cook and others. It's hard to say what is right for you. Now we will talk about installing a chimney from a pipe.
Preparing tools and material again
- Bulgarian;
- welding machine;
- thick pipe with a diameter of 10-12 cm;
- elbows with the desired angle of rotation (not needed if the chimney is straight).
Important!
It is not worth connecting pipe sections at right angles. The angle must be obtuse, otherwise the thrust will be very weak.
If the chimney according to the project is multistage, cut the pipe with a grinder into pieces of the required length at the required angle.
After that, we proceed to the assembly of the chimney:
- Lay the pipe pieces on a flat place, attach a knee to them and scald them.
- We repeat this procedure the required number of times.
- Take a grinder and remove scale and other welding irregularities.
- Install a chimney (it would be nice to call an assistant) and seal up with mortar.
Your oven is ready! Try it with a low fire in the furnace. This will be enough to test traction and possible flaws. Try to put a cauldron on the fire, it should boil evenly. If all is well, the fire will also help dry out the seams.
Possible combinations
Agree, the cauldron is not the only kitchen utensil in which you cook.
Therefore, the videos in this article will show you how to build the following fixtures:
- street complex made of bricks for cooking in a cauldron, in an oven, on a grill, in a tandoor, barbecue, with a warm stove bench,
- brazier with cauldron, barbecue and smokehouse
Outdoor oven brazier - cauldron - barbecue - brick smokehouse
Furnace complex with a cauldron for the street
Summary
Using the material from the story, build any version of the street oven, and enjoy the dishes cooked on it!
Portable light barbecues are good in nature, but near the house or in the country you want more convenience, and aesthetics. All this can be provided by brick barbecues. Due to the plasticity of the material, they can be small - occupy about one square space of the area, or there can be decent corner complexes with a hearth, a hob and even a sink and supplied water / sewage. Even a completely inexperienced bricklayer can lay out the simplest brick braziers with their own hands. One of these projects will be described in detail below. It can be used as a training mission before building something more serious.
Simple brick brazier
Any brick structure requires a foundation. And even such a small barbecue, as presented below, is very undesirable to put directly on the ground. The foundation will have to be poured. You can make it tape or slab. The slab is safer: in winter it will not lead and the masonry will not fall apart.
The dimensions of the foundation for a brick brazier are 10-15 cm larger than its dimensions. First, the vegetation layer is removed, if necessary, the pit deepens by 10-15 cm. Its bottom is leveled and rammed. A layer of crushed stone 10 cm is poured and rammed again. It is advisable to use a vibrating plate in this case: you will not compact enough soil with a manual rammer. The height of the tape is 20-30 cm, the thickness of the slab foundation is 10 cm.
Depending on the type of foundation chosen, an appropriate formwork is constructed. For greater strength, reinforcement is made with a rod of 10-12 mm in diameter. For the tape - two threads are laid along the perimeter, a "cage" is made for the slab: the bars are laid along and across with a step of 20 cm. Everything is poured with concrete of a grade not lower than M200.
If the temperature during construction is around + 20 ° C, work can be continued after about a week: the concrete has gained more than half its strength. Two rows of waterproofing (roofing felt, roofing felt, modern roll waterproofing) are laid on it, coated with bitumen mastic or other liquid waterproofing solution. After that, you can start laying.
Dimensions and materials
This small brazier made of bricks can be folded with your own hands even without any experience. It is a structure in the shape of the letter "P". There are two parts: the brazier itself and a table next to it. The design is simple and easy to modify. You can add another section side by side, make it wider or narrower, deeper or shallower. You can make two ledges under the grates - this is if a large number of kebabs will be prepared.
In the basic version, the dimensions are:
- width 180 cm;
- depth 90 cm;
- barbecue height 100 cm.
For laying this garden barbecue, you can take a solid ceramic brick, you can also use fireclay SHA-8. For the order given below, 202 bricks were used.
For the lower part - up to the 5th row - the mortar is used cement-sand 1: 3 or with the addition of one part of lime to it. Further, where heating will already take place, a clay-sand mortar is used. Its proportions are selected based on the qualities of the clay (oily, normal, skinny). In terms of density - it should not be too liquid, but not too thick. About how good thick sour cream is.
Order and order of work
This country grill is made up of bricks laid on the bed. Two protruding rows (bricks are laid across) serve as a support for a brazier sheet and a brazier mesh. Here you can put it on a spoon (put on a narrow part), then the sheet will rise a little higher. In the lower part, you can stack firewood or use it for other household needs.
The rows are put in a dressing - with an offset, for this you need halves of bricks. They can be cut with a grinder. The first six rows form the brazier and table on the right. Starting from the 7th row, the laying goes only in the part where the brazier itself will be located.
Seam thickness 5-8 mm. It should be the same.

In order not to break the geometry during construction, you can pull the cords and align all the rows along them. But each brick and each row are controlled by the level for horizontalness. You constantly need to check the verticality of the walls and corners. To do this, use a construction plumb line (a cord with a load at the end). You can check the verticality with the level, but it has an error, especially if it is not a professional, but an amateur instrument. So with such a check, there is a solid likelihood of getting a brazier with oblique, heaped walls.
The order of this brick barbecue is simple, and does not require additional explanations. Questions about drying may arise. If the weather is dry, leave the grill to dry for three to four days. Then you can start a fire little by little. Heat for a couple of days in a gentle mode, using thin firewood and a little. Then you can fry the first batch of kebabs.

One of the options for a simple brick barbecue. It differs from the basic version in that there are two rows of protruding bricks. Another difference is that the table is smaller.
If rain is foreseen, and there is no canopy over the barbecue, cover it with oilcloth. After about a week, you can start slowly drying: light the fire small and briefly. Drying will also take 2-3 days. Then a brick brazier, folded with your own hands, can be tested.
Video ordering of a brick barbecue with a stove
For those who perceive visuals better than words, it will be more convenient to look than to read the description. For you, detailed explanations of how to build a brick brazier with your own hands in video format.
This structure is more monumental - the vault at the firebox is round and the stove is next to it. Without any experience at all, it will be difficult to cope.
Brazier made of bricks in the gazebo
If you set brick barbecue are going in a gazebo, the options proposed above will not work - the smoke will be all under the roof, which will not add joy to you. For gazebos you need a barbecue with chimney... This structure is more complex, but you can easily do this option yourself. The order of a brick barbecue for a gazebo given below is also not very difficult to fold with your own hands. She, like the first, has an even arch, which is much easier to do in the absence of experience.
Dimensions and materials
This brick brazier / barbecue is medium in size:
- width 150 cm;
- depth 75 cm;
- total height to the beginning of the chimney 217.5 cm.

For masonry, you can use solid ceramic bricks. For the zone where the fire will burn, it is possible (but not necessary) to use fireclay bricks. In the figure, it is indicated in light yellow.
The laying of the "cold" belt - up to row 11 inclusive - can be done on a cement-sand mortar (1: 3). Next, you need to use clay-sand. The seam thickness is in any case 5-7 mm. To withstand it exactly.
Structurally, this brazier consists of three "cold" compartments, in which you can store firewood and use it for household items. The hot zone starts from the 12th row. Here they make a fire, set up a grill under the barbecue or barbecue racks.
Order and explanation
The order of this brick grill is a little more complicated, therefore explanations are needed. The first row is laid out flush with the floor of the gazebo. If your foundation turned out to be low, you can also raise it with bricks laid on cement mortar.

The next four rows are laid with a dressing. This will be a firewood - an area where it is convenient to store firewood. On the fifth row, three strips of metal with a thickness of 3 mm and a width of 50 mm are laid from above. They will serve as a support for the next row of bricks. Lay the sixth and seventh rows according to the scheme.
In the 8th row, the formation of two chambers for household items begins. Look carefully at the location of the seams. This is essential: none should match the seam of the bottom row. Only in this way will the brick wall be strong enough. Where it is required according to the scheme, the bricks are cut off: halves and even quarters are used.
In the 11th row, the middle wall is no longer placed, but metal strips are again put on top: the next row will rest on them, overlapping the utility compartment. The 12th row is slightly larger in size than all those located below: everything goes smoothly along the back wall, and in front of the bricks protrude about 3 cm.
The 13th row is also laid out solid. A brazier will be installed on it. In size, it is still slightly larger than the previous one.

The next rows form a "hot" zone - a fire will burn here. This zone is smaller in size than all the underlying rows. To make it more resistant to fire, it is lined with fireclay bricks, placed on the narrow side. In size, it does not coincide with ceramic and the height of the rows and seams will be different. Ignore it by laying it out regardless of ceramic. Just follow the alternation as indicated in the diagrams.
In the 21st row, a steel corner is laid. It can be used from black or stainless steel with a thickness of 3-4 mm. The dimensions of the corner are 40 * 40 mm or 50 * 50 mm. Length - from the middle of the brick on the right to the middle of the one on the left. The front wall of the flue pipe will rest on this corner.
In the 22nd row, there is also fireclay brick, and the front wall of the chimney appears, resting on a corner. In size, this row is larger than the previous ones: in front of the bricks hang over the corner by 3 cm. The next row becomes even wider, and then there is a gradual decrease. Row by row, the smoke channel becomes narrower. By the 30th row, a pipe is formed. It rises above the roof of the gazebo by at least 50 cm. During its construction, the 30th and 31st rows alternate. ON this brazier made of bricks with your own hands can be considered built. Now you need to dry it without fire for 5-7 days, and then gradually heat it for several days, evaporating the water from the masonry.
Brick masonry grill: another project
Another option for a brick barbecue grill in a gazebo is presented in the video. There are no explanations, but everything is clear enough and there are no difficulties in this project. Perhaps it should be said that starting from 52 seconds, 4 sawn bricks are laid. The front upper part of them is cut off at an angle of 45 °. In the video, the sawn-off parts have a lighter shade.
Also in the second minute (1:35) the vault is being formed. It is easier to do this if you cut and fasten the drywall template, and lay bricks on it.
Brazier with a brick cauldron
Another option for a barbecue, but more complicated: under a cauldron with a stove. The video instruction is detailed, there are explanations in the frame from the author.
Corner brazier made of brick
Sometimes you want to fit a brick manga into a corner. For this there is a special shape of the firebox, although no one bothers to make one of the previously proposed options, but to attach the utility surface with an angle. One of the corner barbecues made of bricks is laid out in the order below. This is already quite serious work, with doors, latches and other attributes of the stove business.


Arriving at the dacha in the summer, I do not want to cook food in a hot kitchen in the heat. It is much more pleasant to do it outdoors under the cool jets of a light breeze. In order to be able to combine rest with pleasant work on cooking, you need to worry in advance and build a brick stationary brazier with a cauldron on your site.
Building a stove with your own hands is a complicated matter, but if you understand the intricacies, then every owner can handle it. Work done on your own will save enough money and give the owner and his loved ones real pleasure from the process of building a kitchen unit in nature. After the completion of construction, all friends will be delighted and take a photo against the background of a brick barbecue.
Some features of a barbecue stove with a cauldron


![]()
List of materials, fixtures and tools
To ensure full-fledged work without stopping to purchase missing materials and tools, they provide the construction site with everything necessary in advance.

The choice of materials for the construction of a barbecue
Sand
For the preparation of the concrete mixture, river and quarry sand is used, and only gully sand is used for the masonry clay mortar. River sand grains are constantly sharpened by water and have a smooth, rounded surface that does not adhere well to clay.
Before adding to the masonry mortar, the sand is preliminarily cleaned of impurities by sieving and washed with a stream of water.
Brick
For the lower rows of masonry, first grade refractory ceramic bricks are used, red in color, without cracks, with a clear sound when tapped. Unburned second grade and burnt Brown color it is advisable not to buy.
The firebox itself is made of fireclay refractory bricks that stands the test of fire. The arch and vault are made of wedge-shaped bricks or are grinded to the desired shape ordinary red brick... Silicate bricks are not used for masonry ovens due to their high hygroscopicity.
Solution
 It is made from clay with the addition of sand. The amount of sand is mixed with the fat content of the clay. For laying the lower rows and the facing layer, cement is added to the solution at the rate of 1 kg per bucket of ready-made solution.
Before preparing the solution, the clay is kneaded for two weeks for complete swelling and soaking. It needs to be stirred every day. After this period, they are mixed with sand.
If there is no time for such procedures, you can purchase ready-made dry mortar mixtures on the construction market, which are used in furnace construction. The description and characteristics of the mixtures along with the photo can be found in the store catalogs.
We start with a project
 First you need to find a place for a furnace on the site, take the necessary measurements on the ground and transfer them to paper. Then try to fit the dimensions of the desired structure into the existing framework.
Project or schematic drawings the builder makes with my own hand, it is very difficult to find a typical project with a photo for a specific case, especially with individual wishes.
The drawing is needed in order to have a clear location of all working blocks, outbuildings, foundations, furnaces, smoke pipes. Having a diagram in hand, in the process of work, it is much easier to make the necessary changes.
Implementation of the foundation of the barbecue

The foundation pit is dug 5 cm wider than the dimensions of the furnace according to the project and 40 cm deep.If you dig a hole exactly in size, no formwork is required, concrete is poured into the pit in the ground. For marking, nylon threads are used, which are pulled over pegs. In order not to dig out the pegs together with the extreme soil, they are carried out a meter from the design size, and the intersection of the threads is taken for the corners of the pit.
A layer of sand is laid on the bottom, mixed with rubble... It is compacted with homemade rammers or construction vibrators. Be sure to watered with water for compacted styling.
It is better to prepare concrete in a concrete mixer, if there is none, then you will have to stir it with a shovel. All components are mixed dry before filling with water.
Concrete is poured into the pit, sprinkled with sawdust in a layer of 5 cm and in hot weather water sawdust to prevent surface cracking. The next day, the concrete will gain 50% strength, and will fully recover in 27 days. You can start laying in 10 days.
Base waterproofing
It is carried out so that the concrete, which is saturated with moisture from the soil, does not transfer water to the walls of the furnace. Made of two layers of roofing material or construction roofing. Each layer is glued on special mastics or hot resin. The edges of the insulation are brought onto the side surfaces by 10 cm.
Brickwork
 A layer of asbestos or felt moistened with a solution is laid on the waterproofing. The first row of bricks according to the drawing is laid without mortar, the order and dimensions are clearly maintained. The rectangularity of the masonry is checked. The complexity of further work depends on the correctness of the first row.
Two rows of bricks are laid out with solid masonry, and from the third begin to form a place for the oven... Do not forget to remove excess solution protruding from the seams to maintain a beautiful appearance... Along the way, the seams of the masonry are embroidered with special jointing.
Installing and fixing the oven door

The next part of the job is to install the blower door. Such finished products are sold at a hardware store. If possible, you can do it yourself weld metal frame and door.
The metal increases in size at high temperatures, if you do not make a gap between the structure and the brick, then cracks will appear over time. A gap is made, which is filled with asbestos cord or modern silicon-based insulating materials. When heated, they do not emit substances harmful to the human body into the air, do not contain fibers and do not create a lot of smoke in a fire.
When installing the firebox door, it is worth remembering that the working surface of the barbecue stove with a cauldron also depends on its height. The height of the firebox is not set too high, which prevents placing a large amount of firewood in the firebox.
When laying, do not forget to provide a place for hot air to enter the brazier. A height of two bricks is usually sufficient. This improvement makes it easier to scoop up the coal.
Be sure to insert the cleaning door. When erecting the side parts, a niche for firewood or coal is made for about two to three furnaces.
Arch and arched lintel
The arch-shaped lintel plays not only the role of a decorative element of decoration, it distributes the load from the upper part of the brickwork, increasing the strength of the barbecue with a cauldron. It is not difficult to make such an arch with your own hands.
Arched lintel performed in the form of a brick row, laid out in an arc. All bricks must be wedge-shaped. You can buy such ready-made bricks or cut ordinary ones. An odd number of stones in the arc are used, the uppermost central one is called a lock, and the extreme lateral ones are called heels. Depending on the described radius, the arches are divided:

Stages of masonry arch
When laying the arched structure, use a template prepared in advance. It is drawn in duplicate on a sheet of plywood. Two parts of the template according to the size of the wall thickness are fastened together with jumpers. Sometimes a welded metal template is made from reinforcement.

Some landlords arrange awnings with full kitchen function. The stove is performed with a barbecue, in which you can install a barbecue grill, provide a brazier for a barbecue, build in an oven and make a smoking chamber in one building. If you supply water and drain the sewage system, then this full-fledged summer kitchen in the fresh air.
It remains to build a beautiful romantic gazebo and after the weekend you will not want to return to the city.
Now gardeners and summer residents are interested in a new product offered in hardware stores - barbecue ovens for the site. You can cook pies and pizza in them, as well as fry barbecue, which is loved by almost everyone. However, the cost of such a stove stops many, forcing them to dream about it for months. But instead of saving up for one, you can create it yourself.

A self-built brick stove with a barbecue will easily replace your kitchen stove in your country house.
Many craftsmen have learned how to make a brazier with a brick stove with their own hands. This design is very stable, reliable and is an excellent substitute for an indoor cooker. A brazier stove is usually installed in a garden or yard. And it is used most often in the hot season, when there is a desire to stay longer in the fresh air.
The housewives who got the opportunity to cook on such an oven are immensely grateful to their men with golden hands for the fact that now they do not languish from the heat in the kitchen when the temperature is very high outside. The advantages of a grill with ovens also lie in the fact that you can cook ordinary dishes on it. For example, using a large saucepan, you can easily prepare jam that is harvested in summer time for winter. And if you buy a cauldron, then there is an opportunity to cook delicious pilaf.
Tools for laying barbecue and for equipping the site

To cut bricks, you need a grinder with sufficient power for this.
The necessary tools, with the help of which the craftsmen create a platform for the stove with their own hands and build the brazier itself, include:
- Master OK;
- grinder for cutting bricks;
- vibrating plate;
- shovel;
- rubber hammer;
- container for solution;
- bucket.
Materials for arranging the site and for creating a barbecue
The necessary materials for creating a platform with a stove and equipment for it are:

For the inner framing of the furnace furnace, a refractory one is used.
- solid ceramic brick;
- fireclay brick, for framing the firebox;
- dry mixes intended for masonry ovens;
- clay;
- sand;
- cement;
- wild stone;
- gravel;
- metal corner 30X40 cm;
- blower door;
- furnace door;
- grates;
- cooking stove;
- roofing material.
Choosing a place to install the barbecue
The place where the brazier will be built must be open. A large yard is suitable for its installation.

For fire safety reasons, the place for installing the barbecue must be chosen away from tall trees.
However, having decided to place it in this way, you should check whether smoke will enter the windows of neighbors. To do this, you need to make a small fire at the place where the brazier will be installed. In this case, you should ask your neighbors if smoke is getting into their house or summer kitchen. A barbecue stove can be built in the garden or in the garden. In this case, you should choose an open area, preferably in the center of the site. If the installation site for such a structure is a garden with many trees, then part of the plantings should be removed from the place where food will be cooked over an open fire. This is necessary to prevent fires from occurring.
Preparing the ground for the barbecue area
![]()
Trenches for the foundation of the furnace must be dug to the depth of soil freezing in winter.
If your yard is not concreted, rolled up with asphalt or lined with stone, then you should prepare a platform for the stove. The same recommendations for a garden plot or vegetable garden. The oven itself will be about 2.5 m by 1.5 m. The site for it must be at least 3 square meters. m, and better more. First, the selected place is cleaned of debris and the topsoil is removed. Then it is necessary to mark on the site the dimensions of the barbecue with the stove and dig trenches to create the foundation. They are made as deep as the soil freezes in winter time of the year. You can find out this data in the design and construction organizations or in the district department of architecture.
Creating a foundation for a brick barbecue

To improve the waterproofing of the finished furnace foundation, clay is laid and compacted with a layer of about 2 cm around it.
The "clay castle" allows to strengthen the foundation of the barbecue. To create it, clay of any type is used, it is laid in a layer of 2 cm around the finished foundation and carefully tamped. Thus, a reliable waterproofing of the base of the furnace is carried out, which turns out to be much more profitable than that created using artificial materials.
The plan for the construction of the barbecue

For one hundred percent high-quality result, the plan for the construction of the barbecue must be ordered from professional architects.
To create a brick oven with your own hands, you must first of all draw up a plan for it. To do this, you need to take into account a number of nuances that only professional stove-makers know. If you decide to build a brazier with a height of 40 rows of bricks, then you need to create a plan of all 40 layers. Thus, there will be no mistakes when laying it.
It is impossible to create a simple or complex plan of a good barbecue yourself. Also, you cannot find one on the Internet that would guarantee the construction of a high-quality structure. Basically, in the vastness of the global network, schemes are presented that were created for review and it is impossible to build a furnace on the site using them. A quality plan of the desired barbecue should be ordered from professional stove-makers or architects who specialize in this. Depending on the customer's ideas, schemes will be created that will allow you to build a full-fledged barbecue oven with several chimney turns. If you plan to heat water in the grill, then cast-iron hot water boilers are built into it.
Why should you buy a quality plan for making a barbecue oven? Because the low-quality ones that can be found on the Internet are private developments that do not guarantee that the grill will retain heat and that it will be fireproof. In addition, with an incorrectly drawn up plan, the draft in the brazier-stove is disrupted, and the smoke comes from the front of the brazier, which is why the structure looks, at least not aesthetically pleasing.
Hand-made production of a brazier from a brick with a stove

Before laying the brick on the foundation, it is additionally waterproofed with roofing material.
When the plan is ready, you should start building the barbecue. To do this, on the finished foundation, which has hardened for two weeks, it is necessary to lay two layers of roofing material for waterproofing. After the oven has been laid out with your own hands, it will be possible to cut off its excess with a knife. On the foundation, they draw the base of the barbecue with a chalk cord, which is planned to be built. To keep its walls strictly vertical, a plumb line should be used. To facilitate the alignment of the walls of the stove, you can install a stationary wooden frame at the very beginning, which will be a good helper when laying bricks. Since the grill will be in the open air all the time, you should make sure that as little moisture as possible gets on it. The first thing to do is to use the clay in the mortar for laying bricks. The second is to build a shelter for the furnace from precipitation.
To block the horizontal openings of the furnace, a 3 by 4 cm metal corner is required. A mortar for laying bricks is created using cement and clay. But some experts who create, recommend buying dry mixes of such brands as "Pechnik" or "Ogonyok" intended for laying stoves.
Grill-stove masonry scheme
Since a brazier should be created only according to a plan worked out by a professional, an approximate will be given in this publication:
- The first two rows are usually laid out solid, according to the dimensions that are provided in the plan. In this case, you need to ensure that the rows are strictly horizontal, a plumb line will help in this.
- In the third row, you can install the ash door of the stove with your own hands. And the fourth row is created solid.
- In the fifth row, the above-mentioned ash door is closed with a lock and grate bars are installed. In this case, a gap of 5 mm should be left between the bricks and grates. The sixth row is laid out without missing bricks.
- The combustion door is usually installed in the seventh row. Next, lay out several rows in a continuous pattern, while you need to be guided by the barbecue plan.
- From the tenth row, as a rule, they begin to form a stove chimney. And in the eleventh, they block the opening of the furnace door.
- Around the twelfth row, they most often create a barbecue hearth and a stove hob with their own hands. Typically, the level of the brazier is from the tenth to the thirteenth row.
- Starting from the fourteenth row, only the back and side walls of the barbecue oven are laid out, as well as the chimney channel of the kitchen stove.
- From about 21 rows to 23, a semicircular, arched ceiling of the barbecue hearth is being constructed. At the same time, for the correct laying of a brick, it is sawn at the right angle with the help of a grinder. Typically, the vault is constructed using a wooden frame with an arched line, the dimensions that are provided for in the furnace plan. You can make such a frame with your own hands.
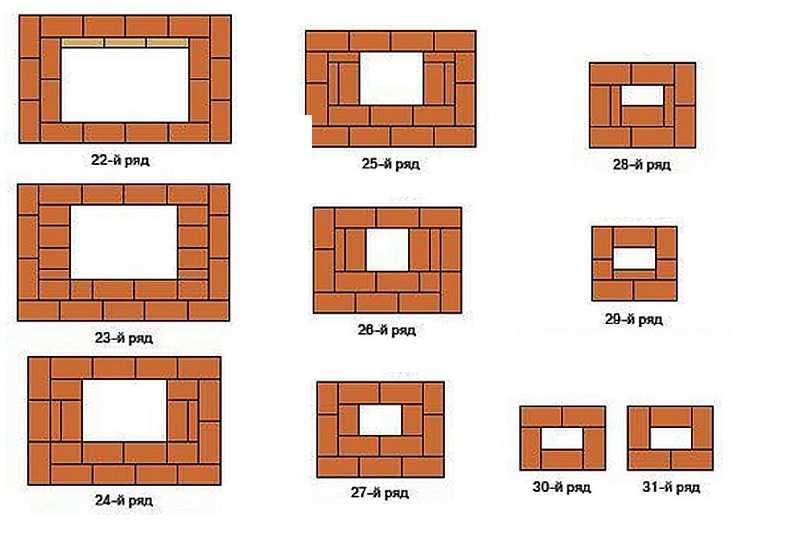
- From 24 levels to 31, bricks are laid out most often in continuous rows. The smoke channel of the cooker is led out at about 26.
- Somewhere from 32 rows, the smoke-collecting part of the barbecue from the brick goes into a pipe. The cap above it is made of the same building material as the oven itself. Some use ready-made metal.
Arrangement of the site where the barbecue is located
The easiest way would be to put the formwork and fill the entire area with concrete. However, the latter cracks and crumbles over time, from rain and heating. This means that after a very short period of time, such a foundation will require major repairs. Therefore, it is recommended to install the stove on a concrete foundation, and pave the site with wild stone. This remains stable for decades, and besides, it always looks well-groomed.
Difficulties with laying stone in the yard, for those who assemble with their own hands, cannot arise, because the latter is a rather complicated matter, which most often only an experienced stove-maker can do. Usually, sand is used to pave the site with stone, the thickness of which is more than three centimeters. At least 15 cm of sand is poured into a "trough" compacted with a vibrating plate, 30 cm deep. Moreover, each five-centimeter layer must be watered and tamped with a vibrating plate.
Between the layers of sand, a layer of gravel should also be poured, which also needs to be tamped. The edge of the barbecue area must be laid out with the same natural stone, but on a cement mortar. The rest of the stones are laid from the middle of the site to the edge and hammered into the sand with a special rubber hammer. It is necessary to leave gaps of 3 mm between each part of the platform, which must subsequently be filled with sand. When the site is ready, you can relax by your brick barbecue.
However, this will only be possible if the weather outside is cloudless. If it rains, it will not be possible to fry the kebabs. Therefore, it is recommended to create a canopy over a self-built barbecue oven. It is usually made of construction wood, and the roof is covered with tiles. Slate should not be used, because it does not contribute to fire safety. As you can see from this publication, you can create a brazier with a stove on your site without resorting to the services of professional stove-makers. You only need a high-quality plan, building material, time and a desire to create a useful thing for yourself and your family.
The brick barbecue on the site can be called the most beautiful and functional decoration of the latter. Cook amazingly delicious dishes on the heat or smoldering coals, enjoy a live fire, spend time in a leisurely conversation - all this will become possible if you decide to make a brazier stove with your own hands. We will not argue that it is quick and easy, but with the desire and diligence, you will get a beautiful hearth, which will not be afraid of rain, frost, or hot sun.
Choosing a place for a magnal
First you need to decide where exactly you plan to build a brick brazier. First of all, this place should be close to home or summer kitchen and next to the recreation area so as not to run around with skewers all over the site. Secondly, from the leeward side - so that there are no problems with lighting the fire, and it does not go out at every opportunity. Third, in a safe place for the whole family to use.
Most often, a brazier oven is placed in a gazebo or on a terrace, so that common roof could cover the device from precipitation. If this is not possible, be sure to provide protection over the barbecue. It can be an awning covering or cellular polycarbonate. In this article we will talk about how to make a brazier oven with your own hands correctly - ordering, drawings and diagrams, we will give recommendations from the masters. And how to arrange - the services of professional designers or your own imagination will help you with this question.

After you have chosen a suitable place, draw up a drawing of the brazier stove indicating all the required dimensions. This will calculate the amount of material.
In the drawing, be sure to indicate the ash pan, the blower and the place for storing fuel (firewood, coal). If you are planning a separate canopy, determine the place for the mortgages.
The height of the barbecue should be selected taking into account the growth of the one who will most often "cook". To do this, it is convenient to stand up, pretend that you are already frying kebabs, and measure the distance from the ground to the wrist.
The length of the barbecue is also selected based on the characteristics of a particular family. The standard is a meter, which will allow you to place 10-12 skewers at a time. If the firebox is one meter long, then the height of the barbecue in this case is 140x50 cm, 300-310 bricks will be spent on such a structure.
As with the laying of any other variety - Russian stove, Dutch, etc. - a lot depends on the quality of the material. The brick should be new, without chips or cracks. For the base, you will need a solid oven brick, for the firebox - chamotte, it best withstands temperature peaks and a sharp change.
The ideal mortar for masonry is a mixture of clay, sand and water, later we will tell you how and in what proportions to cook. It is undesirable to acquire ready-made refractory mixtures - instead of clay, cement is included in their composition, which over time begins to burst.
A mortar based on refractory clay increases its strength during operation. The more often the fire is lit in the stove, the stronger the masonry becomes. The minimum operation of such a furnace will be 25 years or more.
Grill oven masonry
Set of tools:
- grinder and 1 circle (for cutting bricks);
- electric arc welding (for the construction of a canopy);
- mounting level;
- Master OK;
- jointing;
- ordering;
- shovel;
- a hammer;
- capacity (trough and buckets).
List of materials:
- full-bodied oven brick;
- fireclay brick;
- sand;
- fire-clay;
- crushed stone;
- boards;
- fittings;
- metal corners;
- fasteners;
- material for the canopy.
After the tools and materials are prepared, you can start laying, cleaning the site before that.
Foundation
Since the brazier oven is a rather heavy structure, you will need to dig the foundation.
The foundation is necessary so that after the very first winter the stove does not "float" and does not burst on the moving ground. If the soil is stable, then you do not need to do the reinforcement, but the foundation is necessary!
- Dig a hole 50-70 cm deep.
- 10-15 cm of sand is poured to the bottom, pour it abundantly with water and tamp it.
- Cover the sand with 2 layers of waterproofing material - roofing material is quite suitable for this.
- Prepare the solution from sand, cement and crushed stone and dilute with water so that there is a semi-liquid consistency.
- In regions with soft, mobile and heterogeneous soil, it is recommended to reinforce the foundation with reinforcement.
- Pour the ready-made solution into the pit and, as it is poured, stick a shovel or pickaxe several times to release excess air. Insert several reinforcing rods into the mass that has not yet been found, and when it hardens, cover it crosswise with reinforcement from above.
- Level the top layer with a long board (usually) and leave it for 7-10 days, depending on how the temperature is outside. If the sun is too hot, pour water on top of the solution to prevent cracks.
- When the foundation is completely dry, cover it with roofing material or dense polyethylene folded in 2-3 layers.

Making a foundation with your own hands is not as difficult as it seems at first glance. But this will be a guarantee that even with heavy precipitation, the furnace will remain in place and will not change its geometry.
How to prepare a solution
A properly prepared solution is the key to the integrity of the oven for decades. Clay for mortar should be optimally oily and lean. These words, of course, do not mean that it needs to be tasted - it is enough to make a few balls and check them for wear.
- You clean the clay from debris, for which you pass it through a sieve 2-3 times. Soak the clay in plain water for a day. Prepare a small amount first to try it out.
- Make dough balls or tortillas. Mix sand, clay and water in different proportions. The solution should be as soft as plasticine and shiny. Make small balls (with Walnut) and leave to dry. A day later, you select those that remained intact and throw them from a low height onto the floor (without acceleration). A whole ball will show you in what proportion to mix the solution.
We do the order
If you have a good eye, consider yourself very lucky. We recommend to everyone else to draw with chalk the parameters of the future barbecue on the foundation (it should protrude 5-7 cm outside the oven). This will help you lay out the bricks evenly.
For those who are first engaged in laying a stove, experienced craftsmen advise to lay out the bricks dry without using mortar and number them. So you will get a brazier stove the first time.
Before starting the laying, soak the bricks in water for several hours so that they do not compensate for the deficiency from the solution.
![]()
All work is carried out according to the scheme.
In each subsequent row, the brick is shifted by half to get a checkerboard pattern. Each new row ALWAYS starts from a corner.
- The first row is laid without mortar. After all the bricks are laid out along the perimeter of the future barbecue, spread a small - 5 mm - layer of mortar on top.

- From the second row, the formation of an ash pan and a blower begins. To increase the strength of the barbecue, reinforce every third row with a mesh.

- From the third row, you also continue to lay out the back wall in the brick, forming the right and left sections. Check the perpendicularity of the corners with a plumb line, straightness - with a mounting level.


- From the seventh row, you close the console with a frame, on top of which you lay a brick.

- From the 11th row (at a standard height), you begin to form a brazier.


- The photo of the brazier stove shows an example of a tile roof. What you will have depends on the design of the site and financial capabilities. The roof does not have to be connected to the chimney.
Since the ordering for all types of barbecues is identical, the following recommendations must be observed:
- the brazier is attached to the stove on metal corners, which "sit" on the mortgages;
- the firebox is lined with a metal sheet of 4-5 mm around the perimeter;
- in every third row, leave a few small slots without mortar - this will improve traction;
- in the grill itself, lay out a few bricks with a ledge so that you can put the barbecue grate on them.

A tabletop, a place for storing firewood can be stationary and connected by a common structure with a barbecue, or act as separate elements. In order not to waste time, make an initial drawing taking into account all the components.
And so you can make an outdoor brazier stove with a brick smokehouse with your own hands
The last stage of work
The finish of the barbecue depends only on personal preference. You can leave the brick in its original state, the quality of cooking and the service life, by and large, this does not affect.

But it is better, nevertheless, to decorate the brazier, for which they are suitable:
- ceramic tile;
- tiles;
- wild stone;
- marble;
- porcelain stoneware;
- booth, etc.

For masonry of all materials, except for marble and porcelain stoneware, the same mortar is used as for bricks. It is better to use a special adhesive for marble slabs.
Doors for the grill will act as an additional functional detail. For their manufacture, you can use strips and fittings (forging) or wood.
To exclude the fire of a wooden structure, it must be impregnated with a fire retardant.

If you still have questions about laying a barbecue oven with your own hands, the video will help you